Forum Replies Created
-
AuthorPosts
-
“We were wild camping from Friday to last night.”
That was what the problem might have been, Katy – three nights relying on a single battery may have been a bit much?
Barry
I assume you only have the one battery, Katy?
Irrespective, a healthy battery should more than cope with ‘phone chargers (a miniscule voltage) and a light + heater for one evening.
As I see it, the possible problems – either the charging system (vehicle alternator to battery via Schaudt Electroblok) is defective; you haven’t given the engine long enough running to charge up a depleted battery; a defective 240v-Electroblok supply to the battery if on site; or a battery that is on the way out, not holding a charge.
I’d check the battery first, the most likely culprit, if your use of it hasn’t stretched over several days?
Stop by a battery supplier or even your usual garage – they can run a test for you, of both the battery and the charging circuit.
I believe you ‘wild camp’ a lot, Katy? In which case I would seriously consider adding a second battery to your habitation set-up. If your battery is defective, then now is a good time to fit a pair, as they should be matching, in both amperage AND condition. With winter approaching, the security of having more than sufficient battery power is great.
My set-up consists of two 110ah batteries, with a Sterling B-to-B charger between the alternator and batteries. This means that the very minimum of engine running pumps the maximum power into the batteries, keeping them topped up on even very short runs. We normally have several lights on (for the pleasant ambience) a TV/DVD playing, plus heater, ‘phone chargers, etc., all running together with no problem at all. And for more than just one night.
Good luck and let us know how you get on?
Barry
Thanks Katy.
You always make me chuckle with your infectious enthusiasm for your Exsis!
And you sometimes express exactly what I feel about ours, too!
“Keeping Exsis’ Exsis-ting” should be our mantra. Whaddya think, eh? 🙂
And thanks Craig & Joan, and all the other Exsisupporters.
That’s better!
And uploading here is SO much easier, as I discovered uploading (one by one) all of Jan’s Windscreen Shelf Repair pics!
I found these, Harvey…
Any good?
Quite a few more on eBay so plenty of options. Maybe find a supplier near you to actually try one, if they cannot say if it will definitely fit?
You’ll need a (Momo?) steering wheel too.
One other idea…
I note the standard wheel nut is held on with a tabbed washer. How about remomving it and fitting a robust stainless steel ‘R’ clip instead, via a small drilled hole in the appropriate spot?
-
This reply was modified 5 years, 7 months ago by
 Barry & Maggie.
A good way to lubricate these handles (not the lock keyway, though) is to open the boot lid, horizontal to the ground and, over a period of time, bathe the joint between the handle and the fixed part (with the two screws) with WD40 or similar penetrant. Note that this will NOT lubricate the handle mechanism, just provide an excellent path for the light oil (3-in-1 or similar) that WILL lubricate the handle. Bathe this handle joint over a period of time while the boot lid is parallel to the ground and hopefully sufficient lubricant will find its way through the joint to ease the handle movement.
See my separate post regarding WD40 and the dangers of treating it as a lubricant, which it is not (well, not very much, anyway!).
Have a read of this, Peter, from Atlantic motorhomes…
And then read about the Varta Professional Dual Purpose 930 090 080 battery they recommend…
-
This reply was modified 5 years, 7 months ago by Barry & Maggie.
If you can download it to your computer, it likes that!! 😉
Thank you, Leigh.
As far as “polishing”, I would concentrate on the roof which receives possibly the least attention from owners (I know mine does, or rather doesn’t!). Of course everywhere else could do with a good coat of polish too, but it’s the horizontal, out-of-sight roof that suffers.
Forgive me describing the following but some members may not have this information. Choosing a polish is problematic in that there are now a lot of “quick fix” products that purport to give you a shine with little or no effort, even some that need no water even. They contain silicones and a variety of other revolutionary products but… crucially, they don’t give long-lasting PROTECTION. Carnauba wax gives an acknowledged best protection but few products contain much carnauba because a) it’s so expensive and b) it’s so hard to apply! I’ve used Zymol on my motorcycle and it’s superb – https://tinyurl.com/y8dto2gf
But a slightly cheaper alternative for the motorhome could be Meguire’s. This is among the best, particularly for the metallic silver, red and blue Exsis’ https://tinyurl.com/y9euadla but this is maybe an easier product to apply https://tinyurl.com/y94zqbbs . Any of the really good polish people (Autoglym, Turtle, etc.) will do a good product, but the importance is finding one with, imho, a large % of carnauba wax, 30%+ if possible.
I’d be pleased to hear of other’s experiences with not only winter covers for motorhomes but also the various polishes that they’ve found to be effective. I know that in the garage I’ve got a lot of bottles of part used stuff I’ve bought and then side-lined…!
One final tip, mentioned on here before but, as we’re approaching winter, maybe a good time to repeat it. Use silicon (spray or grease) on all the sealing rubbers round the Exsis – mainly door/boot rubbers but also the sliding window rubber and maybe even the windscreen rubber (DON’T get any on the glass!). This forms a protective, slippery barrier on the rubber/plastic and stops it sticking to the frame when it’s frosty or icy. Silicon can often be cheaply obtained in Lidl in the form of an aerosol, or from plumbers merchants, B&Q, etc., as either a silicon spray or a small tub of grease. It’s also important to do this if you’re laying-up the Exsis, not necessarily over winter.
-
This reply was modified 5 years, 7 months ago by Barry & Maggie.
-
This reply was modified 5 years, 7 months ago by Barry & Maggie.
Assuming this is a “total vehicle” cover, and not just windscreen covers? (Windscreen covers have been well discussed on here – search).
I’m possibly not the best person to comment on “total covers” because I don’t like the idea of them and I really don’t see the need for them. I know people cover caravans occasionally.
My prejudices come under two headings…
The need for a cover – Our Exsis’ are based on commercial vehicle chassis’, where the greater damage from the elements is on the underside, the chassis. The bodywork is protected by enamel/fibreglass/plastic which, if kept polished and the rubbers silicon’d, should happily weather a winter without any damage except dirt/leaves. Just make sure it’s well polished before lay-up.
What a cover will do – Yes, a cover will keep the dratted high roof clean of dirt and leaves, but it will billow to some extent, damp wind WILL blow around under the cover. It will flap somewhat and therefore rub the sides and roof, and although the backing is soft with the material breathable, rubbing and wear spots are a possibility. I cannot see the need for what is a VERY expensive item, difficult (because of the height) to put on and take off, and all just to keep a bit of dirt off the polished finish – rainwater does no harm. A jet wash in March would clean that, followed by a polish and Hey Presto!
They offer no extra “security”, as I’ve seen advertised. A Stanley knife would soon give access to door lock/window, where a thief could then operate “under cover”, so to speak!
So… that’s my prejudices! No, I’m not a fan of them but if you still desire to fit one, I would just recommend getting the best you can afford – a cheap one will surely disappoint.
And here’s a great post on how to do it by Harvey… This refers to fitting a central handle to the boot lid but includes some pictures of lock removal and refitting. There are some great photos with Harvey’s post and I’ll endeavour to get these posted here too – I need the computer for that.
Harvey
Member
Posts: 41
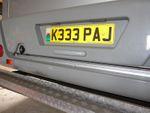
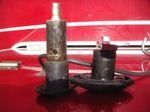
Fitting a boot Handle1. The Handle was purchased from the Kenmore Caravans ebay site http://www.ebay.co.uk/itm/380589555869?ssPageName=STRK:MEWAX:IT&_trksid=p3984.m1423.l2649. My thanks to Dave for the information – post August 2014.
2. I removed the door lock securing tabs from the boot locks, (20mm open ended spanner required) – note position of washers for reassembly.
3. Then unscrewed the posi screws from each side of the locks, undoing them symmetrically made it easier to lift the lock as the screws are removed. Pulled the locks out from the door.
4. Removed the number plate and then the 4 screws underneath it (Mine was glued on and it snapped so had to be replaced).
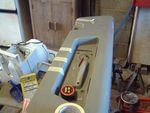
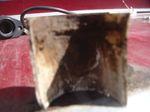
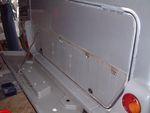 Outer boot cover removed
5. I positioned a stool alongside the door to support the raised section once it was removed.
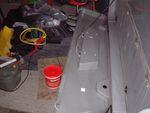 Cover placed on stool
6. Then I lifted the Exsis garage door into a horizontal position, a gentle tap along the bottom of the door released it from the securing clamps along the top, lifting the bottom of the raised section of the door as I did so.
7. There are two plastic spacer lugs under the raised section which space off the locks and stop the lock securing screws from distorting the raised section. These were split into several pieces when I removed them; the plastic had “broken down” with time. Fortunately I discovered that these fit exactly inside 1.25” (32mm) soil waste pipe, so two pieces were cut and the original spacers glued inside the waste pipe. The new wall thickness still “just” allows the securing screws to locate in the rear door lock sections, whilst the original inners locate over the raised base sections of the lock.
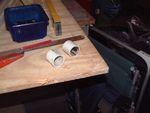 The plastic spacer tubes were in pieces, fortunately they neatly fit into 1.25″ plastic waste pipe.
8. Examination of the brackets clipping the top of the raised section in place reveals corrosion taking place, this is because of galvanic action between the (cadmium plated?) brackets and the stainless securing screws, I coated them all with marine grease to slow this down. This corrosion was also evident between the stainless screws and the aluminium of the door, again this was greased up.
9. I glued a length of thick wall 5mm x 50mm trunking with “Stixall” to the underside of the raised section, to provide support for the handle, then clamped and left it 12hr to allow it to set fully.
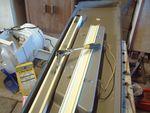 trunking fitted and glues in place to brace up the cover and spread the load
10. Turning the raised section over I positioned masking tape along the base to make marking out easier. Measure out the centre line of the section and marked out where the holes would be needed for the handle.
 Masking tape used for marking out
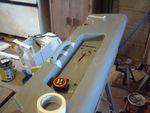 Handle trial fitted
11. Using a cordless drill (less aggressive and lighter than a mains drill) I drilled two 2mm holes through the section and the trunking, then checked alignment with the handle. Holes were then drilled out to 6mm.
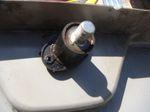
12. The new boot handle incorporates two M6 tapped alloy inserts, since I was using stainless steel screws this will create a situation where galvanic action can occur; to slow down the resulting corrosion I coated the screws and the inserts with marine grease. I also used the grease on the large “penny” washers used under the M6 s/s screws to spread the load, as these were mild steel.
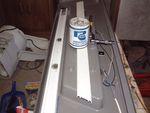 Handle bolts in place
13. I also made two gaskets from oil impregnated paper to fit between the handle and the raised section of the door (though these are probably unnecessary).
14. The two soft plastic inserts that cover the holes in the boot handle are very fiddly to fit; I used a rubber mallet to coax them carefully into position.
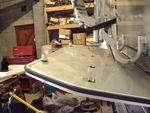 Plastic spacers fitted, ready for refitting the cover
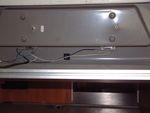 Clinch nuts fitted for screwing the number plate into position
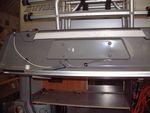 picture of trunking in position on the cover
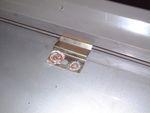 Showing the galvanic corrosion, this is caused by dissimilar metals in close proximity getting wet.
 More galvanic corrosion on the door.
15. Replaced the top section onto the door, fit the spacing plastic lugs, screwed the whole thing together, job complete
—
HarveyJune 6, 2016 at 10:19 AM
Edit Delete Flag Quote & ReplyBarry & Maggie
Administrator
Posts: 1280
A first-class “How To..”, thanks, Harvey. The photo guide in Photo Gallery is excellent too.This has given me the kick up the backside that I’ve needed, as I bought a handle a year or so ago and have never got round to fitting it!
Thanks again, Harvey. Great stuff!
—
Barry & Maggie-
This reply was modified 5 years, 7 months ago by Barry & Maggie.
-
This reply was modified 5 years, 7 months ago by Barry & Maggie.
-
This reply was modified 5 years, 7 months ago by Barry & Maggie.
-
This reply was modified 5 years, 7 months ago by Barry & Maggie.
-
This reply was modified 5 years, 7 months ago by Barry & Maggie.
Sorry to hear this, Peter.
There have been a few threads over the years about this problem. Here is probably the best answer for you…
Katy McG
Member
Posts: 161
Hi AllHas anyone changed or mended the locks on the back door (the storage comparment)? The catch doesn’t turn on ours anymore. By catch, I mean the metal bar that slides into the van when you turn the black, oval handle.
Advice or thoughts welcome!
August 14, 2013 at 11:14 AM
Edit Delete Flag Quote & ReplyDave & Sharon
Member
Posts: 97
One of ours has snapped Katy, so I’m going to have a go at replacing it. This place http://www.motorcaravanning.co.uk/shopuk/zadi_locks.htm sells Zadi locks which look the same (for £16.95 – scroll down about half way on the page). Has anyone fitted anything more robust?August 16, 2013 at 12:20 AM
Edit Delete Flag Quote & ReplyNick & Joc
Member
Posts: 55
I fixed mine shortly after we had the van. The seller ordered a new lock and it was delivered to me. Fairly easy to fit if I remember correctly. I did have to remove an extension piece from the original at fix it to the repalcement.August 17, 2013 at 5:39 PM
Edit Delete Flag Quote & ReplyCatriona
Member
Posts: 26
We replaced ours a couple of years ago through Hymer UK who were then at Preston. They emailed us an exploded diagram of the parts and ordered them from Germany. If you can find out who have replaced the Preston people, Hymer in Germany probably still have them.—
August 19, 2013 at 2:18 PM
Edit Delete Flag Quote & ReplyKaty McG
Member
Posts: 161
Dave, did you have any joy with the Zadi locks?Thanks everyone for replies, by the way.
August 28, 2013 at 1:53 PM
Edit Delete Flag Quote & ReplyDave & Sharon
Member
Posts: 97
Katy McG at August 28, 2013 at 1:53 PM
Dave, did you have any joy with the Zadi locks?Thanks everyone for replies, by the way.
Hi Katy
I haven’t ordered them yet – keep meaning to double-check dimensions – but will let you knowCheers
DaveSeptember 4, 2013 at 8:33 PM
Edit Delete Flag Quote & ReplyKaty McG
Member
Posts: 161
It’s one of those unappealing tasks, isn’t it!September 19, 2013 at 11:44 AM
Edit Delete Flag Quote & ReplyDave & Sharon
Member
Posts: 97
Hi folksIn the end I had my local garage fit two new locks when they were servicing the Exsis. I bought the locks from www.motorcaravanning.co.uk
Description:Zadi Small Push Lock – Black,
Item no:N74080
Unit price:16.95 GBPand
Description:ZADI Compartment Lock Body-only (no barrel/keys) 180
Black,
Item no:RLV931195
Unit price:6.95 GBPCheers
DaveMay 16, 2014 at 11:43 AM
Edit Delete Flag Quote & ReplyFred & Gill
Member
Posts: 463
Well done Dave, Looks like another fix to get our heads around at the ‘meet’.Pity that Nick and Joc havn’t indicated that they can come, as they seem to have replaced it themselves (DIY).
Fred
—
RubyMay 16, 2014 at 6:14 PM
Edit Delete Flag Quote & ReplyTom & Carol Mulcahy
Member
Posts: 178
I replaced one of the locks years ago because it broke. The reason I think was the rear door seal was dry and held the door fast. I now rub silcone grease on the door seal. I ‘grease’ all of the seals on the Exsis. I no longer get black rubber marks and sticking windows and doors. This also prevents the problem with the inner part of the Hyki roof light coming adrift.May 17, 2014 at 10:51 AM
Edit Delete Flag Quote & ReplyFred & Gill
Member
Posts: 463
Managed to break off a rear door handle from the lock – its been dodgy and -5 overnight whilst camping this week didn’t help, too much force whilst frozen!Read some very helpful information above and also by Harvey topic & Photos ‘Fitting Boot Handle’ June 2016.
Hoping this was going to be a straightforward removal and order complete units (Zadi N74080, thanks Dave & co)
My problem this very cold morning is:….( I have a detatched/broken handle), but could release the inside latch by turning the groove inside the lock body)
I have removed the nut, metal latch and washers from inside the boot door
I have removed the 2 x screws from the plastic boss outside and tapped the shaft inside the boot and eventually managed to prise the boss outwards revealing more of the lock body…..but I can’t pull the unit out because there seems to be another boss or support on the inside.
Am I correct in this assumption? and do I now have to remove the whole Plastic rear trim as per Harvey’s post. Harvey mentions that there is something that the round plastic supports (wastepipe) sits on and it looks like that in his 1st picture
If so, I guess this could be a fine weather job and make do with only one locking handle for now.
ADvice from the experienced please as I don’t want to go trying to force off any boss on the inside and leave it floating about.
Fred
—
RubyDecember 1, 2016 at 1:15 PM
Edit Delete Flag Quote & ReplyBarry & Maggie
Administrator
Posts: 1280
Oh bad luck, Fred. And at this time of year too. (Minus 5 here last night )I’m afraid I can’t assist, but would just ask that you take a load of photos for possible inclusion in a ‘How To’ later?
Good luck, chum. I think your idea is sound, of waiting until better weather, or an alternative suggestion – reverse into a friendly (large!) heated garage!
—
Barry & MaggieDecember 1, 2016 at 2:38 PM
Edit Delete Flag Quote & ReplyJP
Member
Posts: 38
I too broke a rear door/locker lock so ordered the Zadi replacement which arrived with a new barrel and keys, the barrel can be removed with the lock in unlocked position and the key inserted, you will then see a small tab that can be pushed in allowing you to withdraw the barrel. I did the same on the old lock handle and inserted the old barrel into the new lock to allow me to keep one key for all. You can hire a removal tool which is basically a key that also pulls in the small tab but this is not necessary. I disassembled the rear panel and locks but found it the extension pieces that fit on the end of the zadi locks to be very stiff and this is what caused the original to break. I decided while I was doing the job to order this extension piece and thought I would do both sides at the same time. I contacted Hymer and found that these small extensions are �£176.52 each !! so I will be soaking mine to free them off before refitting. Can I recommend that if anyones rear door locks are becoming stiff to attend to them before its an expensive repair. JamesJanuary 12, 2017 at 3:02 PM
Edit Delete Flag Quote & ReplyFred & Gill
Member
Posts: 463
Thanks JP, Good advice, that seems to be exactly the same problem that I have. My near side lock had been very stiff for some time so I had tried all sorts of lubricants and only marginally improved it – the -5 freezing weather when camping in Builth Wells at the end of November finally broke it. Harvey posted some good info – I think that I posted the link in my previous thread. Please update us with your fix because there could be others soon with the same problem. My fix will have to wait until the warmer weather! Don’t know what is going on with this site as I am writing this in a little box about 30mm x10mm on my IPad . I haven’t bothered to order my locks yet Fred
—
RubyJanuary 13, 2017 at 8:36 AM
Edit Delete Flag Quote & ReplyBarry & Maggie
Administrator
Posts: 1280
Excellent advice, JP.I have a new (to me) problem with my rear door lock, gas locker side. I think one of my gas bottles has moved slightly, despite the securing strap, and the edge of the bottle is stopping the lock undoing. That’s what I surmise the problem is, as the lock won’t turn sufficiently far enough to release it. I’ll try “jerking” the bottle forward by braking sharply on a small steep hill near me, being careful of following traffic, naturally! If that cannot cure it, I can see no other option than boring a hole in the rear door where I can physically push the bottle away, then cover the hole with a Hymer sticker or summat. Darned nuisance.
But not as big a nuisance as not being able to post new Threads on this site. “Webs” (who run the site) have been carrying out a major update which has resulted in every new Thread I’ve tried to post being rejected. I cannot even post an explanation for all of you in case you’ve been trying and failing to creat a new Thread. It looks as though updating existing Threads is still OK, which is why I’m writing this. Anyway, my apologies to one and all and I hope the site will be back to normal VERY soon.
—
Barry & MaggieJanuary 13, 2017 at 12:29 PM
Edit Delete Flag Quote & ReplyFred & Gill
Member
Posts: 463
Further to my first reporting that I had broken a rear door lock handle (see post above 1/12/16), I can now report that I have fixed it and can now pass on some hints and pictures.Please note also comments above from JP regarding good advice not to let handles stiffen up – it would be good to hear back from JP if he separated the Hymer extension boss – I didn’t bother as you can see in my notes below.
There is also useful information by Harvey Mods & Enh/Fitting Boot Handle 6/June/2016- its page 2 ) explaining removal of rear plastic boot trim and note point 7. regarding repair of spacer pieces. See also his Photo Gallery photos 3 & 11.
If I can get the photos in the right order you will see:-
1st Photo – The Hymer extension piece gunged/corroded inside plastic boss that goes through boot door, thats why I couldn’t pull handle and lock body out without removing the plastic trim.
2nd Photo – Better view
3rd Photo – The good side (offside) also showing plastic spacer and Allen Key in grubb screw.
4thPhoto – The broken plastic spacer that allowed the elements to corrode the extension piece in the plastic base boss that fits on door. The
broken pieces were glued together inside 32mm waste pipe as described by Harvey.
5th Photo – The cleaned up Hymer extension boss showing grubb screw. It is alongside the nerw handle.
NOW – I couldn’t remove the grubb screw on the corroded boss, but I could on the other one. However, it would not shift easily and I didnt know if it screwed or slid off and as I didn’t want to cause damage to the good handle- I left it.
Therefore I didn’t drill out the grubb screw from the corroded one and decided to use the whole of the old assembly now that it moved freely and to fit just the new handle and change the barrell lock to keep the original keys.
Fred
—
RubyApril 26, 2017 at 4:01 PM
Edit Delete Flag Quote & Reply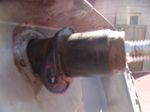

Barry & Maggie
Administrator
Posts: 1280
Thanks, for all that, Fred.This can happen to any one of us, so regular lubrication using an appropriate lubricant would appear to be essential.
WD40… This is an excellent penetrant… ie it penetrates corroded items and breaks the corrosion but… it does not lubricate (other than a minuscule amount).
So, use WD40 to penetrate and break apart items that are seized but then immediately apply an appropriate lubricant, ranging from light oil, silicon grease to heavy grease, depending upon the application.
Fred (and other’s) lock problem would appear to be a good case in point. Getting lubrication into this unit appears to be essential but difficult.
—
Barry & MaggieApril 26, 2017 at 9:39 PM
Edit Delete Flag Quote & ReplyPablicito
Member
Posts: 8
Unfortunately one of my rear locker handle is gone… I tried to find a spare part, but it seems not so easy. I cannot understand if I have to separate the locker itself from the Hymer spacer, since the Zadi spare part is far shorter than the complete Hymer mounted locker. If the answer is yes, hot to do it?—
July 6, 2018 at 3:51 PM
Edit Delete Flag Quote & ReplyBarry & Maggie
Administrator
Posts: 1280
I believe there is a grub screw that holds the handle to Hymer’s extension rod, Pablo. Fred had problems with it I believe. One of the guys who has done this job will be along to tell you how to do it, I’m sure.
—
Barry & MaggieJuly 6, 2018 at 5:15 PM
Edit Delete Flag Quote & ReplyFred & Gill
Member
Posts: 463
Hi Pablo,I have been away and just returned home – no time at the moment to research the previous threads and photos on this topics, but I will try later today.
Meanwhile if this helps….
If the hymer extension tubes are free within the plastic spacer tube of the rear panel and having removed the angled locking arm the unit should pull out complete – if not you will have to remove the rear panel to access them.
The plastic handle with the locking barrel removes by undoing the grubb screw.
The extension piece fits over the handle square bar and is held by a grubb screw, which may be corroded and difficult to remove without drilling out.
Secondly even if you remove the grubb screw the extension piece sleeve may still be corroded onto the bar of the original handle – this will need to be soaked with a penetrating oil……..mine was still stuck so rather than force or break/ damage the unit – I used the original unit still fused together and only changed the handle and swapped my old cylinder lock into the new handle unit to keep the keys the same as original
I will review this and original post/ photos later and get back
Fred
—
RubyJuly 10, 2018 at 1:40 PM
cito
Member
Posts: 8
Hi Ruby,thanks for your information! As you can see in the pictures I already removed the complete locker.
The plastic handle is broken, so there wasn’t any need to unscrew a grubb screw
The extension piece over the handle square bar is stuck: a friend of mine is trying to drilling out and remove the grubb screw, but I still don’t have an answer from him.
My main problem is what to buy, evoiding to unecessary pieces. I’m waiting an answer from Travelworld and even Hymer in Germany…
Again, thank you very much for your help
Paolo
July 11, 2018 at 3:15 PM
Edit Delete Flag Quote & ReplyFred & Gill
Member
Posts: 463
Hi Pablicito,The replacement lock can be found on the Internet previous threads state that the lock is
Zadi N74080,
The Hymer extension piece screws directly onto the bar after removing the locking tab from the new unit
The problem may well be that after your friend has Drillled out the grub screw on the extension piece it will still be fused/ corroded in place – there could be a danger of rendering the extension piece useless by snapping off the original bar or other damage…..
That is why I left mine in place and only used the new handle and external fitting and changed the lock – see earlier thread of JP also.
Of course if you successfully remove the extension piece you will be able to use all of the new Zadi lock unit – but you may wish to change the locking barrel to use original keys – or you could order two lock and replace both by ordering the same key. I have just done a search and you can buy a new part here motorcaravaning.co.uk for £19 currently.
I made new spacers and everything operates smoothly
Fred
Best wishes
Ruby
Post Reply Include my signature (edit)
Lock topic©2006
-
This reply was modified 5 years, 7 months ago by Barry & Maggie.
Thanks, Dave. Hope the racing is going well and you’ve not been beaten by your son too many times this season! 🙂
Stephen has sorted the Capital Letter problem on Forum responses, and will be looking at the “oversized” avatars and profile names soon. This is most noticeable on mobile ‘phones where the post is squeezed over onto the right hand side. My workaround until it gets fixed is to turn the phone on it’s side – read it sideways and the problem almost disappears.
The icing on the cake, Fred…
your picture!
“You can see it shining, just in front of the step.”
It might also be fluid level, Alan? That’s one possibility easily checked.
What does the handbook say (mine’s in the motorhome, across the road!)?
I’ll have a look later.
-
This reply was modified 5 years, 7 months ago by
-
AuthorPosts