Forum Replies Created
-
AuthorPosts
-
And the mirror stalks which are longer on the Exsis than the standard van.
Tony
If the replacement shelf is properly bonded to the ABS tray all round the periphery, then water cannot get into the tray. I’m happy I’ve achieved that. At the moment, while I still have a windscreen leak, the water which has penetrated goes behind the tray and shelf and passes down into the engine compartment and is largely absorbed by the thick insulating sponge below. Inside it’s now dry. Shame I can’t go anywhere!
cheers Tony
And the rubber:-
Sponge Rubber Sheet – EPDM/Neoprene Blend – Self Adhesive 6mm
https://rocketrubber.com/product/sponge-rubber-sheet-epdm-neoprene-blend-self-adhesive-black/
cheers
Tony
Re my materials.
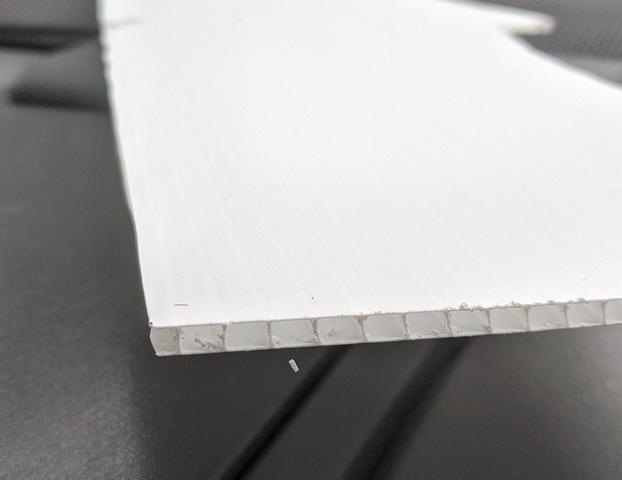
I bought 2 x 4mm correx from here https://www.ebay.co.uk/itm/4mm-White-Correx-610mmx813mm-Fluted-Board-Correx-Sheet-Corrugated-Plastic-Sign/232372226653?ssPageName=STRK%3AMEBIDX%3AIT&_trksid=p2057872.m2749.l2649
The under flooring material is too thin and bendy – I wouldn’t recommend it.
You need to join them in the middle – I bonded another bit of correx below. They are securely packed.
Remember to seal ends with silicone to keep water out of the flutes. It’s easily cut with sharp scissors and or a craft knife
Tony
Test as my posts wont post!
I do not consider my repair to be temporary – it will last as long as the van does. The Correx is easily strong enough – I had 4 x 10kg weights on it when bonding to the ABS tray. All the materials are utterly rot proof. Its important to get mastic all the way round so air from the engine compartment can’t get into the cab. I would counsel against any ply other than marine grade as ‘exterior’ ply will get soggy and de-laminates on exposure to wet as I know from past experience. This is not a job anyone wants to do twice. Interestingly my screen is still leaking (the foam in the engine compartment is still getting wet but the shelf is bone dry as the leak is coming from the bottom of the seal which is below the shelf . Screen repair can wait for better weather as I want heat and dry.
stay safe
Tony
I had to replace the whole thing after an encounter at speed with a bit of road furniture. It’s not quite the same as the generic van one as it protrudes further. No idea what a Hymer replacement would cost but it would be a lot I think. However I was able to use the replacement with the existing mount which was minimally damaged. I seem to remember it was quite a hassle. Anyway glass only is dead easy and cheap! Good luck
Tony
At this stage I’ve no idea about sound deadening as I haven’t gone anywhere yet! I did plug up some gaps in the th1ck foam “sponge” that lies below the shelf.
The correx obviously has very little mass so will transmit low frequencies with little resistance, but the foam bonded to it should help a bit. Any further deadening would have to be in the engine side as there is no room for additional thickness above the plastic tray
Time will tell, but I’m just happy I can have a clear screen again!
If anyone uses ply make sure its marine grade!
Tony
Tony
A while back I suspected (wrongly) my struts had lost pressure. I looked up the references on my existing one and found them on the Internet. No idea where now as I didnt take it any further.
Tony
Finally the foam
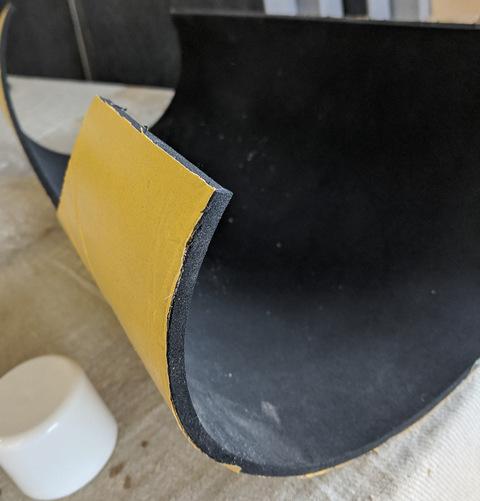
Next the Correx material
Here’s the first pic of the finished shelf
-
This reply was modified 4 years, 2 months ago by
 TonyFlisch.
-
This reply was modified 4 years, 2 months ago by TonyFlisch.
I’ve now finished this. It’s taken longer than I had anticipated. I decided to use no natural materials as I’m not convinced, I won’t have further screen leaks – also condensation runs down the inside of the screen on to the shelf. I used some Correx sheet. It’s easy to cut with a craft knife and sufficiently strong given the number of supports below. I sealed all the channels before fitting – just in case water got in. I then put some self-adhesive high-density foam on top of the Correx and finally bonded the original fabric to the foam. I used a hybrid sealant (Screwfix X8) to bond the shelf to the underlying tray then more sealant around the edges. It’s not perfect, but then neither is the rest of than van now. I do have an effective demist system now and no worries about further rot. Things I would not repeat: – The Correx sheet wasn’t quite long enough and so it had to be joined in the centre – not a big problem. Also the foam came as separate 600mm squares as I misunderstood the website. I’ll post pics of the finished shelf and the materials below.
best wishes and good luck
TonyGood to hear from a new enthusiast. I’m a fellow silver 2.8 owner who decided that this was the motorhome I wanted long before finding one. One correction though – the roof and sides are not GRP but a sandwich construction with an aluminum external skin, a foam core and plastics interior. Much lighter than GRP and better thermal performance. The A-class cab addition is GRP.
Tony
Chris – I found, when I last actually cured the windscreen leak about 8 years ago , that water was getting into the rubber seal at the very top and running down the sides and then into the van at the corners, and not, as I thought, between the glass and the seal at the corners.
By using a plastic alternative to the original ply shelf, and sealing it to the tray all the way round, I hope that even if water does get in, it won’t do any harm and my demister will continue to demist!
Hope the screen replacement goes well – perhaps with a new seal it won’t leak! I’ll order some more Sikkaflex for when we get a dry few days !
Tony
-
This reply was modified 4 years, 2 months ago by
-
AuthorPosts