Home › Forums › Modifications & Enhancements › Windscreen shelf (copied from Old Site)
- This topic has 60 replies, 6 voices, and was last updated 3 years, 10 months ago by
 Tresjolie.
-
AuthorPosts
-
-
16th September 2018 at 18:55 #445
Pam and Bill
Member
Posts: 20
Just completed a bit of sprucing up of the Exsis for future travels and noticed some decay in the rubberised plywood shelf right at the front. We intend to remove the securing screws and carefully take off the rubberised cover. We hope to replicate the plywood or replace part of it. Rot seems to be quite bad in a small area at the very front on the passenger side. We presume this has been caused by some windscreen condensation over the 12 years that we have owned the ‘van. Has any one experienced this problem and had cause to remove the shelf ? if so, should there be any problems?Cheers Pam & Bill
February 6, 2018 at 9:54 PM
Edit Delete Flag Quote & Reply
Barry & MaggieAdministrator
Posts: 1280
I’ve not heard of this particular problem, Pam & Bill, but it seems reasonable, considering the amount of condensation our screens produce. I’m not sure what you’ll find when you remove the wood, but it would certainly be very helpful if you could take a series of stage photos as you go along. This sort of problem will face us all, I presume. I would closely examine underneath, from the engine compartment, before you begin. It might also give you the opportunity to add extra soundproofing while you’re at it? Let us know how this progresses? Good luck.
—Barry & Maggie
February 7, 2018 at 10:25 AM
Edit Delete Flag Quote & Reply
Fred & GillMember
Posts: 463
Hello Pam & Bill.Yes this is aproblem area in the van, as Barry says there is alot of condensation in this area.
Dont know what you will find, or quite how you will go about it. I believe ( as told many years ago by Brownhills) that there is a fibreglass tray over the engine bay fitting around the extended cab area and plywood is above that with the ‘fabric cover over that for decor. If this fabris isstuck down you may want to source an alternativematerial for replacement.
The insulation/soundproofing underneath this tray above the engine bay ‘touches where it fits’ and is not very effective, which I believe exposes the cab area to virtually the outside air temperature – hence the extreme condensation.
Not sure much can effectively be done from underneath and I think there is the added problem of items being screwed up through this into the plywood.
Please let us know how you tackle this – if you dont get any advice from someone who has done this before.
A few years ago I contemplated fitting a piece of ‘insulated cow mat’ which comes in several thicknesses over this area in the cab to combat insulation and soundproof – it is black and has a finished surface. Needless to say, Gill was not impressed, but honestly I thought that it looked ok. Currently when we use the van in extreme temperature I have a thin piece of insulated foil that is fitted over this area at night…..is it effective, well probably not, but it might help it probably needs to be thicker .
Best wishe for a good and smart outcome.
Fred
—Ruby
February 9, 2018 at 2:02 PM
Edit Delete Flag Quote & Reply
France and MikeMember
Posts: 122
Hi Pam and Bill,We had a windscreen leak some years ago and that coupled with the condensation issue, led to the plywood panel windscreen shelf rotting. We had it replaced with marine grade plywood, had the windscreen refitted and have had no repeat of the problem. Our Exsis is one of the very earliest so whether Hymer eventiually fitted a fibre glass shelf in place of the ols plywood one I don’t know.
February 13, 2018 at 12:38 PM
Edit Delete Flag Quote & Reply
Pam and BillMember
Posts: 20
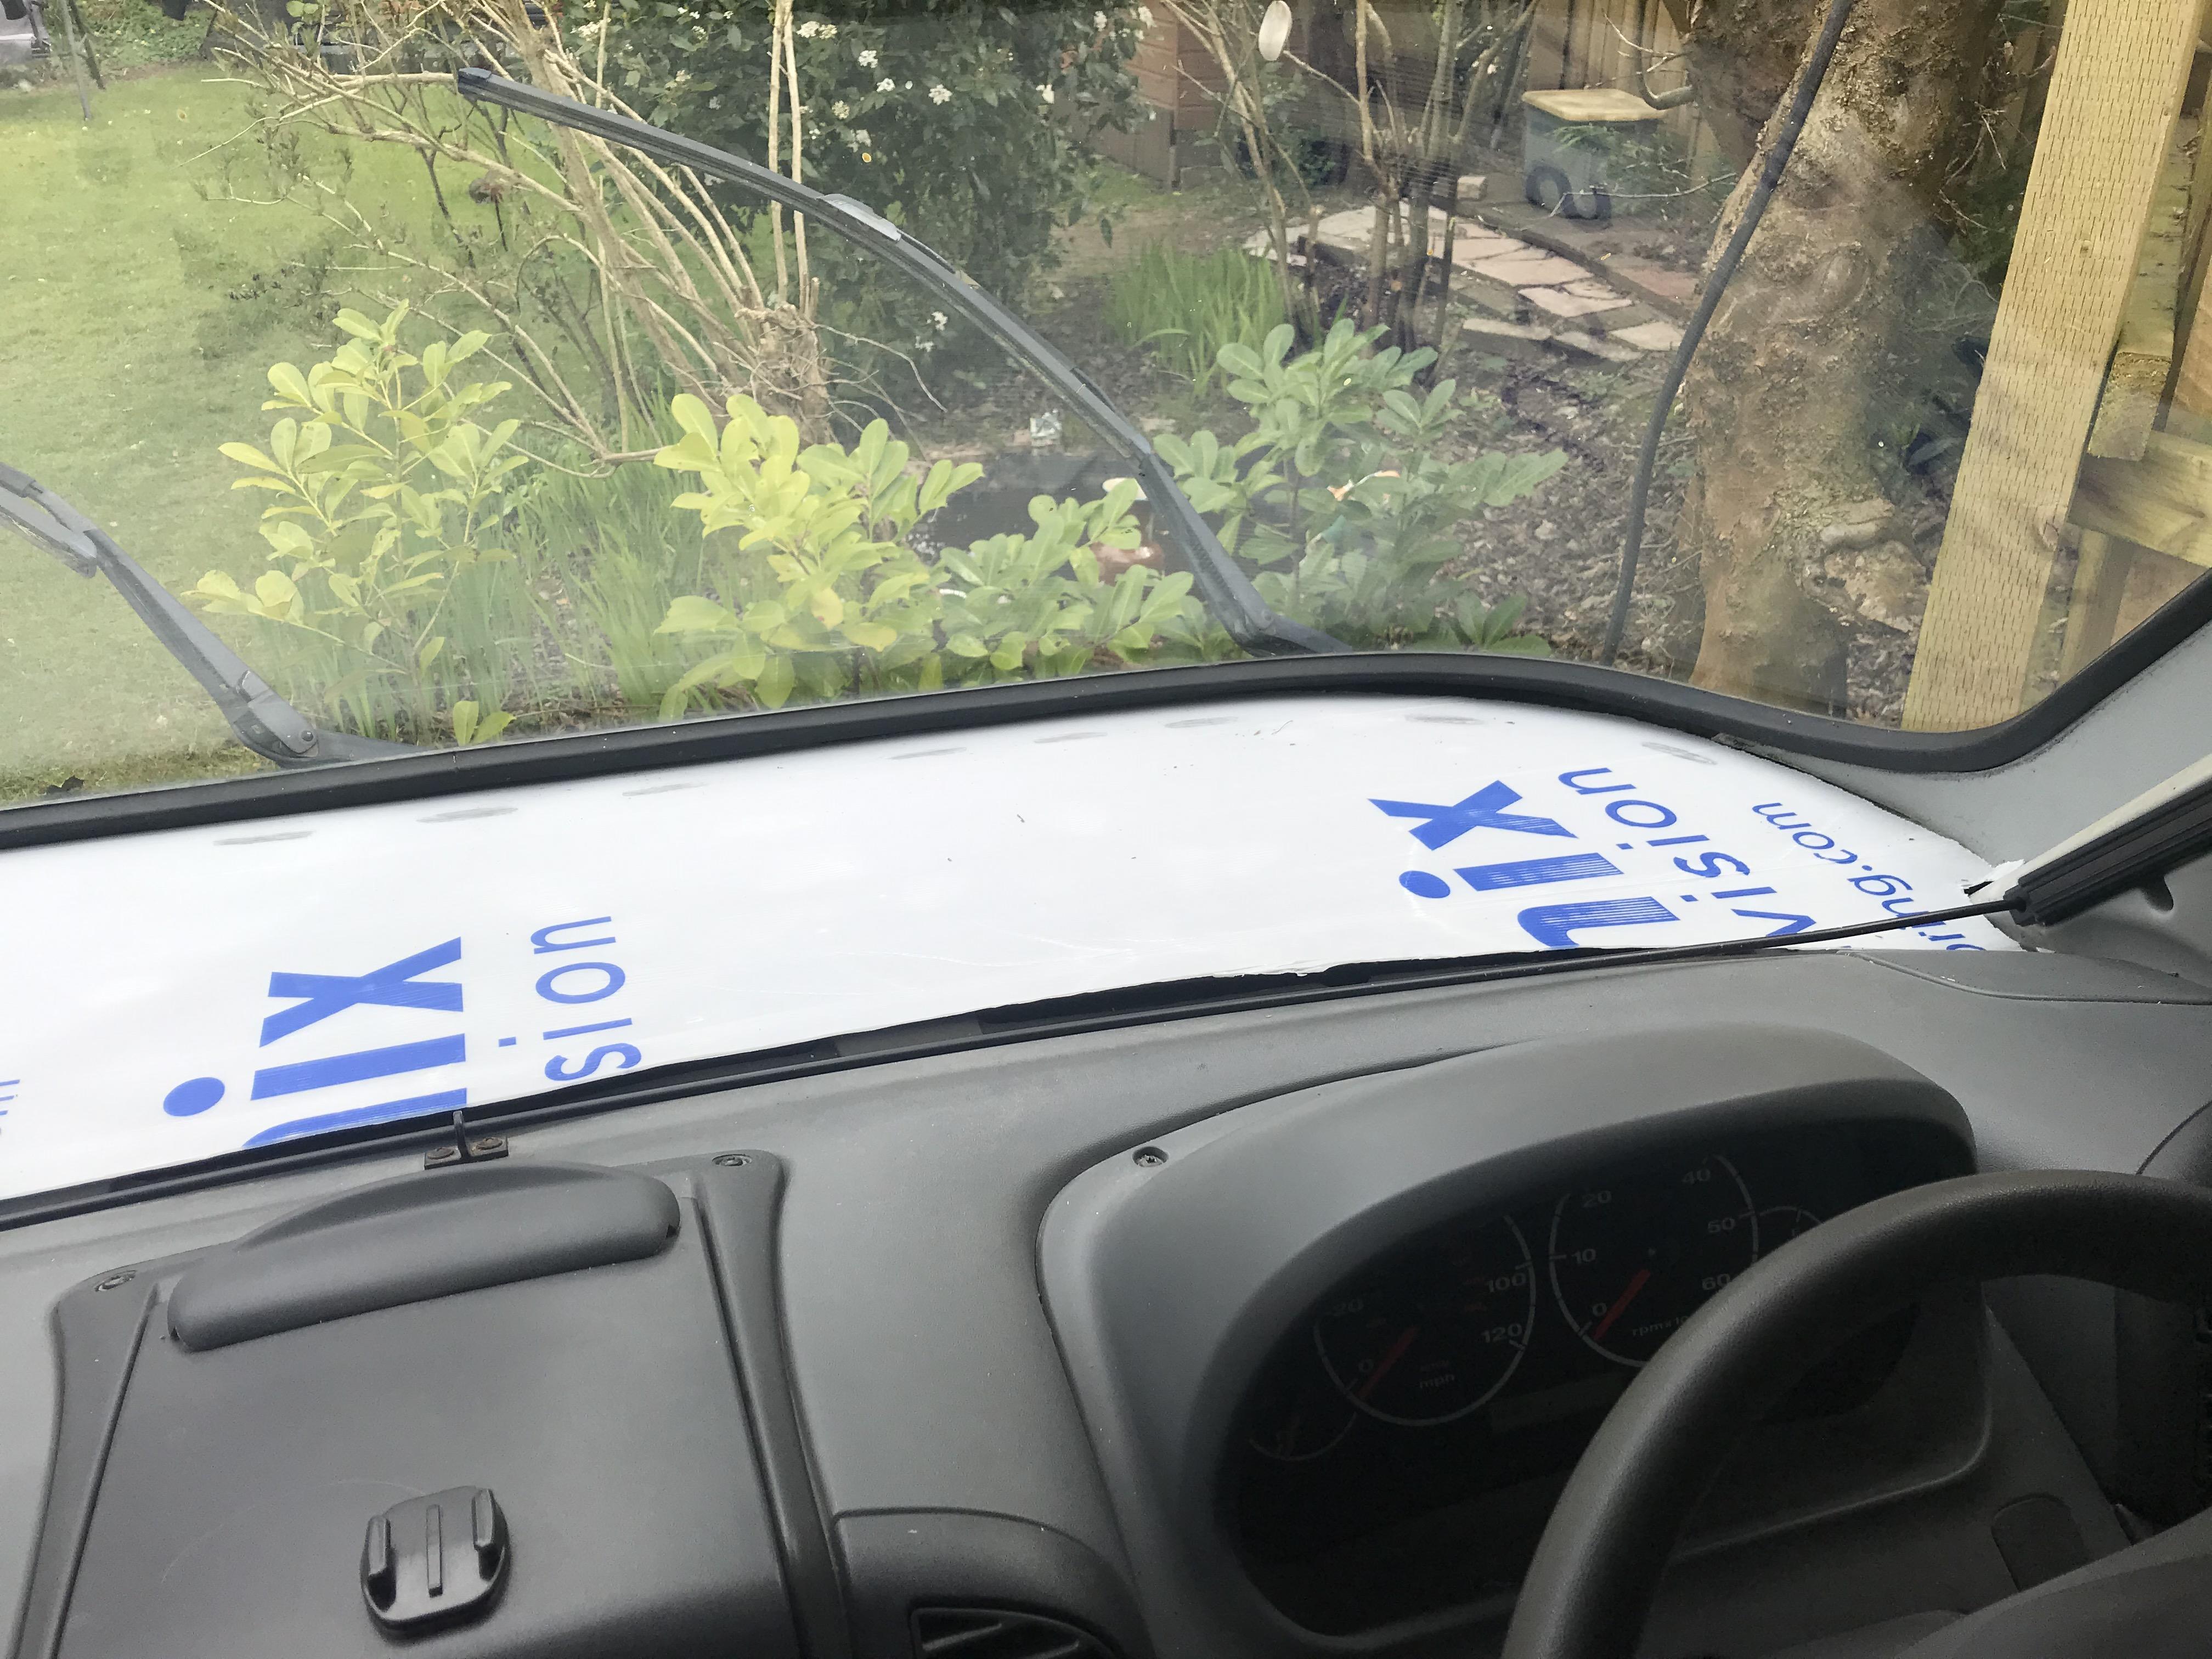
Thanks for the replies folks. We have removed the rubberised trim totally in one piece mostly by rolling fingernails and constant scatching! Thus the plywood shelf was revealed, passenger side good and drivers side completely disintegrated. We are working on some 6mm Malaysian plywood using the trim and the driver side plywood as a template. Unfortunately marine ply was not available in this thickness so it is soaked in anti rot solution. The plastic shelf is exposed and we are leaving it for a while to see if it is definitely condensation or a winscreen leak. I have ordered a roll of compact thin insulation and carbon black trim so should have some more news. Thanks again and will let you know. Great fun!
February 15, 2018 at 8:26 PM
Edit Delete Flag Quote & Reply
Fred & GillMember
Posts: 463
A good clue if your windscreen rubber leaks is that the soundproofing underneath the shelf may be wet, Tom has alerted us to this and I also found that to be so many years ago when I had problems in my early years of ownership from new.Thanks for the update, guess it will be tricky with all the cut outs for the plastic air ducts at the base of the windscreen
I wonder how many more of us have a similar problem without knowing?
Fred
—
Ruby
February 16, 2018 at 8:37 AM
Edit Delete Flag Quote & Reply
Liam McKeownMember
Posts: 11
Hi all,We’ve had the same problem with rotting ply etc caused by condensation etc. I was recently about to replace it but in the end thought better of it! However, we have had the trim around the windscreen redone for the second time in about 7 years, which has solved the issue. I read somewhere, possibly on this site, that if the drainage channels down the sides of the windscreen are blocked then damp will collect. However, on our van (’04’, the issue has been so bad that we have had a load of new steel etc put in behind the front bumper. It was an MOT failure with the rot, however all sorted now. Best thing we ever bought for the condensation, was a Karcher rechargeable window vacuum. Works a treat. Hope this helps?
February 18, 2018 at 6:29 PM
Edit Delete Flag Quote & Reply
Liam McKeownMember
Posts: 11
Also, our leak was so bad that the sound proofing was saturated. I could squeeze about 1/4 cup of water out of each corner. You’ll know it’s a major problem when the windscreen won’t defog…?!
February 18, 2018 at 6:32 PM
Edit Delete Flag Quote & Reply
Barry & MaggieAdministrator
Posts: 1280
Wow! Great info regarding the Karcher, Liam. I had never considered one of those. Thank you.
—Barry & Maggie
February 18, 2018 at 8:17 PM
Edit Delete Flag Quote & Reply
Pam and BillMember
Posts: 20
Just fitted the new windscreen shelf. The important thing was to make sure that there was no more water ingress. I was told that that the windscreen fitted to the Exsis is some old upside down Mercedes, although I have not checked this. Apparently rare, extremely expensive, difficult to source from Germany and easily cracked because of the large curvature. So meticulous care was taken cleaning out the rubber gasket all around. I used soft towelling and a blunt plastic scraper to lift back the rubber. Quite tedious but plenty of debris found! After testing the vehicle with a good hosing then I was able to fit the covered shelf. It took me 15 hours of sourcing checking, making and fitting the new shelf. Barry would be interested that the black material I sourced is generally used to recover motorcycle seats. Fred is right when he says it is a problem area as the whole shelf is hand made by Hymer, simply glued down with absolutely copious amounts of mastic, tightly fitted and abutting the windscreen gasket. Many old Hymer A class suffered from the same problem. I was able to add only a little more sound proofing Fred, because if the lack of space. If you get demisting problems then the job probably needs tackling. Any damp and debris causes all sorts of dangerous misting and havoc down the skuttle! The total job is not difficult but quite tedious and meticulous but very satisfying and enjoyable.. Brownhills apparently charge £86 per hour labour without materials and I would guess no change out of £1200. My costs was under £50 ! Will post Barry some photos and post some details in case any of you folks fancy tackling the job.
March 12, 2018 at 10:29 AM
Edit Delete Flag Quote & Reply
Barry & MaggieAdministrator
Posts: 1280
Many thanks, Pam & Bill. Glad the job went Ok. The windscreens are, in fact, Hymer’s own manufactured design and reasonably easy to obtain. I know because I had one fitted a couple of years ago (by Autoglass Specialist Windscreens) and not as horrendous a price as I would have expected ( I can’t remember the price now). A good tip about the motorcycle seat cover material. Thanks. Fingers crossed no more leaks for you.
—Barry & Maggie
March 12, 2018 at 9:59 PM
Edit Delete Flag Quote & Reply
Pam and BillMember
Posts: 20
Items needed for replacing covered windscreen shelf.1. Jig saw for plywood shelf cut out.
2. 9mm brad drill for ends of ventilation holes.
3. One sheet 2400mm 6mm plywood (enough for one prototype and one final shelf)
4. Preservative for plywood cut out shelf (I used Owatrol Seasonite which I had in the shed)
5. 2 metres Black vinyl ref 9/MC08 from Martrim Sandbach (martrim.co.uk) cut to overlap shelf by 15mm.
6. 1 tin Martrim Contact Adhesive to fix 15mm overlap vinyl to underside of plywood.
7. 3 metres Car Sound proofing deadening closed cell foam ref 262418073204 (www.carinsulation.co.uk via Ebay) for top of shelf.
8. 1 tin Mathys Easifil black, for fixing underside of completed shelf to all raised areas of fibre glass under tray ( 5mm bead used).
Don’t forget to put the dashboard screws and the plastic ventilation inserts in a safe place for re use. I visited Martrim which is near to my daugter in Nantwich and not far off the M6. I found it a very interesting vehicle upholstery unit and the staff were very helpful. I hope this is useful for anyone wishing to tackle the job themselves. Cheers Bill
March 18, 2018 at 9:58 PM
Edit Delete Flag Quote & Reply
Barry & MaggieAdministrator
Posts: 1280
Many thanks for that, Bill – a great reference for us all.
—Barry & Maggie
March 19, 2018 at 3:15 PM
Edit Delete Flag Quote & Reply
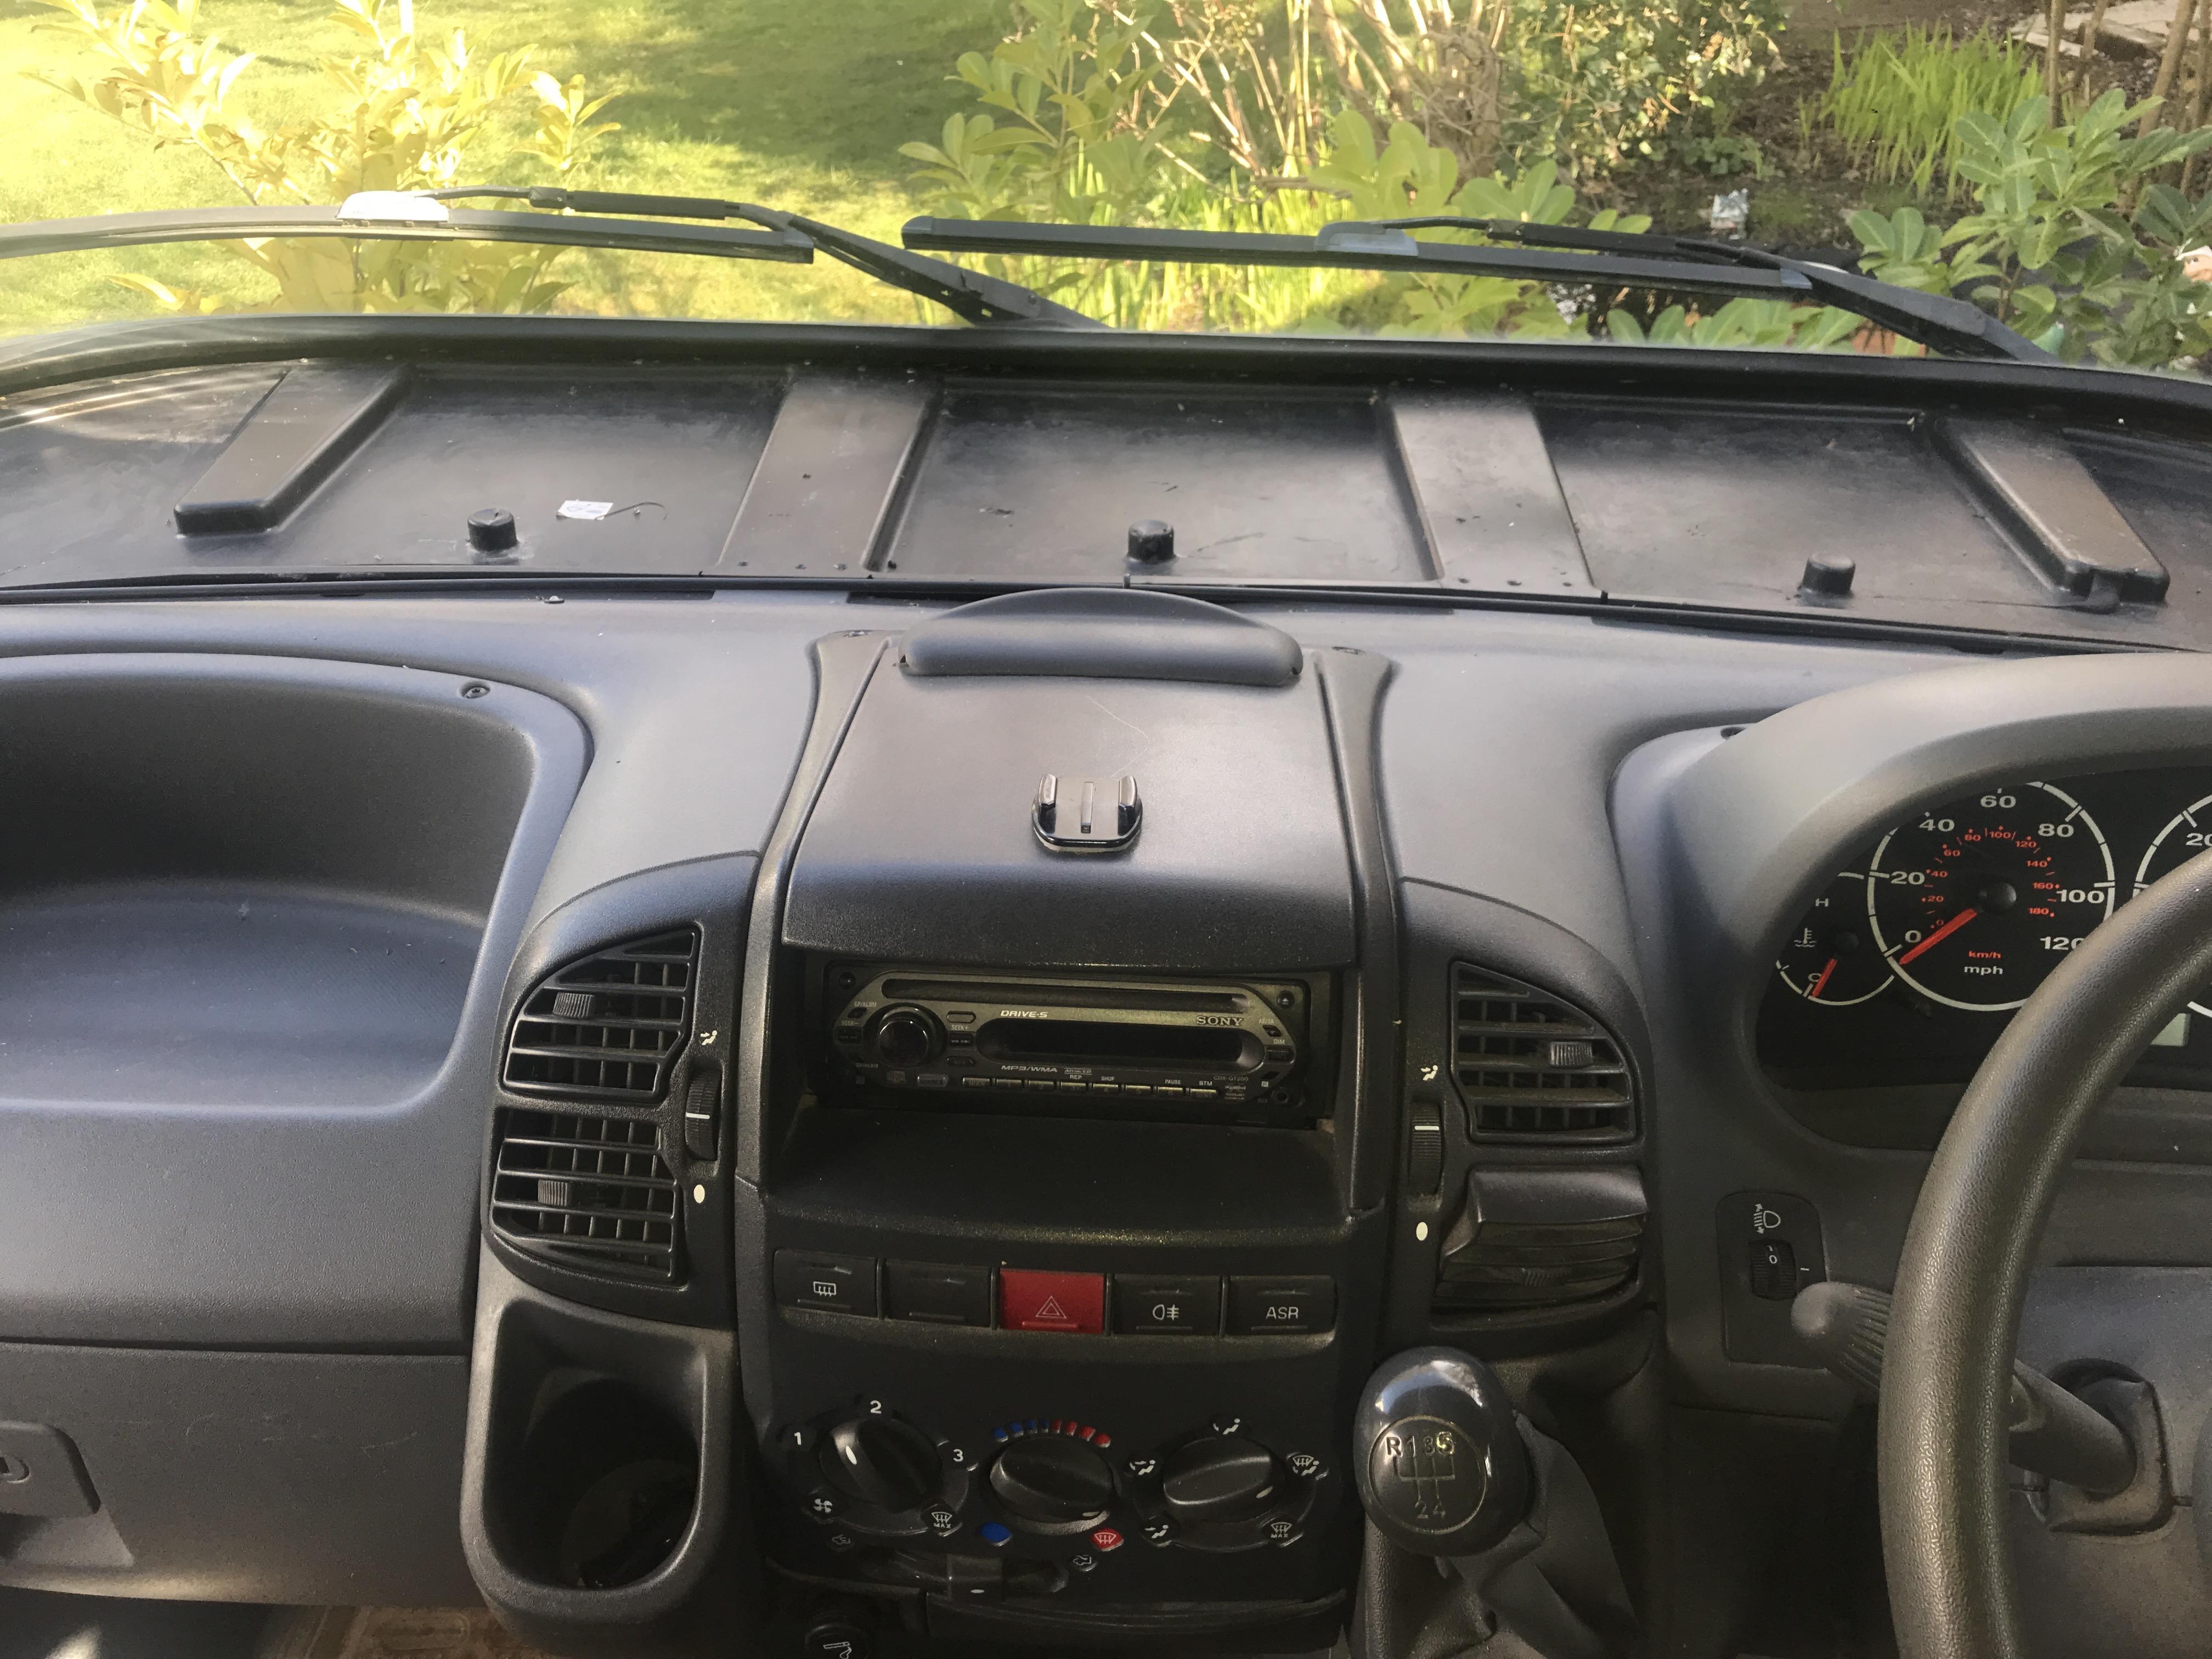
Fred & GillJan’s photos…
 Moist problem – green vegetables grow on the window shelf
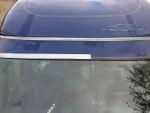
Taping the rubber – Where does the water come in? The top of the window of the bottem? With ductape I sealed the top of the window. If water still comes in, then the leak must be in the lower side.
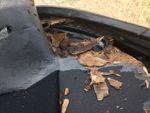 To pieces – Years and years the water could perform its demolishing work, unseen.
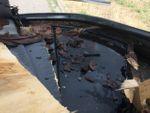 Aquaduct – Instead of conducting warm air to the window the ABS airduct under the shelf is filled with water.
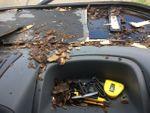 Totally wrecked – the pieces of plywood are held togehter by the rubber cover material
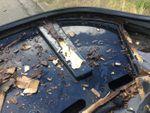 Water! – Do you see the reflection of he sky with clouds? Nice, but not how it should be!
 Lots of rubber glue – Hymer used a lot of rubber-ish stuff to join the plywood shelf and the ABS underside. It has to be air-tight, becouse the warm air of the Fiat Ducato heating has to be brought to the very front of the window, eliminating the condense on it. Pieces of plywood have to be removed here.
 A clean ABS tray – The undertray is clean now. Ready to place the new shelf.
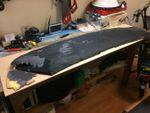 Ye olde cover – The rubber cover I used to determine the size of the new shelf, and the place of the 13 air slots.
 Coffee break – no-one there. Measuring, drawing, drilling, drinking
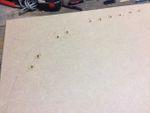 4000 holes in Blackburn, Lancashire…. …and though the holes were rather small we had to count them all. Now we know how many holes it takes to fill the Albert Hall….. (who knows from which song I stole this?). These holes will become the 13 slots for the air.
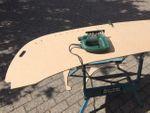 Making a mock-up – At first I bought a piece of MDF. Later I decided to use water-resistant glued plywood. The MDF part I use to see if it was the right size.
 First fit – Not bed, a few adjustments had to be made. Does the shelf slide UNDER the window rubber, or was it againt it? I don’t know!!!
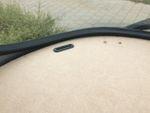 It fits – The MDF shelf in its place. Almost good.
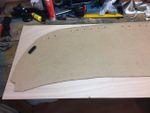 The final countdown – Here the MDF is on the plywood, The size and form is good.
 Jig saw puzzle blues – an electric jigsaw is very handy for jobs like this.
 From holes to slots – for every air-slot drill to holes of 9 mm, and jigsaw in between. Do this 13 times….
 Samples of skai – Because I am Dutch I searched for a Dutch firm who could delever a covermaterial for the plywood, that looked a little like the original material. I asked for three samples, which were send to me. I chose the black 3D. website: http://www.schuimrubberbetaalbaar.nl (which could be translated as ‘foam rubber affordable’.
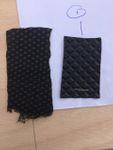 Old and new – left a piece of the old cover, right the new stuff.
(Fantastic photo ‘How to’, thanks Jan – Barry)
Member
Posts: 463
Thank you Jan for posting your step by step photos in the Photo Gallery.I was shocked at the apparent water ingress – did you check that no water was getting in through the window seal rubber – many of us have suffered a problem with the seal leaking and some of us have had it replaced…. I did many years ago and it cured the leaks. The fitters said that it was a poor fit between the windscreen and bodywork and that fitting and sealing were crucial – mine must have leaked from new or just after – my saga was well documented here years ago.
The number of postings on this thread would indicate that this is a fairly common problem caused by in some cases a leaking windscreen rubber and probably common to all the excessive condensation on the windscreen .
I have stated before that I believe the insulation is poor to non existent in this area as the insulation/ sound deadening fitted underneath above the engine bay ‘fits where it touches’ thus virtually exposing the window shelf to the extremes of the cold outside air temperatures meeting the warmer cab air and windscreen in that area – recipe for extreme condensation.
I noted from Bills repair that he mentioned “raised area” where he glued the plywood to the plastic hymer base and thanks to Jan’s excellent and informative step by step process I can see that there must be voids under where the plywood lays across the plastic base area……if it were me I would fill these voids with a waterproof insulating mat (perhaps camping bed roll?) and lay the replacement shelf over a flat area.
I don’t think that at this point my shelf is rotten and I hope that I will not have to make this repair……but a big thank yo to Jan/Bill/Liam/ Mike for contributing to this thread.
Fred
—Ruby
September 1, 2018 at 8:06 AM
Edit Delete Flag Quote & Reply
Pam and BillMember
Posts: 20
Hi folks just like to mention, since I have replaced the shelf and cleaned out the windscreen gasket I have experienced no excess condensation. When I fixed the new plywood shelf to the fibre glass under shelf I used Mathys Elastofil which is highly durable, forms a rubber like mass with high elastcity, resistant to ageing and is waterproof. One problem, Fred, is that there is no space for much sound insulation (about 3 mm). The other snag that occurs is that the new covered shelf interferes with the parking of the windscreen blinds so you cannot raise the new shelf. There is miniscule tolerance.I think that most of you, who have condensation problems, are likely to have some sort of water ingress in this fragile shelf; certainly with water dribbling down the scuttle possibly. I have owned the Exsis SG for 13 years and noticed some fogging up over the last two years. I certainly don’t need my air- con blasting away now. I am sorry I did not post some photos as promised but Jan has excelled. The photos are somewhat similar to mine. Thanks Jan and all of you folks who contributed.
Pam & Bill
September 2, 2018 at 8:27 PM
Edit Delete Flag Quote & Reply
Barry & MaggieAdministrator
Posts: 1280
Thanks for that, Pam & Bill. Something to think about, for everyone whose Exsis is suffering “unnatural” condensation. The source could be a sodden shelf.
—Barry & Maggie
September 2, 2018 at 8:43 PM
Edit Delete Flag Quote & Reply
thepaintinglady@yahoo.comMember
Posts: 6
We found this very interesting as we are still looking for an Exsis. We recently travelled a long distance to see one and were shocked to find a badly replaced front panel on the dashboard. The plywood looked really rough and rubber vents were badly replaced. Something to look out for if we do find another one. Thanks
September 14, 2018 at 3:00 PM
Edit Delete Flag Quote & Reply
Fred & GillMember
Posts: 463
When looking for elderly 2nd hand vans most different models will possibly bear signs of issues or wear and tear.The Hymer Exsis is remarkably well made and has stood the test of time, compared with many cheaper brands.
Many of us, particularly those of us who have owned from new or long term ownership often get compliments on their condition – – again on this weeks trip 2 different people who were admiring the Exsis design thought that mine was new
Luckily the windscreen shelf is a relatively straight forward replacement( as can be seen from the documented fixes. Thanks to a dedicated webmaster ( Barry) and a friendly group of owners and open discussion there is a wealth of information and help availible to resolve most issues. The Exsis is a very compact practical design and that windscreen is also one of its benefits as well as a potential issue.
If you like the Exsis, don’t be put off and give all the benefits greater thought and be patient with a possible long wait and expect to pay a little more or be prepared to consider a bit of remedial work for a lower price.
The Exsis is wearing well.
Fred
—Ruby
September 16, 2018 at 7:56 AM
Edit Delete Flag Quote & Reply
Barry & MaggieAdministrator
Posts: 1280
Many thanks for that considered observation, Fred.Proof is that many owners keep their Exsis’ for an enormously extended period of time – quite a few for well over ten years, which, in vehicle terms, is positively prehistoric!
But joking apart, the cost of repairing and maintaining an Exsis pales in comparison to renewing one.
And this will probably be the very last message on this forum on this site! I’m shortly sending out invitations to you all to register and join the NEW Exsis Owners site, and I will now be closing this site down (I’ll transfer these last few forum posts before they go).
Best wishes to you all, and if you can’t wait for the official invitation, pop along to…
https://www.exsisowners.com/register/
and sign up.
-
This topic was modified 5 years, 7 months ago by
 Barry & Maggie.
-
This topic was modified 5 years, 7 months ago by Barry & Maggie.
-
This topic was modified 5 years, 7 months ago by
-
19th February 2020 at 14:50 #2445
Thanks for the contact, Tony.
If you could perhaps take some photos at various stages, that would be great! One picture is worth a thousand words, so they say!!
Best wishes and good luck with the repair.
Barry
-
19th February 2020 at 14:53 #2447
Strange – I edited my post and added a pic and now it seems to have vanished!
Tony
-
19th February 2020 at 15:30 #2448
Try again?
The little Edit/Delete etc buttons are very close together.
Barry
-
19th February 2020 at 16:30 #2450
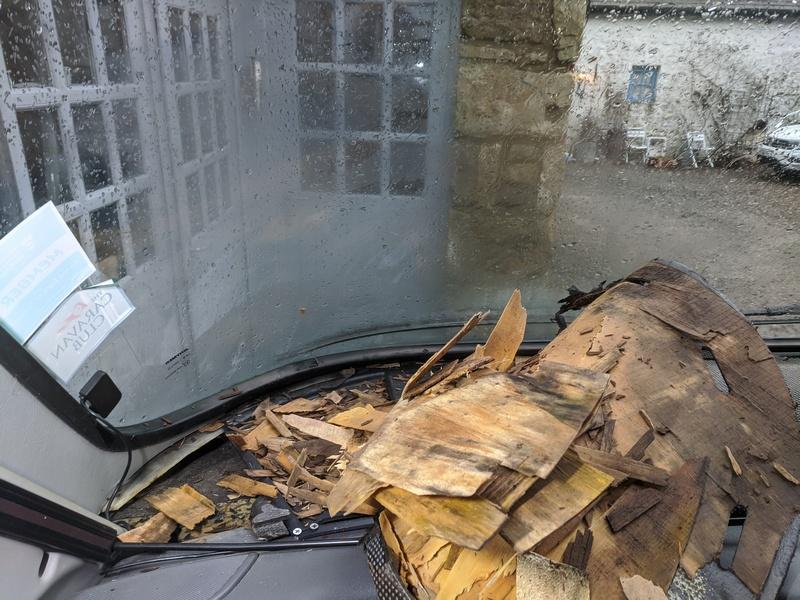
I definitely edited but perhaps the attached photo was too large. So here goes again: –
I would not have had the nerve to tear the shelf apart if it weren’t for this post. I have a leaky windscreen which was previously repaired but clearly the seals are shot. The trouble with the original shelf is the plywood gradually turns into wet Weetabix so I plan to replace it with a rot proof alternative. I have a plan but will only reveal it if it works OK! I have managed to retain the original fabric – not easy separating it from the foam backing and the amazingly tenacious rubber sealant that Hymer used. Will update when I finish it.
Tony
-
19th February 2020 at 17:17 #2452
OMG!
I look forward to seeing the renovated version.
Please also include materials used so that folks have a range of options to compare with other remedies should they be unfortunate enough to suffer the same challenge.
Best wishes for a good and satisfactory result.
Fred
-
20th February 2020 at 17:27 #2458
Hi Tony
Please let us know how you get on. Helga had a windscreen leak which has made the wood on the drivers side corner go to mush. A bead of black Sikaflex around the rubber seal on the out side cured it and has now dried out, but it will need changing. Unfortunately we got hit by a stone which has cracked our windscreen towards the bottom, I need to get this changed via insurance before I tackle the shelf.
Chris
-
20th February 2020 at 17:54 #2460
Wow! What a mess, Tony!
Leaks at the lower corners of the screen were, I believe, a problem with more than one Exsis.
Note that removing an undamaged screen (to repair the seal, maybe?) is not as straightforward a job as you’d possibly think. Windscreen repairers will want an indemnity before they start as the screen “could” crack as it is being removed. I had the screen on my Talbot AutoSleeper removed so I could tackle rust under the rubber seal on the scuttle, so I know the procedure (and the heart-stopping moments as they try to remove the screen whole and intact!).
I think Fred had leaks at the bottom corner of the screen (now cured)? Definitely a point to watch.
Autoglass replaced my damaged screen and used their “Special Vehicle” unit to do the job. They were superb. I emphasised the problem areas at the bottom corners of the screen, they took due note and assured me that it would NOT leak, under ANY circumstances. 4 or 5 years have passed and… no leaks!
Good luck, both Tony and Chris, and we look forward to seeing the results. I for one, am intrigued…
Barry
-
20th February 2020 at 18:04 #2461
Chris – I found, when I last actually cured the windscreen leak about 8 years ago , that water was getting into the rubber seal at the very top and running down the sides and then into the van at the corners, and not, as I thought, between the glass and the seal at the corners.
By using a plastic alternative to the original ply shelf, and sealing it to the tray all the way round, I hope that even if water does get in, it won’t do any harm and my demister will continue to demist!
Hope the screen replacement goes well – perhaps with a new seal it won’t leak! I’ll order some more Sikkaflex for when we get a dry few days !
Tony
-
20th February 2020 at 18:24 #2463
You’ve just confirmed my belief, Tony, that if you have any kind of a leak, the ENTIRE rubber seal, both to bodywork and to screen, needs to be pulled back slightly, thoroughly DRIED and only then sealant injected right round the entire screen.
I think that when previous attempts at repairs have failed, it is possibly because the point of observable water ingress is most likely NOT the point where water starts to get in. Surface tension and gravity/air pressure, will drag water a long way from its initial entry point. Therefore if you’re attempting to repair a water leak to one of our Exsis screens, first dry under the rubber and then seal right round the edge of the ENTIRE screen, both under the rubber to body and the under the rubber to windscreen.
Barry
-
9th March 2020 at 13:48 #2488
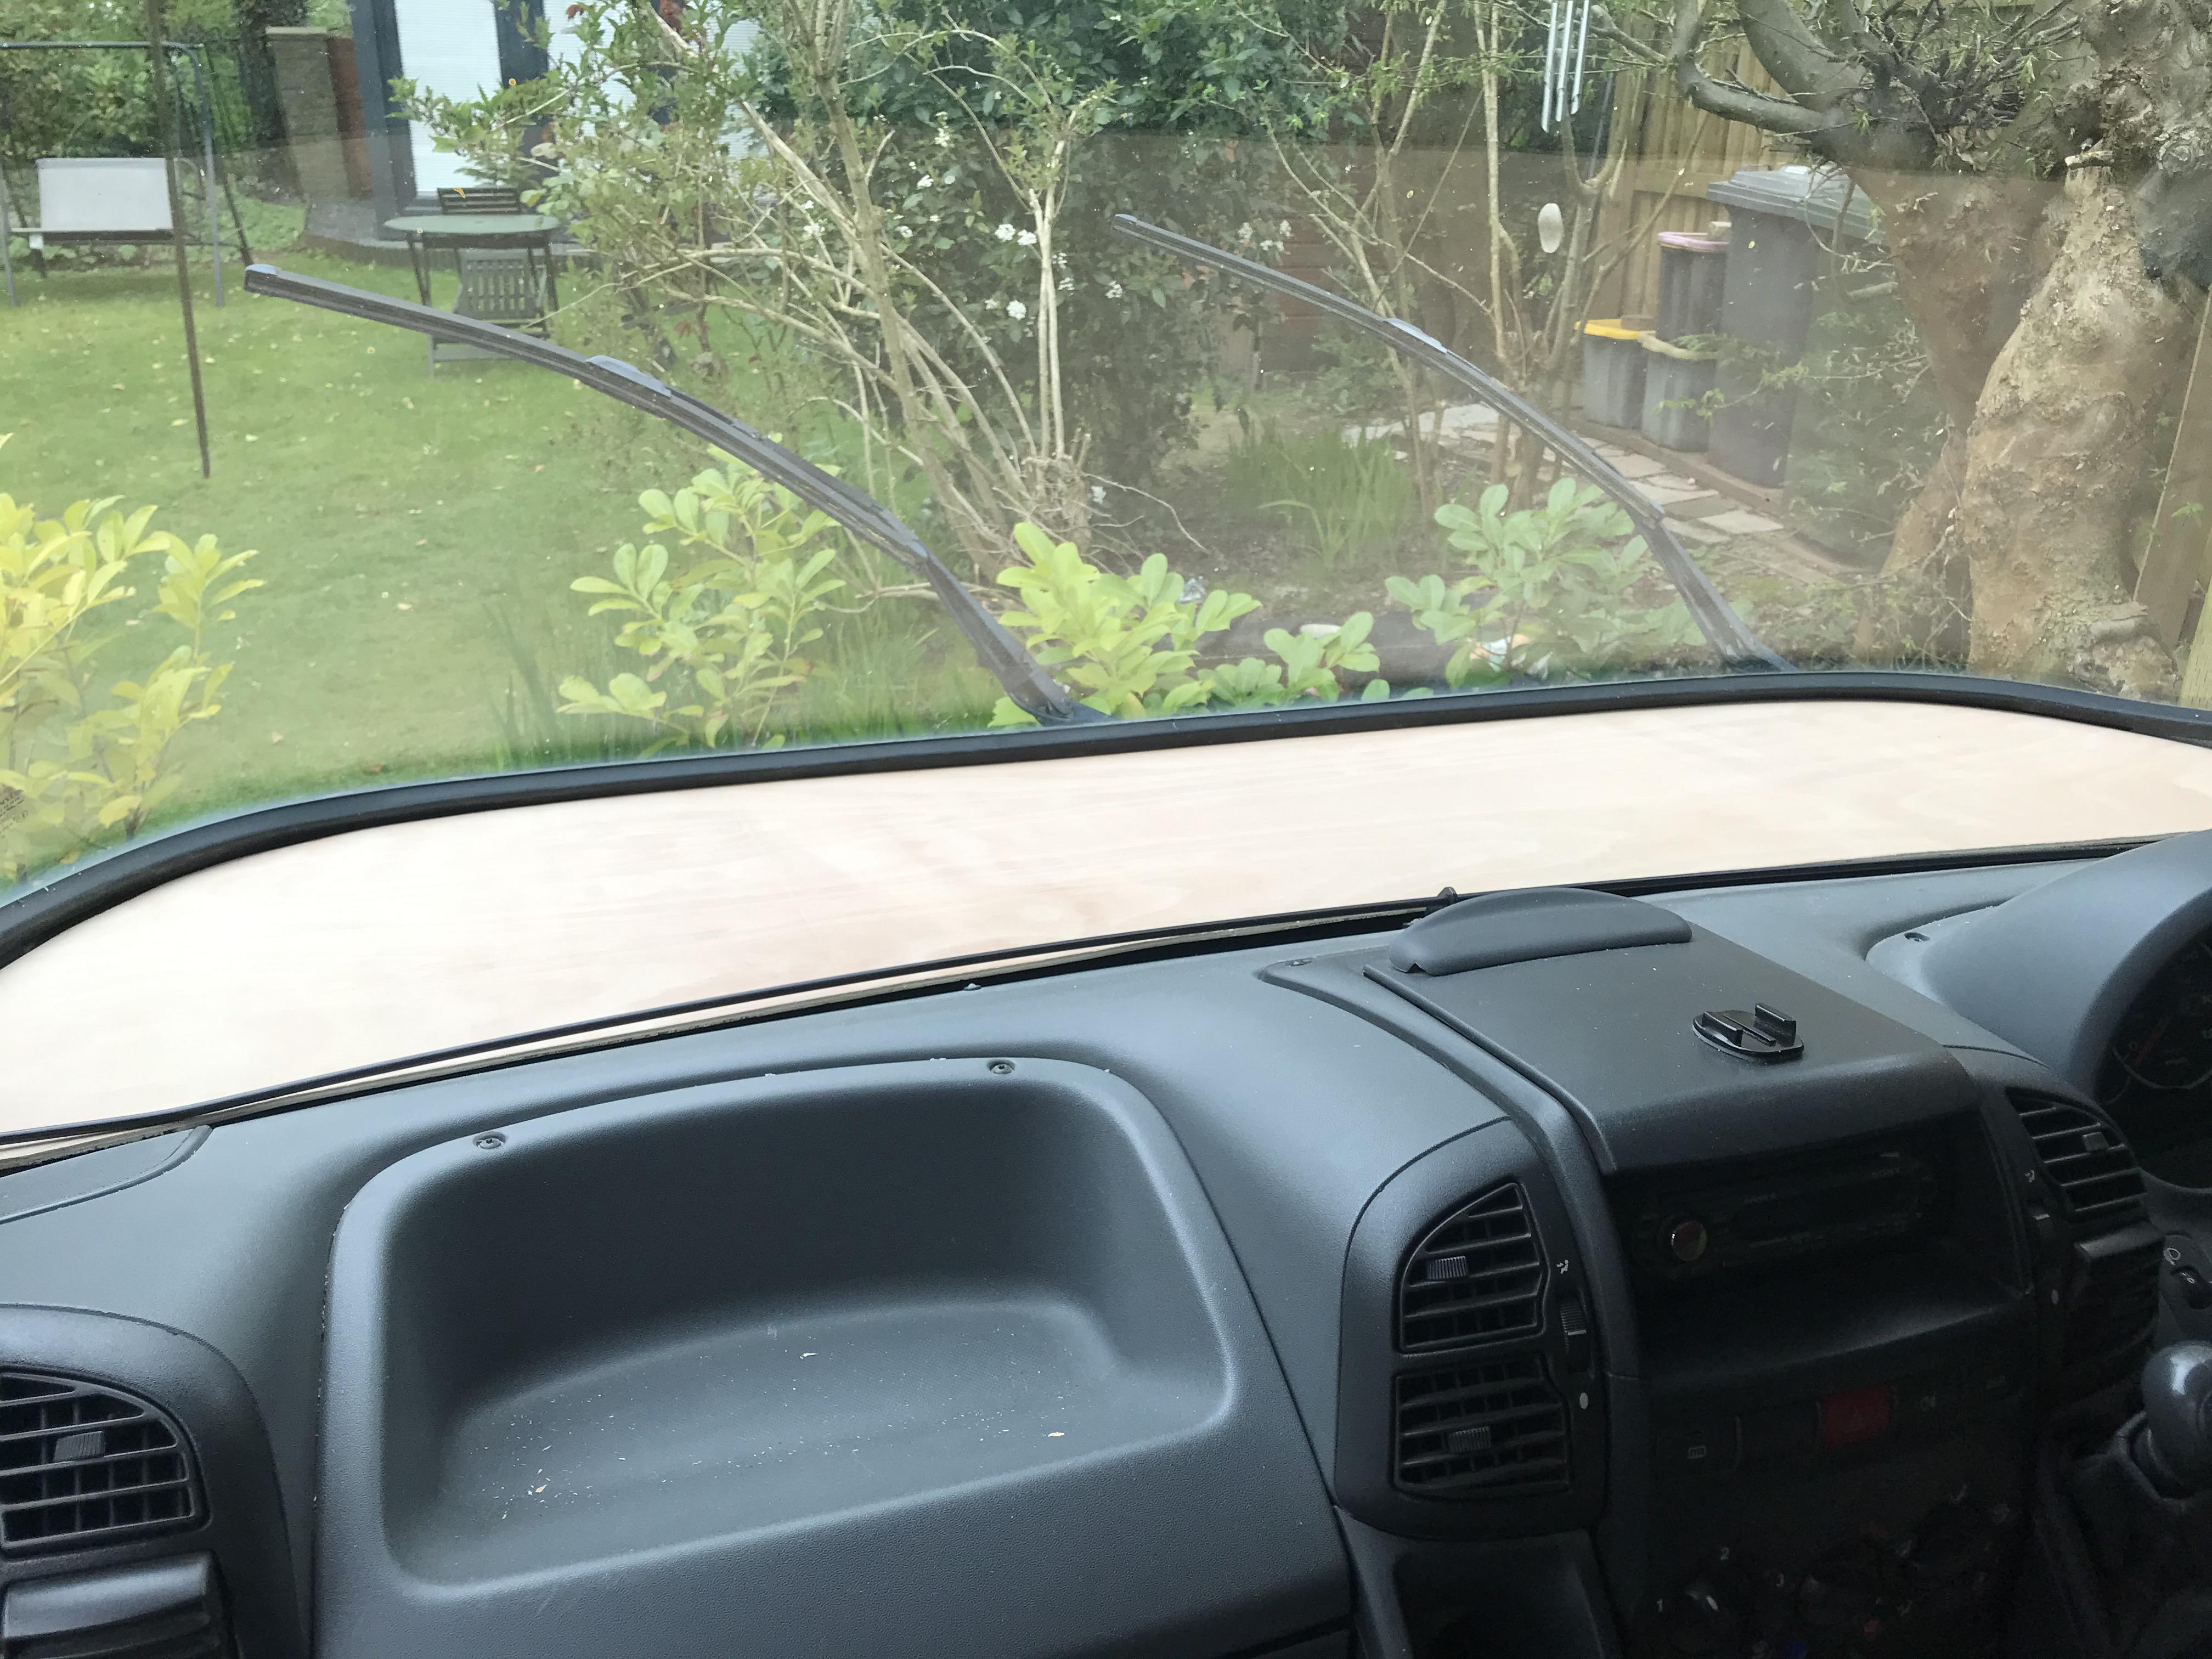
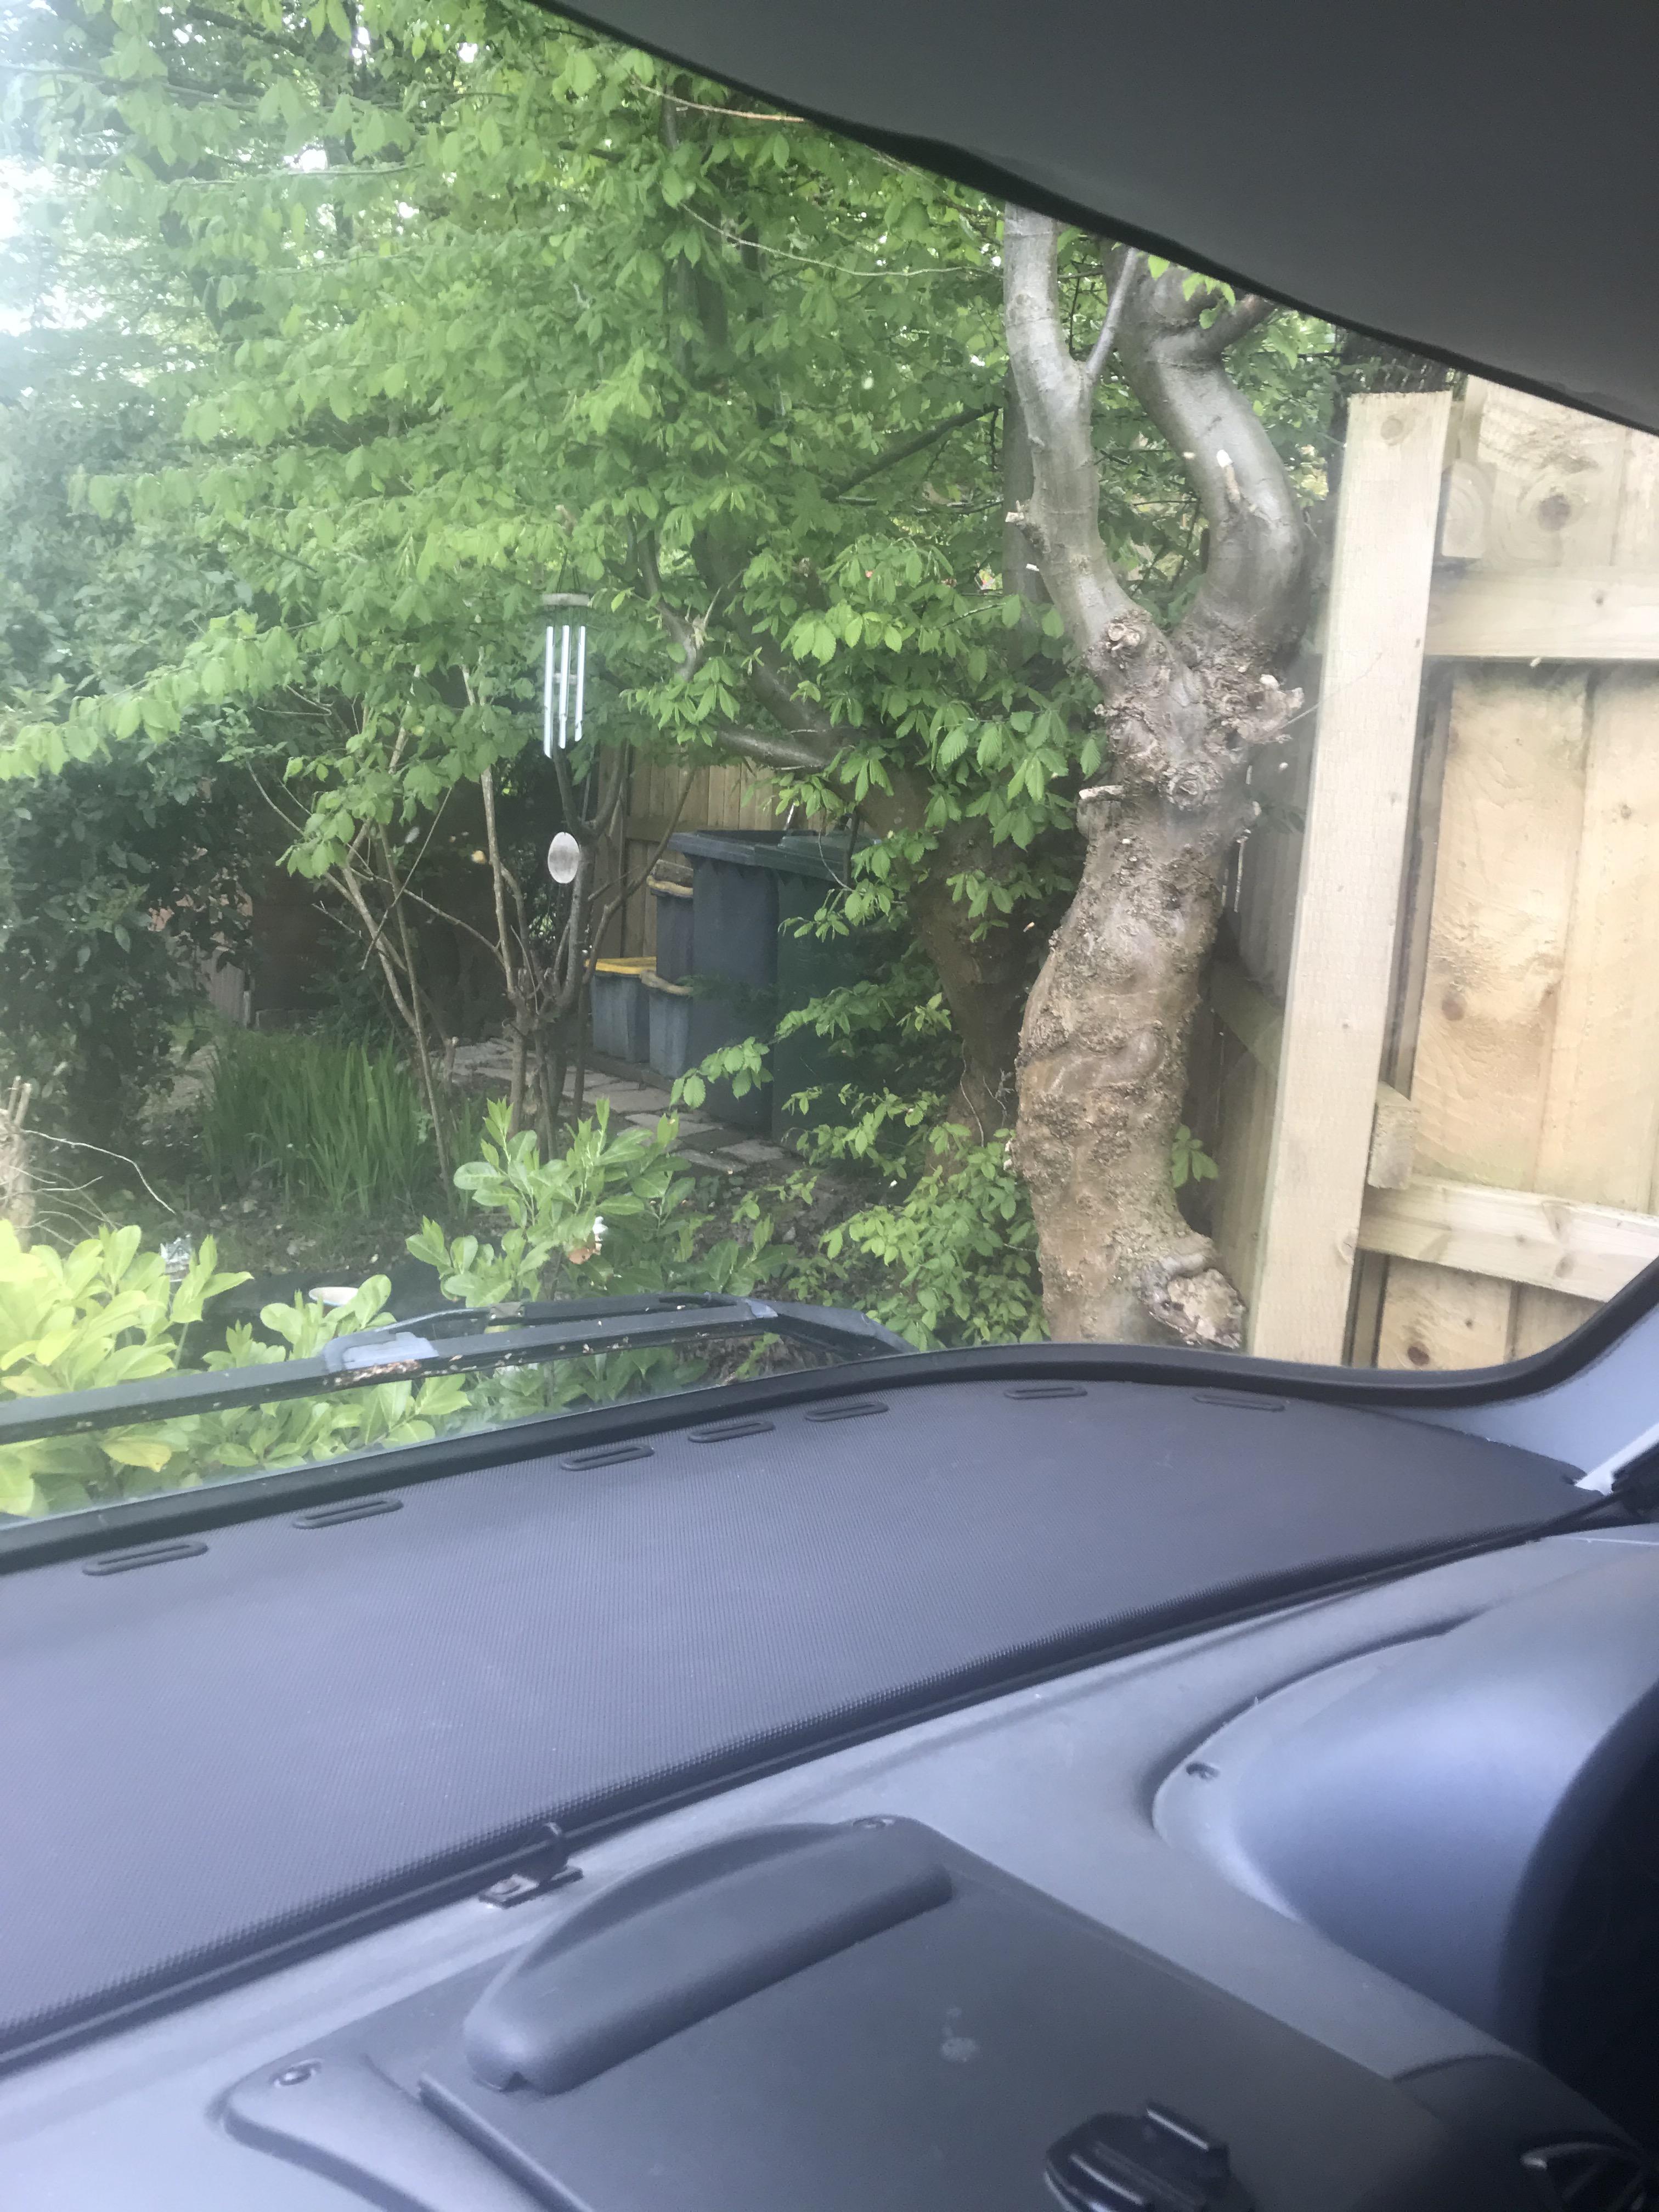
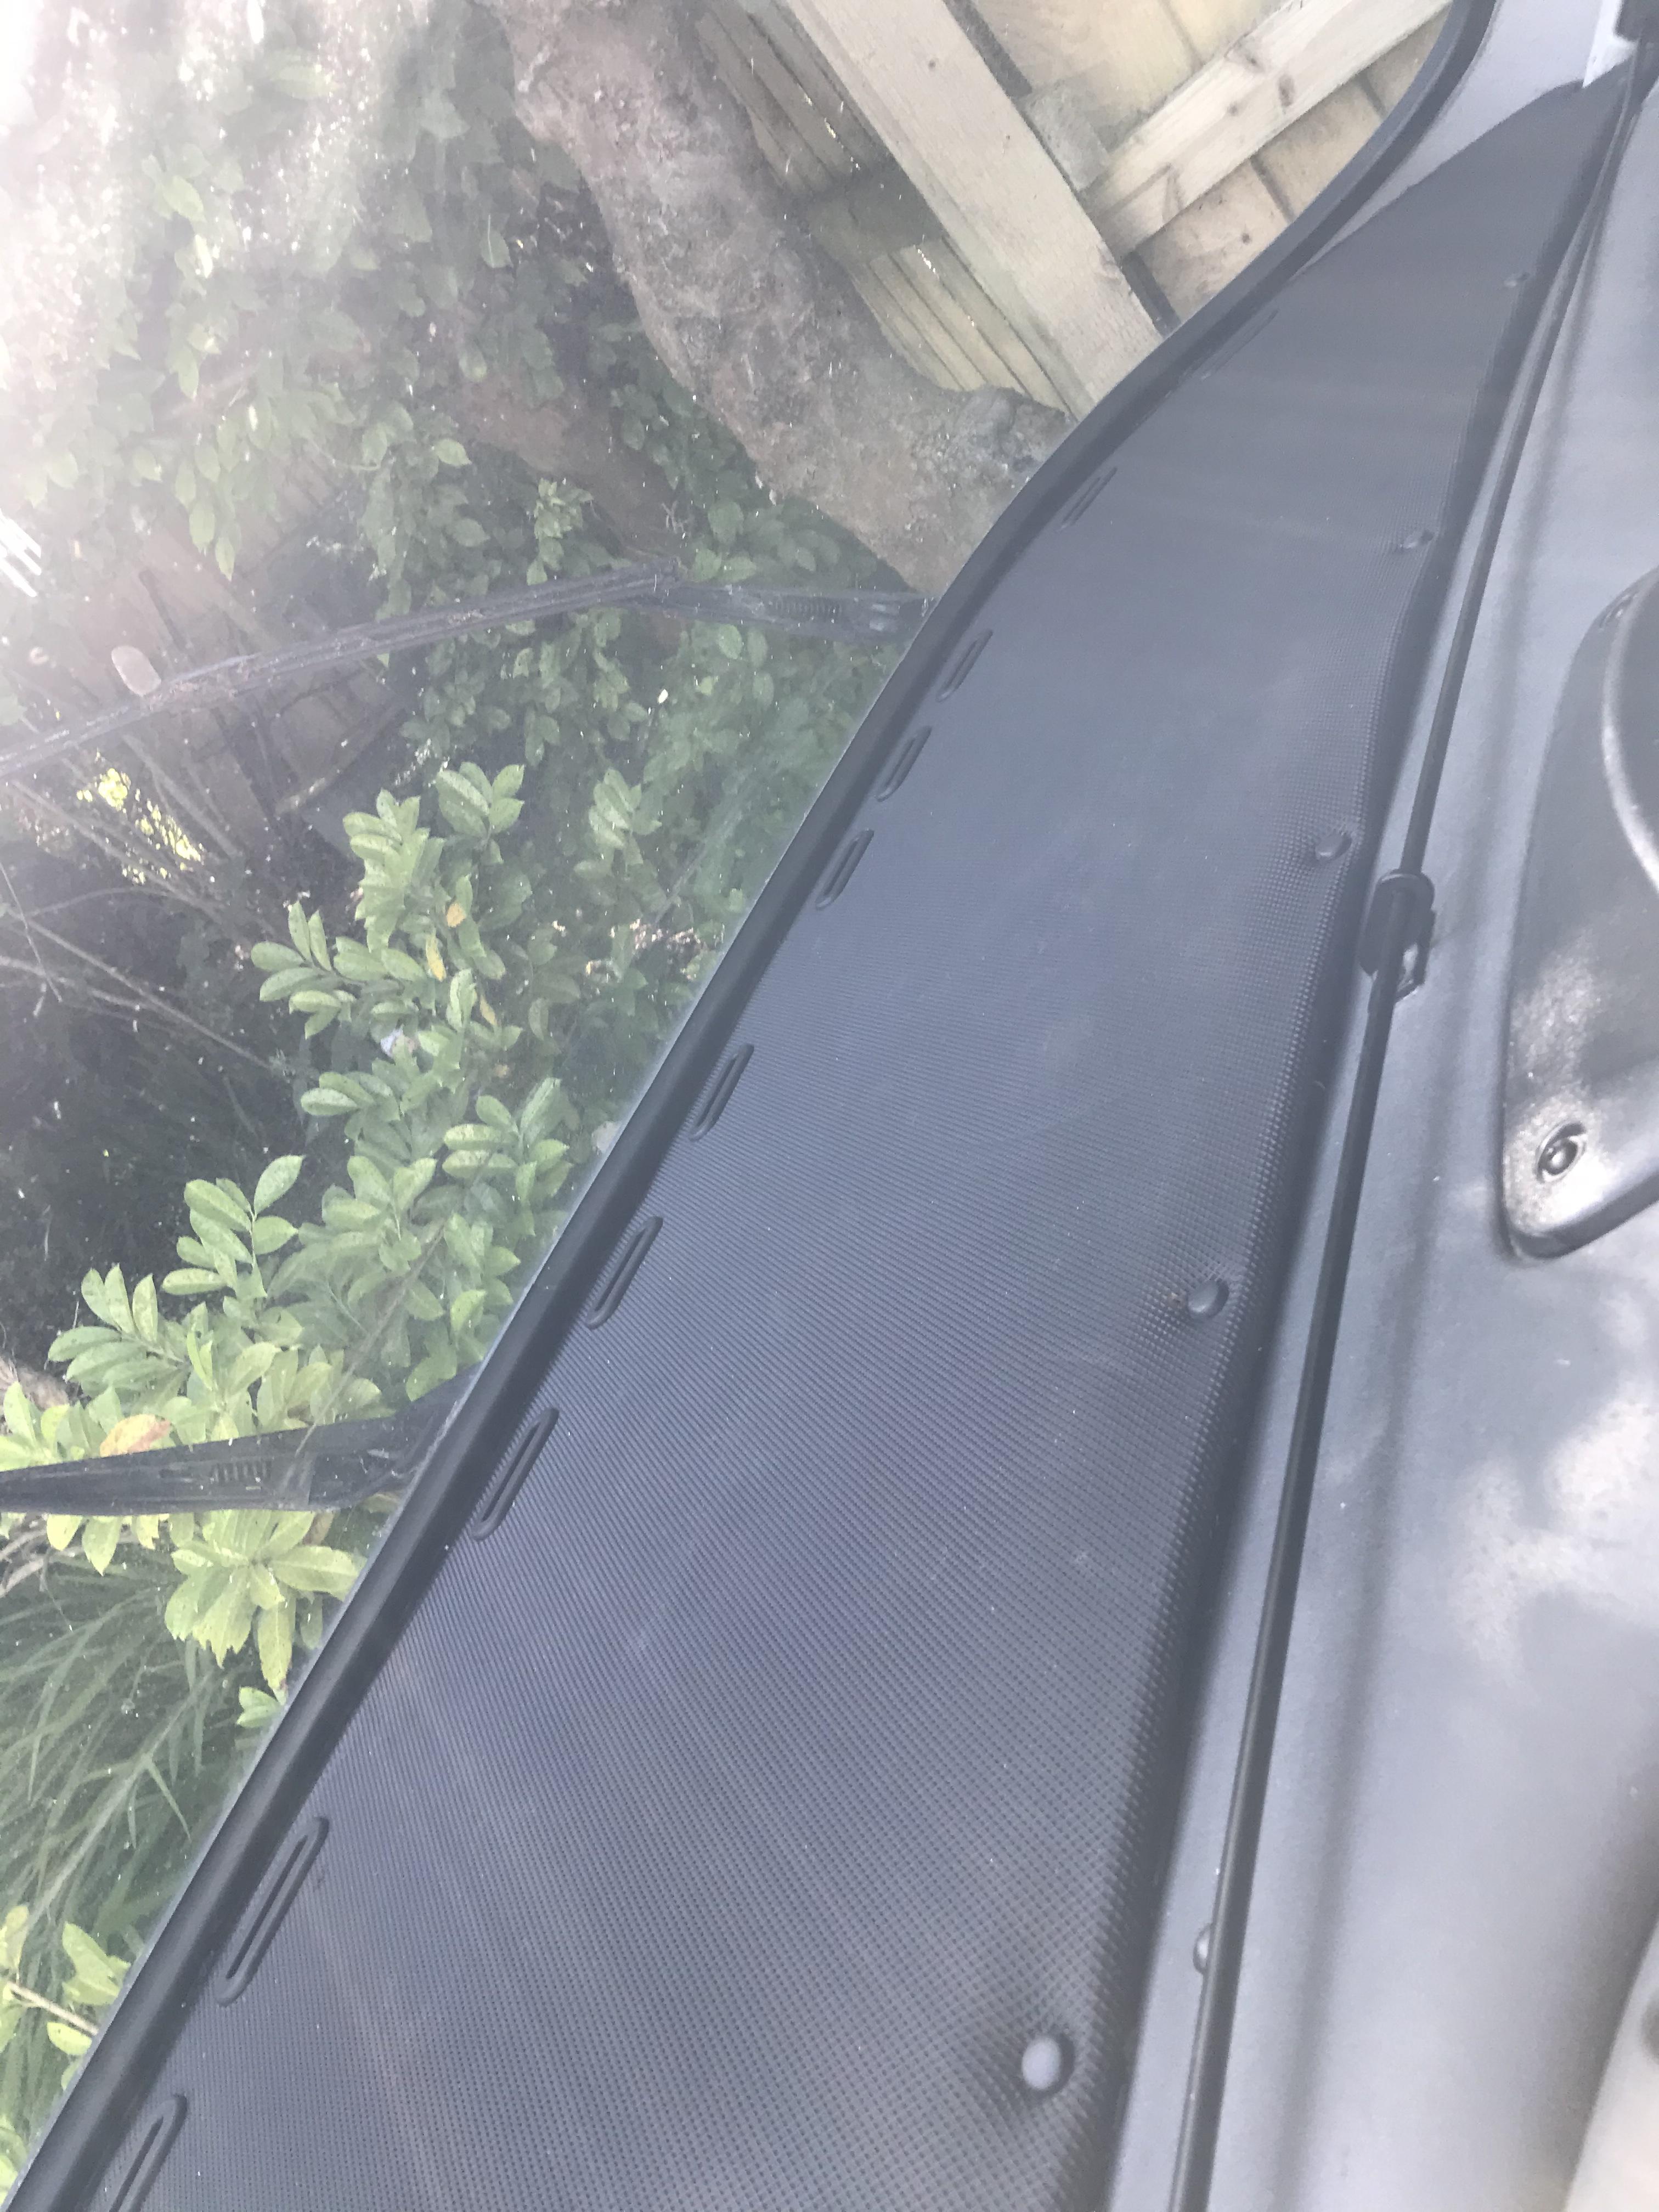
I’ve now finished this. It’s taken longer than I had anticipated. I decided to use no natural materials as I’m not convinced, I won’t have further screen leaks – also condensation runs down the inside of the screen on to the shelf. I used some Correx sheet. It’s easy to cut with a craft knife and sufficiently strong given the number of supports below. I sealed all the channels before fitting – just in case water got in. I then put some self-adhesive high-density foam on top of the Correx and finally bonded the original fabric to the foam. I used a hybrid sealant (Screwfix X8) to bond the shelf to the underlying tray then more sealant around the edges. It’s not perfect, but then neither is the rest of than van now. I do have an effective demist system now and no worries about further rot. Things I would not repeat: – The Correx sheet wasn’t quite long enough and so it had to be joined in the centre – not a big problem. Also the foam came as separate 600mm squares as I misunderstood the website. I’ll post pics of the finished shelf and the materials below.
best wishes and good luck
Tony -
9th March 2020 at 13:54 #2491
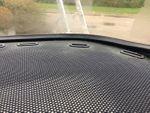
Here’s the first pic of the finished shelf
-
This reply was modified 4 years, 1 month ago by
 TonyFlisch.
-
This reply was modified 4 years, 1 month ago by TonyFlisch.
-
This reply was modified 4 years, 1 month ago by
-
9th March 2020 at 13:57 #2494
Next the Correx material
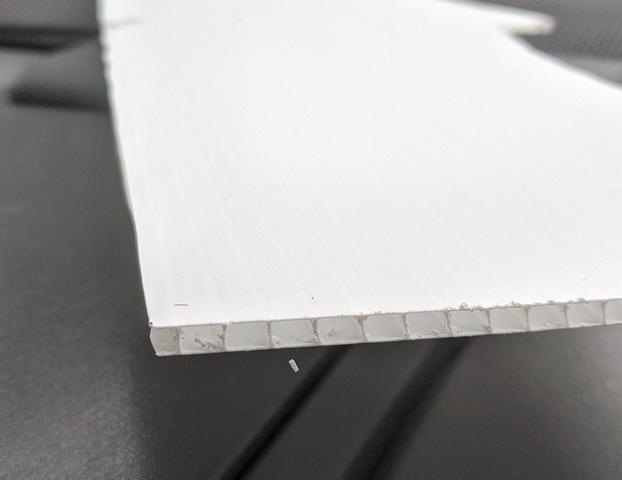
-
9th March 2020 at 13:57 #2495
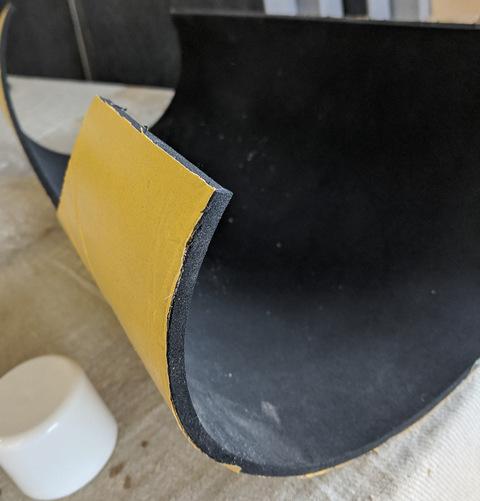
Finally the foam
-
9th March 2020 at 18:50 #2496
Looks good, Tony!
A very satisfying job. A big encouragement for other owners.
Thanks for posting this.
Barry
-
10th March 2020 at 08:22 #2507
Yes Tony quite a neat finish, job well done.
A different approach regarding materials used.
I’m thinking that the Correx may not be as sound deadening as the ply, but perhaps the foam compensates and most certainly insulates better. Have you noticed any affect on engine noise in the cab?
Fairly certain that mine is ok, but some while ago I ‘thought out’ that this area is a weak point for noise and sound insulation and I worked out in my head that I would use ‘cow mat insulation bed’ that is available from Farm supplies stores if ever I had to make this repair……probably similar to your foam, but being denser not as workable.
Fred
-
10th March 2020 at 09:38 #2509
At this stage I’ve no idea about sound deadening as I haven’t gone anywhere yet! I did plug up some gaps in the th1ck foam “sponge” that lies below the shelf.
The correx obviously has very little mass so will transmit low frequencies with little resistance, but the foam bonded to it should help a bit. Any further deadening would have to be in the engine side as there is no room for additional thickness above the plastic tray
Time will tell, but I’m just happy I can have a clear screen again!
If anyone uses ply make sure its marine grade!
Tony
Tony
-
19th March 2020 at 14:17 #2534
 Isolation job! I replaced the windscreen seal many years ago but I think it leaks again. The shelf was rotten on the drivers side. We won’t be going anywhere for a while so I’m going to leave everything exposed and see if it’s leaking or condensation. In the meantime I think I’ll make another shelf probably from marine ply and use the materials in this post. The only real concern is resealing with mastic. Hymer used a shed load of it under the shelf and the windscreen seal. I decided to remove it all.
 -
19th March 2020 at 14:21 #2535
A big job, Tom. But some good info in the earlier posts on this topic. Keep us posted how you get on with this?
Barry
-
20th March 2020 at 12:34 #2537
A super photo Tom and I know that we can count on more top tips from you.
The last few days whilst away wild camping and wiping the windscreen down both mornings, I was thinking to myself “if only I could improve this” and a cursory check of the condition of my fabric covering and tapping convinced me that it was a lot of work probably not required…..now with what you have discovered in yours, I am disturbed again!
Good idea to take an observation break.
I am hoping that in the meanwhile you will be coming up with another of your groundbreaking ideas – other than just marine ply and find a solution that will vastly improve air/sound insulation.
Best wishes for the project, Tom.
Fred
-
20th March 2020 at 20:44 #2539
Hi Fred and Barry
I’ve ordered the same materials used by Pam and Bill. It’s not the best time to experiment as sourcing the materials is difficult. I like the temporary nature of Tony’s shelf as, like him, I’m not confident I can seal the windscreen. So far the stuff I’ve ordered is about £100 with delivery. The original lasted 14 years without special treatment. At 78 I think I can live with that. The difference between hardwood ply and marine ply is subtle so I’m using hardwood ply to model the shelf before I make a final decision. It would be nice not to have to use ply. If you can think of any alternative material with strength and soundproofing let me know.
Removing a ‘glued on’ plywood shelf is not easy if it is not totally rotten. You have to chip away at it with a chisel and hammer.
The ply has to be rigidly fixed to the ABS and underneath/abutting the window seal using mastic.
I do wonder if replacing the window seal with the shelf in situ could make it difficult to get a proper seal.
Tom
-
-
21st March 2020 at 09:37 #2542
I do not consider my repair to be temporary – it will last as long as the van does. The Correx is easily strong enough – I had 4 x 10kg weights on it when bonding to the ABS tray. All the materials are utterly rot proof. Its important to get mastic all the way round so air from the engine compartment can’t get into the cab. I would counsel against any ply other than marine grade as ‘exterior’ ply will get soggy and de-laminates on exposure to wet as I know from past experience. This is not a job anyone wants to do twice. Interestingly my screen is still leaking (the foam in the engine compartment is still getting wet but the shelf is bone dry as the leak is coming from the bottom of the seal which is below the shelf . Screen repair can wait for better weather as I want heat and dry.
stay safe
Tony
-
21st March 2020 at 10:48 #2543
Your point about putting mastic all round to seal from the engine compartment is VERY pertinent, Tony. Fumes from the engine compartment can be extremely insidious, causing nausea, headaches, sickness to occupants within the vehicle, who don’t know the cause. Admittedly, this is worse with petrol-engined vehicles, but the occasional waft of diesel exhaust fumes could ruin any thought of living in the Exsis!
Good point, thank you, Tony.
Barry
-
22nd March 2020 at 00:08 #2544
Thanks Tony. I completely misunderstood your post. Where did you source the corex and mat and what are their dimensions. I understand the need for the seal and have a lot of mastic on order. We won’t be using the van for a while so I’m going to reseal the screen before I replace the shelf. The ply I’m buying is very cheap so I’m going to make a template with it to use for modelling the final shelf. The problem at the moment is self-isolation so i can’t wander around looking for stuff. Sorry for the misunderstanding. If the corex is your permanent solution I’m happy to use it. The thought of removing ply in future fills me with dread. Thanks in advance. Tom
-
23rd March 2020 at 14:04 #2545
I have done some research on the products:-
These are my notes so far (copied from websites)
Ply
1
Marine grade has no natural decay resistance. It has no chemicals added to enhance decay resistance, unless it has been subsequently pressure treated (= $$$). Marine grade has no special waterproofing in or on the wood, unless it has been added as a special feature.
If you don’t get the wood wet very often and if it’s sealed there’s no difference in performance indeed by using a different, less expensive grade and species with an exterior rating.2
If you have a boat or are planning on building something that will be submerged in water, then marine plywood is what you’ll be working with. This type is a thicker material than regular plywood, comprised of about seven to 10 layers as opposed to three to five, with glue locking them all together. The adhesive in regular plywood will actually dissolve over time, causing the structure of the wood to break apart, but marine plywood is specially treated to withstand years in direct contact with water. By sealing this material, however, you can increase its overall lifespan. The information that follows will show you how to properly go about this project so you can get plenty of use out of this material for many years to come.Sand the Surface
One of the things marine plywood has in common with other types is that you will always need to sand it down in order to stain, paint, or seal it. Go over both sides of the wood, as well as the edges, with 80-grit sandpaper by hand. Then, use a tack cloth to thoroughly clean up any dust you created during the process. You may even hose it down, but remember to allow it to dry completely before moving forward.Apply the First Coat
Sealing marine plywood is a lot like sealing other types but it does differ slightly. In most cases, you would coat only one side and be done with it, but since marine plywood is going to be used underwater, everything has to be treated.Dip a foam brush into the clear, penetrating epoxy. Saturate the foam brush, and start spreading it on the top and side edges first, switching to the front face of the wood when you’re done. Allow the epoxy to dry then seal the bottom edge and the back of the plywood. This type of sealant, as its name indicates, works itself deep into the plywood and dries transparent. It also requires less maintenance than other kinds of epoxy sealer. You can use another marine-grade sealer if you like but you will need more coats and will have to reapply it every three or four years.
Add Subsequent Coats
It’s a fact that plywood will rot regardless of what kind it is, but if marine plywood is not properly sealed with the right number of coats (especially if being used as a hull) it will deteriorate unexpectedly and cause serious problems for you. With normal plywood, you would use two coats of sealer, maybe even three. A good rule of thumb for sealing marine plywood is to apply as many layers of sealer as there are layers in the plywood. If you have purchased plywood with six layers, for example, apply six layers of epoxy to seal it. Between each coat, you add, gently sand to rough up the surface for better adherence of the next coat. Make sure you also use a tack cloth to remove dust before continuing to brush on more epoxy for best results.*** Also if you are not careful when cutting ply you can damage the edges ****
Correx This is from one supplier. They only sell in 5 or 10 sheets
2.4M x 1.2M
Available Sheets Types and Thicknesses
Thickness Colour Fire Retardent
2mm Black No
2mm Translucent Yes
2mm Translucent No
2mm White Yes
3mm Black No
3mm Translucent Yes
3mm Translucent No
3mm White Yes
4mm Black No
4mm Translucent Yes
4mm Translucent No
4mm White Yes
6mm Translucent No
6mm White YesOne thing to note is that you could buy Correx which is not flame retardent. Is that something to be concerned about ??
A 6mm Correx board is £19 delivered rolled or £26 delivered flat on eBay.Rubber sheeting
Fred did you mean Insertion Rubber Sheeting. This is heavy duty sheeting used in horse boxes etc. Probably £40 for a sheet.
I’m going to make my template in 6mm external ply. £20 a sheet, enough to do 2 (my wood work is bad) then make a decision. I do like the Correx solution.
One use for Correx is under vinyl flooring. One grandson does this and has delivered 2 thin sheets free of charge. I’m thinking maybe bond them each side of a plywood shelf ??
Onwards and upwards
Tom
-
This reply was modified 4 years, 1 month ago by Tresjolie.
-
This reply was modified 4 years, 1 month ago by
-
23rd March 2020 at 14:15 #2547
Thanks, Tom. Great, informative post, as always.
Barry
-
23rd March 2020 at 14:47 #2551
Test as my posts wont post!
-
23rd March 2020 at 14:49 #2552
Re my materials.
I bought 2 x 4mm correx from here https://www.ebay.co.uk/itm/4mm-White-Correx-610mmx813mm-Fluted-Board-Correx-Sheet-Corrugated-Plastic-Sign/232372226653?ssPageName=STRK%3AMEBIDX%3AIT&_trksid=p2057872.m2749.l2649
The under flooring material is too thin and bendy – I wouldn’t recommend it.
You need to join them in the middle – I bonded another bit of correx below. They are securely packed.
Remember to seal ends with silicone to keep water out of the flutes. It’s easily cut with sharp scissors and or a craft knife
Tony
-
23rd March 2020 at 14:49 #2553
And the rubber:-
Sponge Rubber Sheet – EPDM/Neoprene Blend – Self Adhesive 6mm
https://rocketrubber.com/product/sponge-rubber-sheet-epdm-neoprene-blend-self-adhesive-black/
cheers
Tony
-
24th March 2020 at 19:02 #2557
(Posted on behalf of Fred & Gill because of a site hiccup)
Great interaction between you both Tony & Tom.
The EPDM that Tony came up with looks great. I suppose the ‘cow mat’ that intrigued me a couple of years ago would have done a similar job, but a lot less workable. Tom, I looked on the Mole Valley Farmers website and it seem that they are only offering 44mm thick now, but when the idea struck me they had several thicknesses in stock starting at 20mm. It seems the same sort of stuff as the horse insertion mat that you mentioned. Given the limitations of depth it would seem impractical to use.
Please can someone explain where the air for demisting traverses to enter the slots below the windscreen, because if its what I am thinking then that explains why demisting is not good.
Best wishes for the project Tom….
Fred
-
24th March 2020 at 19:04 #2558
(Posted on behalf of Tony Flisch because of a site hiccup)
The air flow enters the ABS tray at the back – furthest from the screen – and flows through the compartments to the front and up through the slots in the plywood. It requires an airtight connection between the shelf and the tray as well as the periphery for this to work.
My problem was, as the ply was soaking wet and the tray too, the air was passing through 100% humidity – especially at the passenger side and condensed on the screen – the opposite to what it’s supposed to do!
cheers
Tony
-
27th March 2020 at 19:18 #2561
If water gets onto the ABS tray it will drip down from the heater duct into the cab when the van is parked uphill. This is the reason I removed the shelf.
The windscreen seal was replaced by National Windscreens 5 years ago so if it’s a leak I will ask them to reseal it before I replace the shelf. It hasn’t rained since I started this job.
I was worried that the MOT is due in May and that I would have to get everything back together before then but I may have some leeway with the virus allowing a 6 moth stay of MOT.
Tom
-
27th March 2020 at 22:07 #2562
If the replacement shelf is properly bonded to the ABS tray all round the periphery, then water cannot get into the tray. I’m happy I’ve achieved that. At the moment, while I still have a windscreen leak, the water which has penetrated goes behind the tray and shelf and passes down into the engine compartment and is largely absorbed by the thick insulating sponge below. Inside it’s now dry. Shame I can’t go anywhere!
cheers Tony
-
29th March 2020 at 07:35 #2566
Searching for plastic alternatives I found HPL
HPL is the abbreviation for High Pressure Laminate. HPL is made up of several layers that are compressed (laminated) under very high pressure. This creates a very dense, hard and form-retaining sheet (HPL).
The structure of the sheet
An HPL sheet consists of a wood fibre or paper core and two top layers. The core of the sheet consists of several layers of wood fibre and paper that are soaked with phenolic resin. During production, these layers are compressed under high pressure and at a high temperature. The resin that is used is a so-called thermoset. This means that the resin becomes hard under the influence of heat. By compressing, the layers are compacted and create a very dense and hard sheet. The top layers are so hard and dense that sunlight and moisture cannot penetrate into the sheet. In the first instance, HPL sheets were therefore developed as cladding material for outdoor use in residential and non-residential buildings, for example, maintenance-free exterior panels and plastic fascia boards.Any thoughts on this. £46 for a 6mm sheet
-
29th March 2020 at 07:55 #2567
Also available in 4mm which would fit nicely with Tony’s design. One concern is plastic adhesion to metal
Tom
-
29th March 2020 at 09:08 #2568
I think the modern adhesives commonly available should cope. The problem material is polypropylene, but even that can be stuck with appropriate adhesive.
Good find, Tom for other jobs too.
Barry
-
29th March 2020 at 09:36 #2569
One concern Tom, given how hot that area gets in sun behind that big glass windscreen is expansion. How much – perhaps ask before ordering.
Probably can be allowed for with the right sealant that you will be using around the edge anyway and can also be controlled with the external screen that you have anyway.
Fred
-
29th March 2020 at 10:59 #2570
Fred! Excellent thought. I will have to ask that question. I suppose that Correx, being a ‘honeycomb’ construction won’t expand as much. Do you think the original wood shelf expanded and pulled the lower rim of the windscreen seal away when it contracted. The mastic under the seal had deteriorated. I can’t understand why these screens fail.
Barry! The wooden shelf was held in place by screws at the back and under the seal at the front with copious amounts of a rubber mastic and round the rim and across the middle ABS supports. The screws would not have added much strength to the overall construction. The mastic did not set completely hard so when the shelf was removed it came away with difficulty but looked like a rubber gasket. Initially when I started I thought it was a manufactured seal/gasket. The mastic was absorbed slightly by the ply and it adhered to the ABS but pulled away with effort leaving a clean surface. I want to use something similar so I have bought lots of the stuff Pam and Bill used and will play with that before applying.
Thank you both for your contributions.
Tom
-
5th April 2020 at 13:31 #2578
I cut a template from 2mm Correx. It’s quite flexible so could be made to fit. The UK comfort pack came with a horizontal Remis blind. I wonder if I will have to remove the blind to fit the shelf or cut the shelf into 2 pieces
Tom
-
5th April 2020 at 14:52 #2581
They are vertical blinds with horizontal movement. The 2 blinds pull across the cab and lock in the middle. Nothing in the Book so may have to play
Tom
-
5th April 2020 at 15:17 #2582
I’ve removed the side bars on one occasion, one at a time – just two screws holding the vertical plate. Would that not be sufficient to wiggle the new shelf in?
Barry
-
7th April 2020 at 10:55 #2589
Thanks Barry
Looking at Tony’s photo he seems to have moved the horizontal rail back.
I’m doing the plywood template next. It was £20 for a large sheet enough to make 2 if necessary. I’ve cut a large rectangle containing the tracing. The plywood was a bit distorted so I’ve put weights on it to try and flatten it out also I can now measure the rectangle to get and idea of the size for the Correx order.
It still hasn’t rained since I started so can’t check the windscreen. Though I’m pretty sure it’s leaking.
Tom
-
12th April 2020 at 19:39 #2600
Template no 4. 2 Correx and 2 Ply. This is the second ply. I tried to remove the side bars. Discretion is the better part of valour so gave up. I cut the first ply in half then after some thought made the second 2mm Correx and finally the second ply which can be fitted by placing one side first. I’m not looking forward to doing it with all the mastic in place. Hopefully the 4mm Correx has a little flex in it.
Tom
-
13th April 2020 at 12:07 #2601
Hi Tony
I’ve ordered the Correx (4mm). Can you please confirm that you used 6mm EDPM. Also in what order did you proceed i.e. cut Correx, Fix Correx in place, stick EDPM etc. Or did you put it all together then fix it in place ?
Thanks in advance
Tom
-
13th April 2020 at 13:54 #2602
My Correx was cut in such a way that it fitted <span style=”text-decoration: underline;”>under</span> the window seal. I had used cardboard as the template – actually half a template as I assumed the shape was symmetrical. It was then I noticed that it was possible to get it under. I drew the outline of the window seal on the Correx before finally fixing. I cut the foam to fit but before fixing- I fitted the fabric cover – tucking it under the foam. I ran a continuous bead of X8 sealant around the periphery and between the partitions. I didn’t bother sorting the fabric or foam at the edge nearest the interior. If you’ve got really accurate template you wont need to do that. The Correx was weighed down with several circular training weights – 4 in all and each 10kg. Next day I cut a the remaining edge of the foam and turned the fabric underneath and finally ran a bead of sealant around the entire periphery. Don’t forget to seal the ends of all the channels! Good luck – you’ll end up with a much better solution than the original.
cheers
Tony
-
20th April 2020 at 15:06 #2614
Cheers Tony.
Correx cut. EPDM arriving tomorrow
-
22nd April 2020 at 09:02 #2615
Hi folks
Sounds like much Exsisential work is going on in this lockdown. We realise how important the Exsis is when it is not parked up! Hope all you enthusiasts are enjoying the sprucing up and maintenance which has to be done. The weather has been great here in the Lakes for the last 4 weeks and we were able to get plenty of jobs done. It is so frustrating when we can’t just pop out in the Exsis to our favourite local spots in Duddon and Crake valleys on empty roads! . There have been some great ideas to solve the shelf problem. Just to mention that our own windscreen shelf replacement has been successful apart from one snag which we touched on a couple of years ago. The air intake for the windscreen is at the rear of the shelf and plenty of adhesive is needed here to make a good seal and drive the air forward. This, together with the new thin sound deadening material, may cause your shelf to sit high. This could interfere with your blinds mechanism. . Just to say, be careful with any raising of the shelf for you may find it awkward opening and closing the blinds. Keep safe if you are self isolating. Bill & Pam
-
22nd April 2020 at 11:20 #2617
Thanks Bill and Pam
I have all the bits and bobs. A mixture of your solution and Tony’s (Martrim and Mathys, Correx and EPDM)
Having things delivered during lockdown means they have to be left for 72 hours.
I am trying to make the back edge of the Correx not interfere with blind track. The next step will be to get all the bits in place before glueing.
You said that you used a tin of Mathys Easifil to glue the shelf to the ABS. In another post you said you used Mathys Elastofill. I bought 4 tubes of Elastofill. I have not bought the Easifil as I missed the note in your first post. Do I need this?
I was hoping that the Elastofill could be used to completely seal the gaps around the ABS and then across the raised areas to glue down the Correx. Did you fill the voids with Elastofill then use the Easifil across the raised areas? This is the part of the job that really worries me. It has to be right first time.
Tom
-
22nd April 2020 at 12:24 #2619
Hi Tom
Elastofil is the stuff to use. I think that Easifil was something my joiner was using at the time and I put it down by mistake. The hollow areas are the airways and you should not stick anything down there or you will block the air flow to the front. Any sound deadening material goes above the hollow areas on the plastic under shelf. Hope that is clearer.
Good luck Bill
-
22nd April 2020 at 12:51 #2620
I would put nothing between the shelf itself and the plastic tray. As long as you have a bonding sealant along all of the flat surfaces that will be in contact with the shelf then all should be well. Sound deadening needs to be under the tray in the engine compartment, or a thin layer on top. In my van there is a very thick foam pad in the engine compartment. My van was one of the last made so I don’t know if this was common to all, or like some other features a later addition.
cheers Tony
-
26th April 2020 at 15:57 #2644
 Thanks for your help. I’ve cut the EPDM. Doing the trim tomorrow. It’s painfully slow maybe it’s nerves.
I haven’t got the order of sticking down yet
Tony did you glue the Correx in place before glueing the EPDM to it.
I’m thinking maybe:
1 fill all gaps round ABS.
2 glue Correx in place.
3 fit trim to EPDM
4 glue EPDM to CorrexIs that the order you used?
-
26th April 2020 at 15:59 #2645
 Thanks for your help. I’ve cut the EPDM. Doing the trim tomorrow. It’s painfully slow maybe it’s nerves.
I haven’t got the order of sticking down yet
Tony did you glue the Correx in place before glueing the EPDM to it.
I’m thinking maybe:
1 fill all gaps round ABS.
2 glue Correx in place.
3 fit trim to EPDM
4 glue EPDM to CorrexIs that the order you used?
-
27th April 2020 at 09:55 #2646
I stuck the foam using its self adhesive side to the Correx first, then glued the fabric using Wickes flooring adhesive spray which is a pretty amazing contact adhesive. Then fixed the whole thing in place with lots of hybrid sealant. Weighed it down and left it alone for 24 hrs. I then sorted out the edges – tucking the fabric in place and running a thin bead of sealant around the periphery. Finally replaced the original screws along the front. Good luck – it will be fine and a lot better than it was. Did you manage to rescue the original fabric? I like it a lot better than any replacement I have seen and am prepared to overlook the odd blemish – its wonderfully non-slip.
Tony
-
2nd May 2020 at 10:24 #2666
Thanks Tony
I damaged the original trim so bought some trim from same supplier as Pam and Bill. I haven’t glued the shelf in place yet. Is the spray from Wickes flexible? Why didn’t you use the X8? I thought the Elastofill that Pam and Bill used would hold it down. Pam and Bill can you confirm this? I will fill the gaps around the periphery avoiding the air channels.
I’m undecided about the leaking screen. It has rained this week and nothing has shown up even though the sound proofing sponge under the driver’s side is wet.
Thank you both for your help.
Tom
-
2nd May 2020 at 10:50 #2667
Sorry guys I’ve just read the post again Tony used the Wickes stuff to glue the fabric in place. I managed that with the glue I got with the trim. Cheaper to use Wickes stuff.
Thanks again.
Tom
-
3rd May 2020 at 19:09 #2670
Hi Tony and Pam & Bill
I was going to glue the shelf in place today but came across 3 semi-circular cut-outs each one in the top of the dashboard underneath the ABS and the cab end of the shelf behind the 3 airways. They appear to be there to allow air from the back of the airways to enter the cab end of the windscreen from under the shelf. I was going fill the gap between the ABS and the dashboard with mastic to give maximum airflow to the slots in the front of shelf but it looks as if I should leave a gap around these cut-outs to allow airflow to cab end of the windscreen. They look like an afterthought or mod.
Any thoughts appreciated?
Tom
-
3rd May 2020 at 20:22 #2671
I’m sorry but can’t really help. I don’t think they are there for the purpose you describe. I did all I could to force all the air through the slots under the screen and give it no other exit.
Tony
-
1st June 2020 at 10:59 #2706
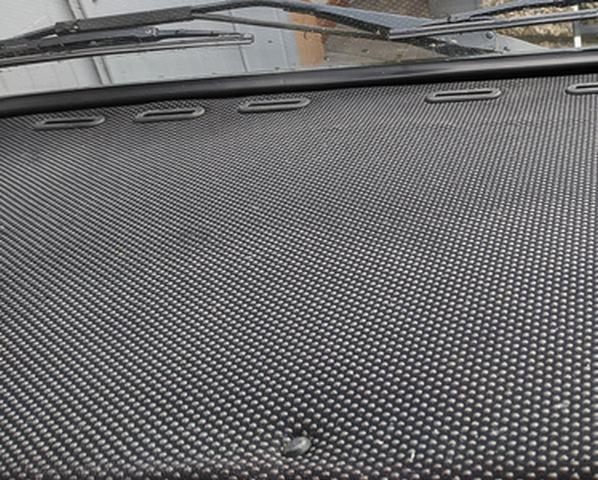
Job done. Not perfect
-
1st June 2020 at 12:05 #2707
Well that looks pretty good to me, Tom. I would be VERY happy with that job!
Well done.
Barry
-
1st June 2020 at 12:38 #2710
I agree – looks fine and it won’t rot!
Tony
-
1st June 2020 at 22:47 #2711
Thanks Barry. It’s better than it was. When you do a job like this you see the imperfections.
Thank you Tony for your innovative idea. I feel confident it won’t rot like the old one and I think I have sealed the area off better than it was.
Tom
-
-
AuthorPosts
- You must be logged in to reply to this topic.