Forum Replies Created
-
AuthorPosts
-
If you are still reading this Forum Tom – and for the benefit of more recent owners……
There was a thread on the old forum with such information with regard to the speedo ‘overreading’.
I am not sure if it is referred to in the ‘Little Exsis Book’ though, as I did not find it in a quick scan just now.
I had mine fixed under a Free Service Recall at a Fiat Professional dealer in October 2009. The Dokumentation page in the service manual has “carried out Recall 5149 (replacement of instrument panel and update software). Work carried out at 14791 miles to correct wrong vehicle speed being displayed” . It is dealer stamped.
The implication of this recall and replacement instrument panel was that the speedo at that point read ZERO. I remember some comments at the time, that was the reason that they would not have the service recall done.
I have placed a note in my service book that 13312 miles has to added to current speedo reading as a result of this ( I deducted 10% off the mileage as that was the figure being talked about at that time and what the service agent though, but could not confirm). There were some folks who thought that it was only the speedo reading was incorrect and not the mileage – I just don’t know. The 10% Speedo reading also tied up with an experiment we did with the car & van at the same time and seemed to be rectified when we re-ran the experiment after the Service Recall).
It also explained why when cruising quietly at 60pmh I always seemed to be being ‘tailgated’ by lorries who were allegedly limited to 56mph. Problem solved!
By the way, my speedo reading at the service & MOT last year was 35451 – but you know that is wrong!
I do hope that you can continue contributing to the Forum – not all ‘motorhomers’ come with practical technical or mechanical experience and you may well have background knowledge that can be helpful to other Exsis owners.
We have always been a friendly and helpful group and unlike some Forums tend to stick with relevant information and help and have never had suffered from inconsiderate postings or insults
Fred
Well done Marley, Well pleased that you are resolutely solving the problems.
it was only a cautionary warning and I realise that you had no option, but I do want to congratulate you on your determined willpower to get it out at all!
Sounds that my assumptions of how the valve body is made up may be wrong – and I don’t quite feel well enough to get underneath yet.
Commonly in plumbing of a tank outlet to a water tank there is a tight fitting hole and similarly tight rubber washer between the flange and the tank and a flange nut on the outside (often using a polythene washer between it and the tank). The two pieces screw together and seal…..sounds as if you have cracked it. By the way I am not a plumber, but not much that I haven’t plumbed.
You are a pioneer for us as it seems nobody has got this far – so some more pictures of the other parts in the future will be very helpful to your fellow Exsis owners.
Thanks for interesting info.
Well done, so pleased that you seem to have it sorted.
Fred
Well done Marley and again especially to Barry for the excellent teamwork – what a lovely bloke.
Wow Marley you have certainly cleaned up those parts nicely.
I am sorry that I seem to be the only person with some idea of the components, but as I said before to my knowledge nobody has ever gone that far!
Marley I just cant imagine how you got that out (female) part as you refer to, what is underneath? Is it just the plastic tank and was there a rubber sealing washer underneath? Do you think the outside thread on that (female) part screws into a plastic thread within the base at the bottom of the tank – if not, then I imagine that it screws into the bottom part of the brass valve body which is under the plastic tank .
If so, then my earliest suspicions may be correct ( which is why I mentioned a warning in an earlier response about using too much force trying to remove the opening top part of the water valve and disturbing the seal at the bottom of the tank.
I am thinking that the (female) part that you have removed is the top part of what I am going to call the valve body. I would imagine that underneath the tank is the bottom part of the valve body. there is probably a rubber washer on top of the bottom part of the valve body (if it wasn’t inside the base of the tank) which seals against the tank and when the top part of the valve body screws inside the bottom part they tighten the washer against the base of the tank and form a water tight seal.
Not sure what to recommend how to get the top and bottom parts of the Water Valve Body back together and probably a good idea to use a sealant – there are some good ones about now that can even be used wet or under water. It would probably be a two person job with someone holding the bottom part in place from underneath – from memory long ago there may be some slots that will help with this.
Maybe the part that you have removed from the bottom of the tank could then be screwed into place using the opening top part of the water valve – using the slots to turn it and tighten the top part of the water valve into the bottom part and tighten to seal against the washer……I imagine that the sealant will hold it in place and a well lubricated thread on the opening part will allow only that to unscrew (open).
I am hoping that I am completely wrong in my thoughts and that you don’t have anything like the problem that I think.
Don’t forget to push some tight fitting pipe ( I used 20mm blue water pipe) into the bottom of the valve underneath and that will stop dirt/debri getting in and fusing the threads together in the future.
Best wishes,
Fred
Seems that from lack of responses current owners have no experience of this issue and perhaps longstanding members (like Tom) may no longer own an Exsis.
Marley the male part which I take to be the top part of the valve I am assuming is the bit with the slot in the top that the long rod with the spigot in the end that breaks off slots into. It also has an ‘O’ ring at the seating boss – there is a picture showing this part by Tom between pages 267-287. The rod is rotated by the wheel on the top of the tank and this raises and lowers the valve by allowing it to raise / lower in the slot Ie unscrew(open) and screw (close).
A picture of the Female part that you refer to would be useful for future owners because none of us appear to have removed this part or referred to it in any past posts.
I am assuming it is the part that I referred to in my original response that I thought that some one had unscrewed from the bottom after first removing the circlip.
Apart from getting older, at the moment I am unable to crawl under the van and look at the valve because I am first day out of starting to recover from flu.
A picture of what you have removed would help clarify……..
Yes there are screws that fix the regulator in place that protrude through the gas locker wall into the tank area. You can see these from above with a torch.
Only one owner has ever reported that it has caused a leak. You are right that a full tank could perhaps flex at the sides….we rarely travel with more than a day or two’s water.
When I changed to ‘ Auto- change’ regulator I used shorter screws.
It would be safer to use shorter screws as there is a potential problem if you travel with a lot of water.
We are lucky that the Exsis is a well put together Hymer…….but when you read on other forums about the poor construction of some caravans/ motorhomes !!!
Fred
Well done Barry for the reference the ‘book’ is big thing to scroll through.
There is a lot of info there for Marley starting at 262-272 and then 273-275 with photos of the one complete plastic replacement , which I don’t think that I would recommend because as you can see some metal base has to be cut away to gain access and there is always the danger of not sealing it properly.
From pages 276-287, all aspects are covered including Tom’s ultimate and final fix whereby he replaced the complete rod with a new one.
Really not too technical or difficult.
Fred
Hello Tom, as the Exsis Guru ( Barry ) says – we have not heard of this problem.
The Exsis is based on the old Ducato X244 base vehicle 2002-2006 , before the X250.
The Exsis cab front is bolted directly onto the original base vehicle and all the other components are therefore standard including complete cab (under bed) and doors – you probably know and realise all that.
The reason that I mention it is because therefore it is a base vehicle issue and a good place to search for advice is the Ducato Forums.
In my case I would take it to my local garage.
Fred
Ducato forums
Hi Marley – the problem with the (fresh water) drain valve is historic.
You will need to try to be more specific about what your actual problem/symptom is.
I would suggest that removing the tank should be avoided if possible!!!!
At this stage I am working from memory and have not trawled through the information that is available – Hein Koops was the first person to post on this many years ago.
There was loads of information on the old site on several threads which is lost, but thankfully the outstanding work done by Tom in producing the’Little Exsis Book’ makes much of that information availible…. also Tom himself became an ‘expert’ in that problem as you will no doubt see in the ‘book’.
The valve at the bottom of the tank seems to pick up dirt/ debris from the open drain underneath which can cause the threads to seize (it’s a good idea to use it frequently (open/close)). The dirt can make it stiff to operate from the wheel at the top of the tank and if it is forced may break the spigot on the end of the rod that fits into the slotted top of the valve at the bottom. There is information on how to make this relatively straightforward repair, but does require some DIY skills.
There may be a problem if the valve is forced that potentially the seal between the inner/outer part could be disturbed, but we have not had this reported as an actual occurrence.
If it leaks it may be the ‘O’ ring that is damaged and this can be replaced by using the sequence to effect the repair above……..or I believe someone has discovered that by removing the circlip in the valve from underneath that the valve head can be screwed right through??? – I may be wrong on this.
One van in the early days had a company replace the old brass valve with a plastic one……not sure if this is in the book, but it is risky.
Thankfully and quite by accident, I avoid getting debris on the threads of the valve by my modification to drain the water to the side of the van, whereby I inserted a short piece of blue water pipe into the base of the valve from underneath……but that’s for another day and not material to your immediate problem.
Best wishes and come back with more info for help/ comments.
Fred
Well done Chris and Susan for a very interesting major mod to the Exsis SG that thankfully is reversible.
The SG is very practical and offers the van to a wider resale market with the extra seatbelts.
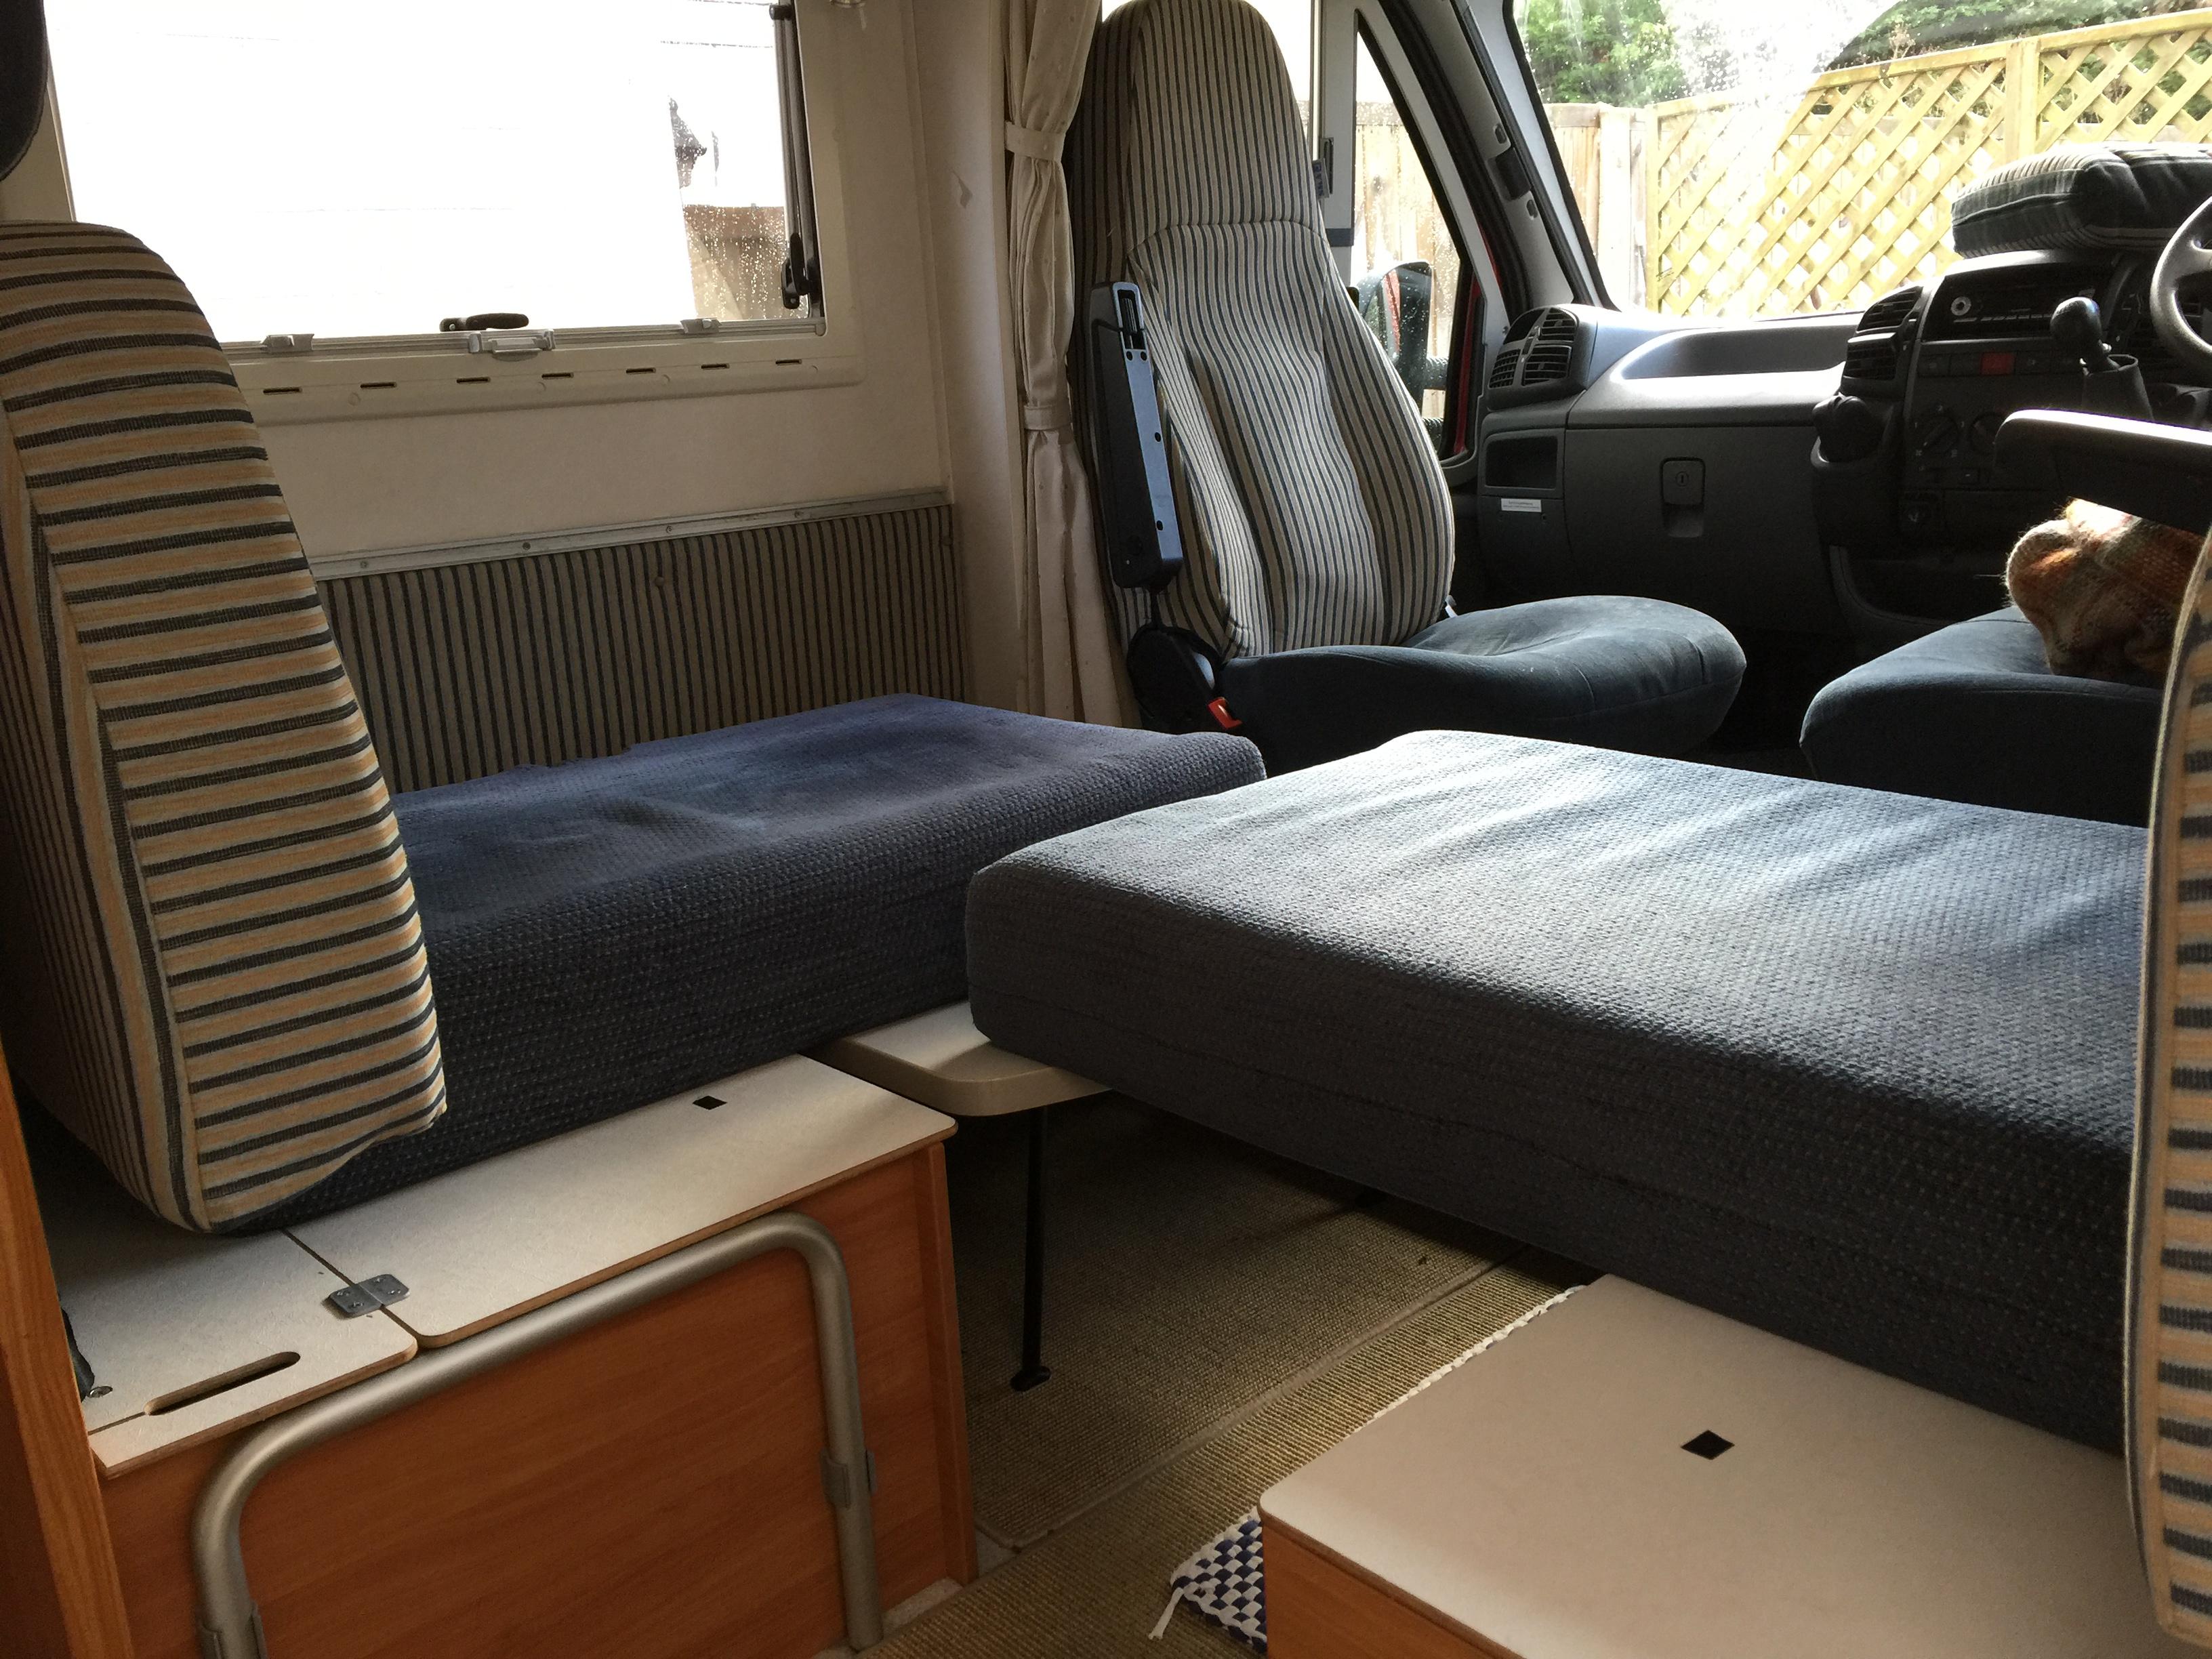
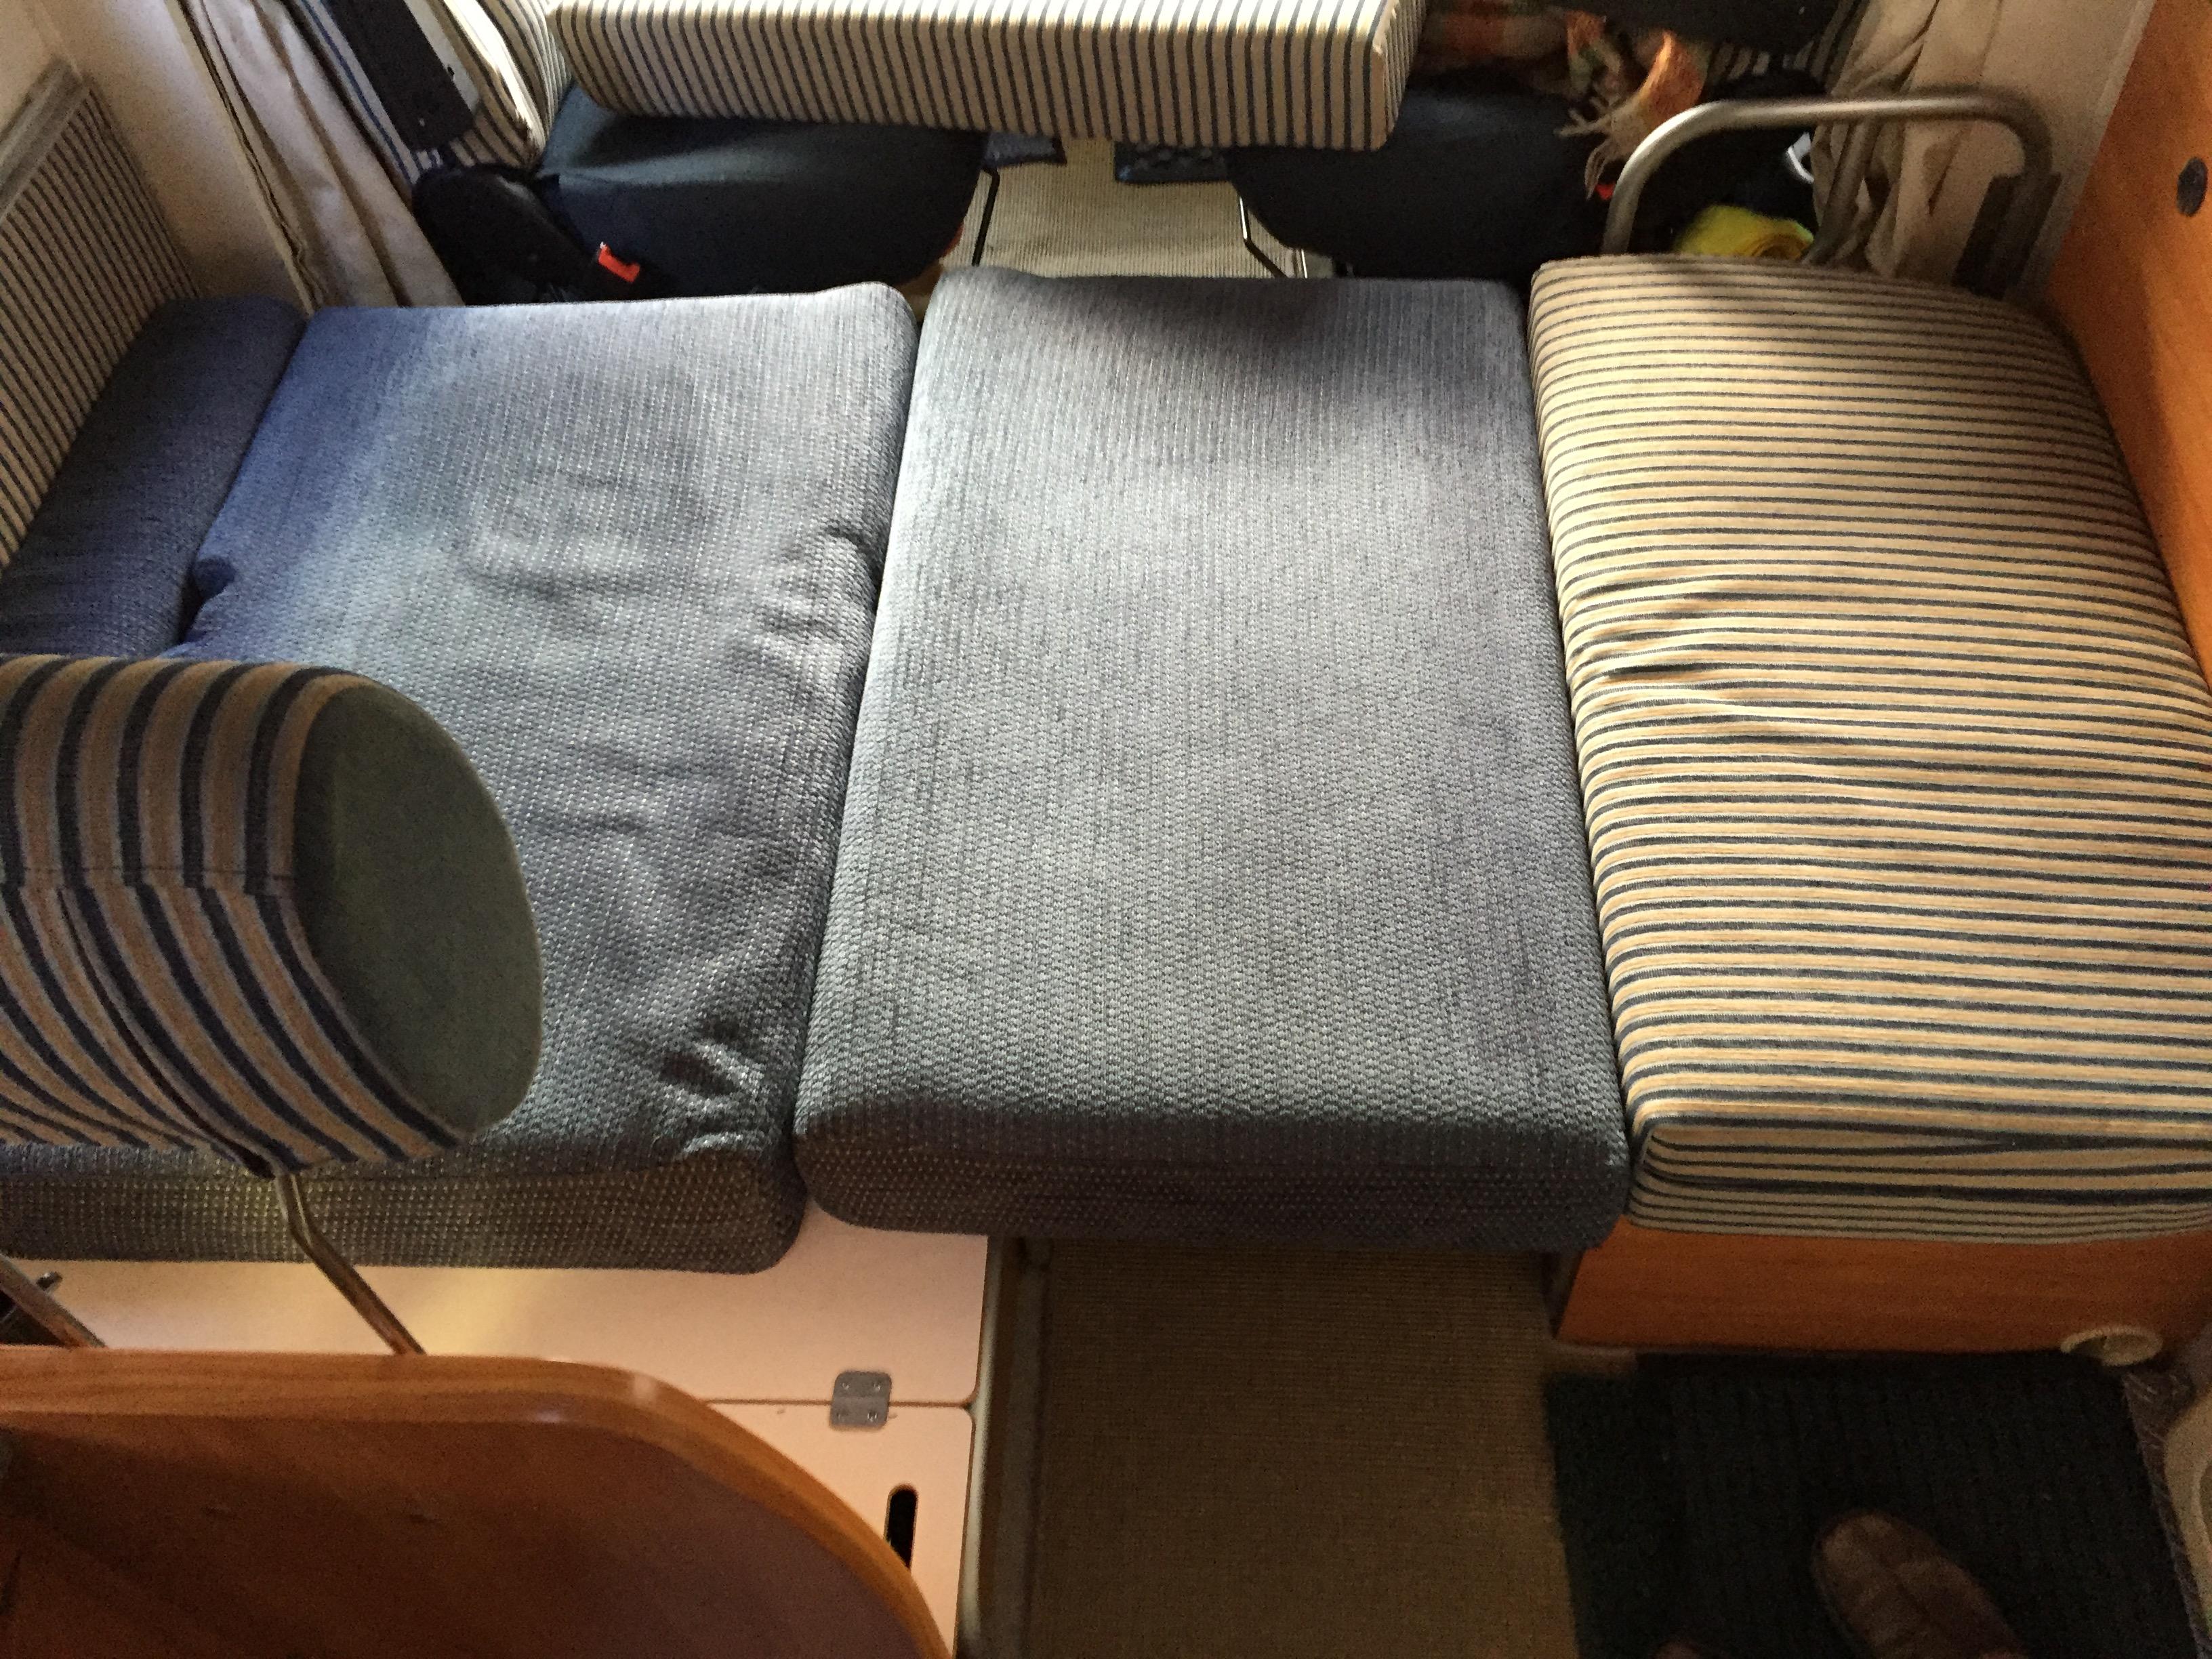
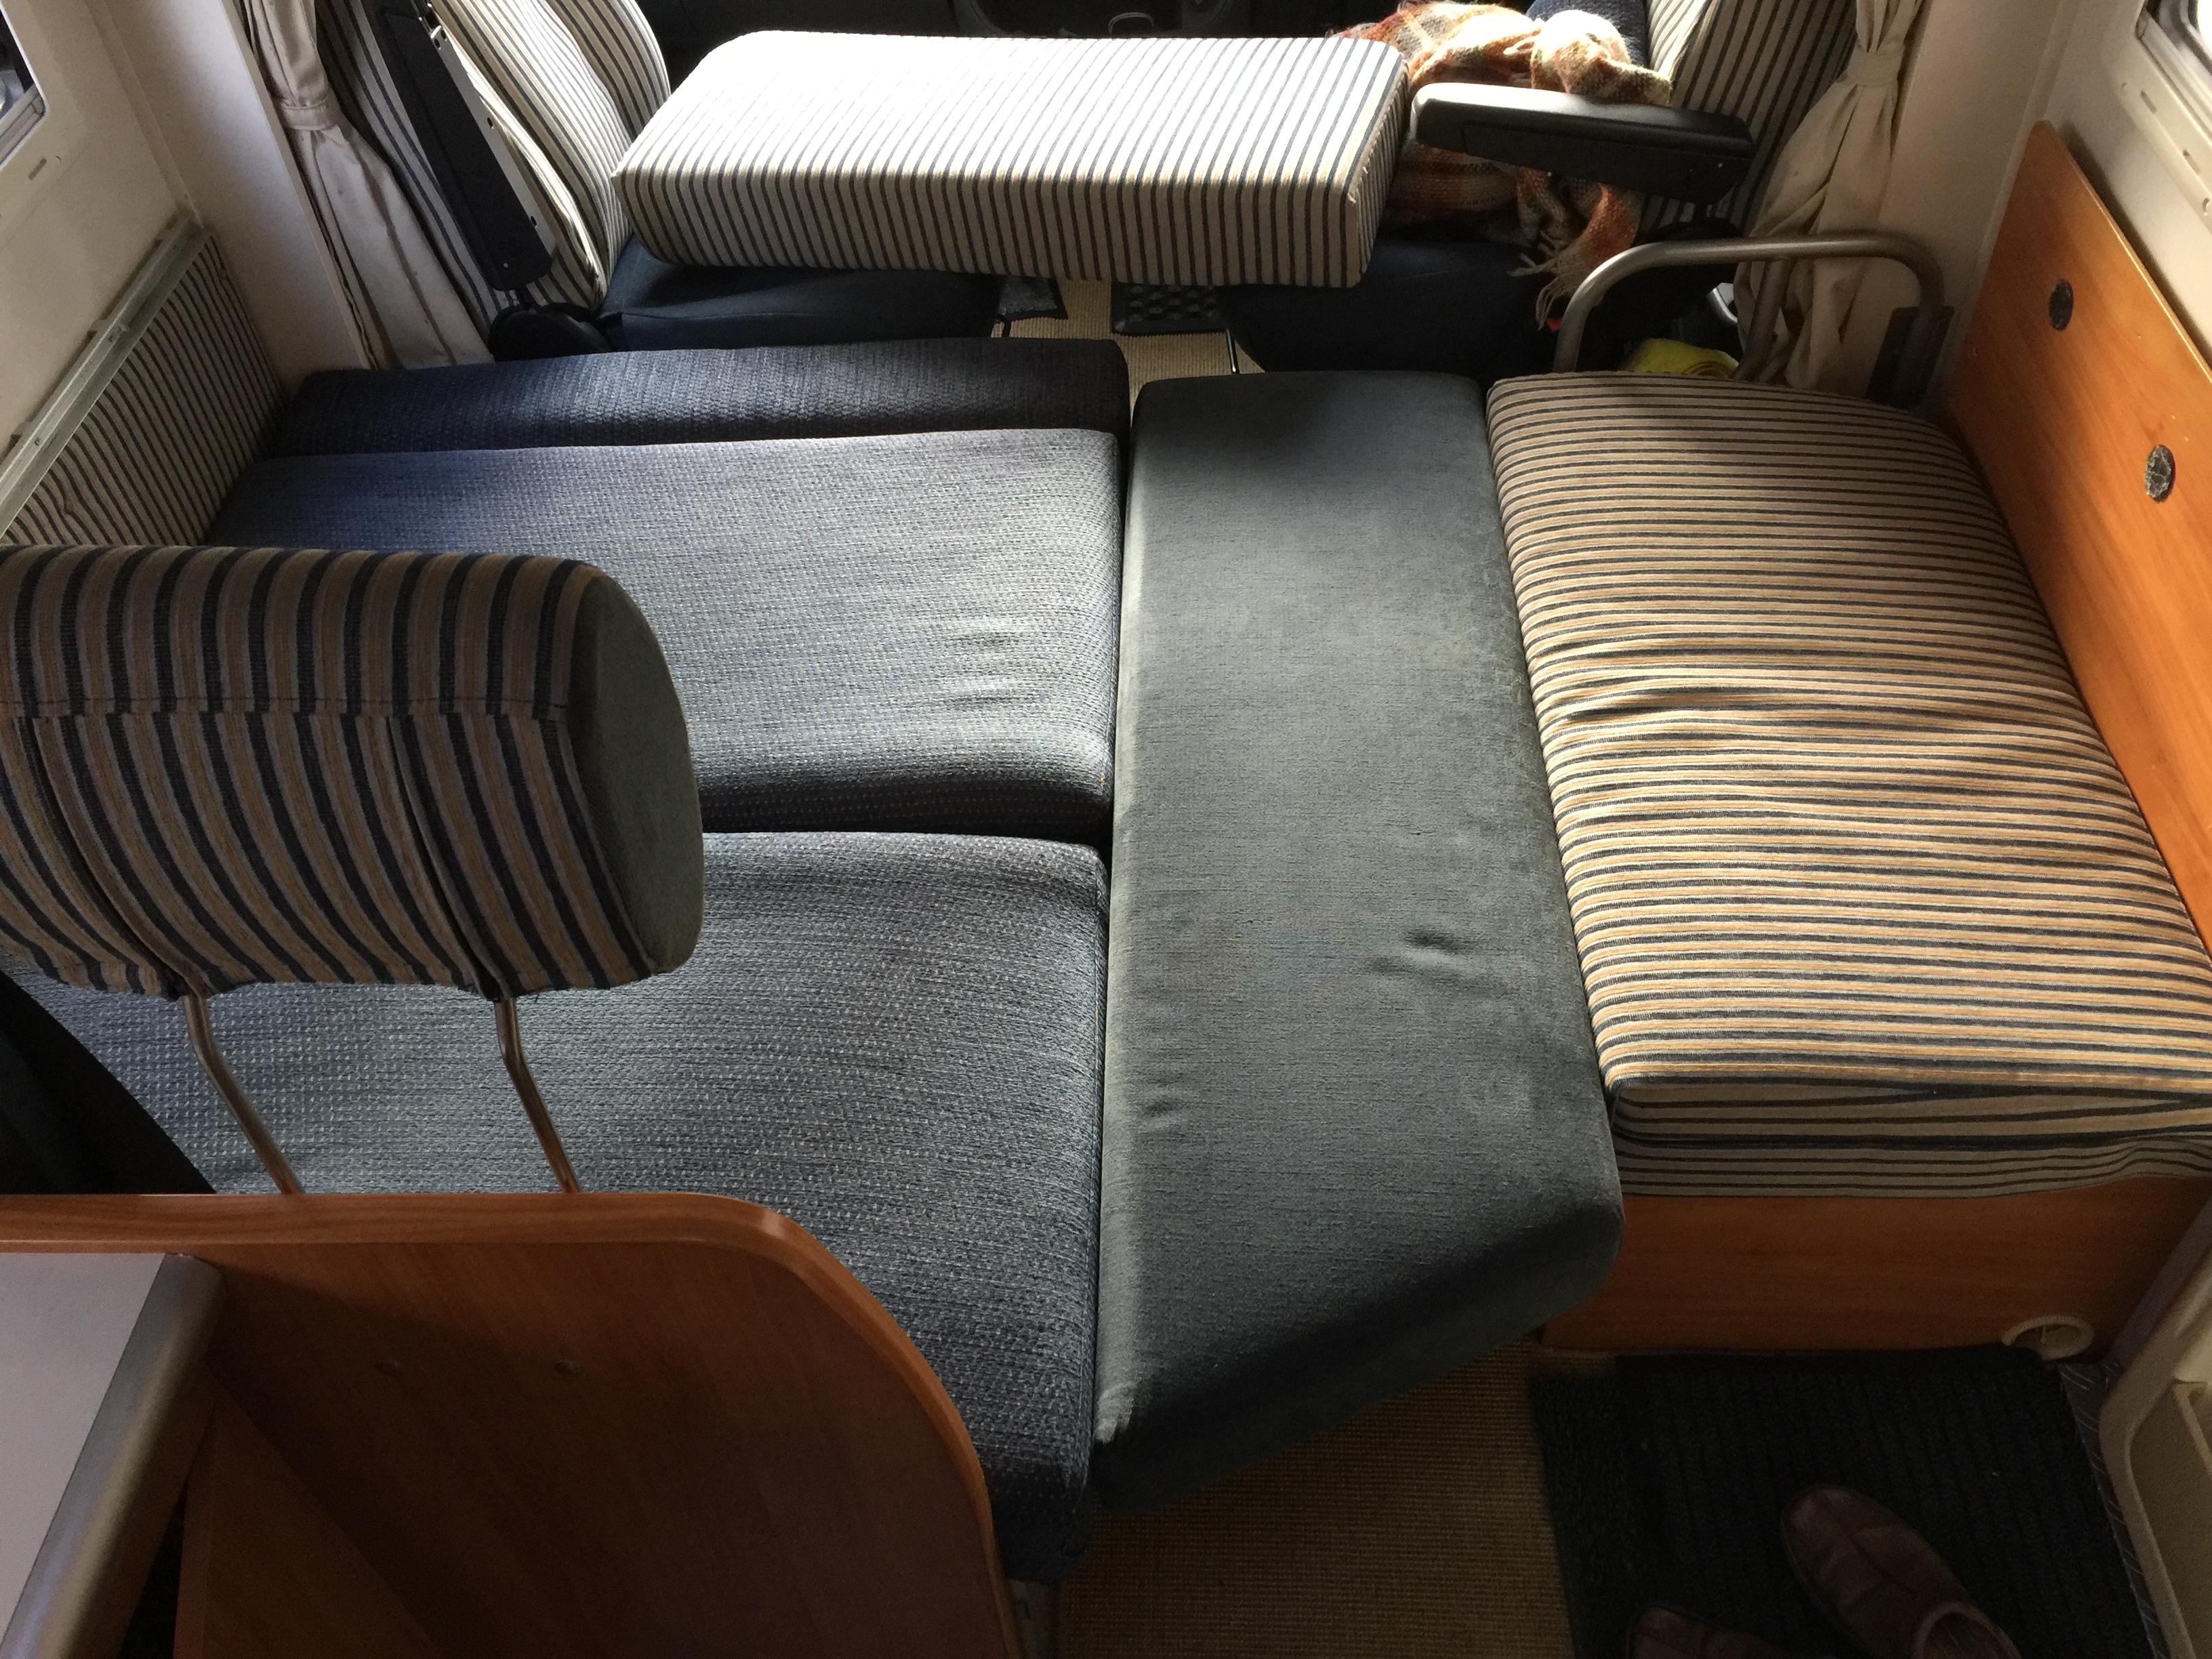
We also found the side bench seat very narrow when we purchased our SG van new in 2007. We also found the original seat bases too soft and too small. We reconfigured our seat bases to give us several options as a single bed, double or for winter lounging by having some thicker (125mm) and firmer Reflex foam topped with memory foam (25mm) made to our larger specified sizes and then Gill made some new covers.
The side bench seat base now has some plywood under it and is approx. 980mm long x 590mm deep with a slight roll edge. This allows it to be placed across the van onto the lowered table for winter lounging so we both have plenty of elbow room.
The dinette seat was increased to give greater width and depth to 980mm long x 630mm wide with a slight roll edge. This also allows it to make a good winter lounging seat.
We also made a smaller ‘infill’ cushion 980mm x 170mm to allow bed configuration and this is stored in the wardrobe.
I have some photos below and I hope that you don’t mind me showing SG owners an easier option to increase comfort and flexibility.
Hello Chris and Susan and thanks for joining the site and sharing.
The Exsis is remarkable and is probably the best small van to allow such adventurous and extensive touring. Ted and Ali had a ‘ year out’ way back in 2013/4 (great shots of the Lederhosen). Impromptu meeting and a warm and enthusiastic Hello is another benefit of such a unique van, as you say.
Your post has also been very beneficial as it has also prompted a Hello and update from some dear longstanding Exsis friends, Richard and Mary and Chris and Peter.
Best wishes to all for safe and incident free touring.
Fred
Ah Tom, if only a backflip from the upper step was possible – especially at our age!
A sleeping bag is not really practical in a roof bed – something we learned early on in our elevating roof camper days.
We use two separate single 4.5 tog duvets, each in their own cover – in winter, as this weekends trip, we put a second duvet in each cover = 9.0 togs each. Separate duvets allows plenty of overlap.
Having separate duvets for us is useful, because in the cooler months Gill prefers downstairs to enjoy her morning cup of tea sat up cosy in bed. In the real winter, I do the same. When we are wild camping, as this weekend, we often both sleep upstairs which leaves the living area intact.
There are probably many variations of maneuvering in/out of bed. The Hymer manouvre was demonstrated at one Exsistravaganza, which is swivelling on your bottom and can be useful if you come down the ladder facing the back of the van. I go up facing the front of the van, move forward and then swivel on my knees so that my head is towards the back of the van and then climb under the duvet.
Its a big wonderful bed and well worth the effort.
Fresh water tank emptying is easy from the side for me because of my simple mods.
I pushed some 20mm blue water pipe up into the base of the out let under the van (tight fit), used a washing machine hose connection, which is a loose fit over the blue pipe and connected black water hose to that which runs around the spare wheel carrier to the side skirt of the van. I pushed some 22mm
plumbing pipe into the black hose and have an end cap to seal it off (not really necessary). I screwed a Terry too
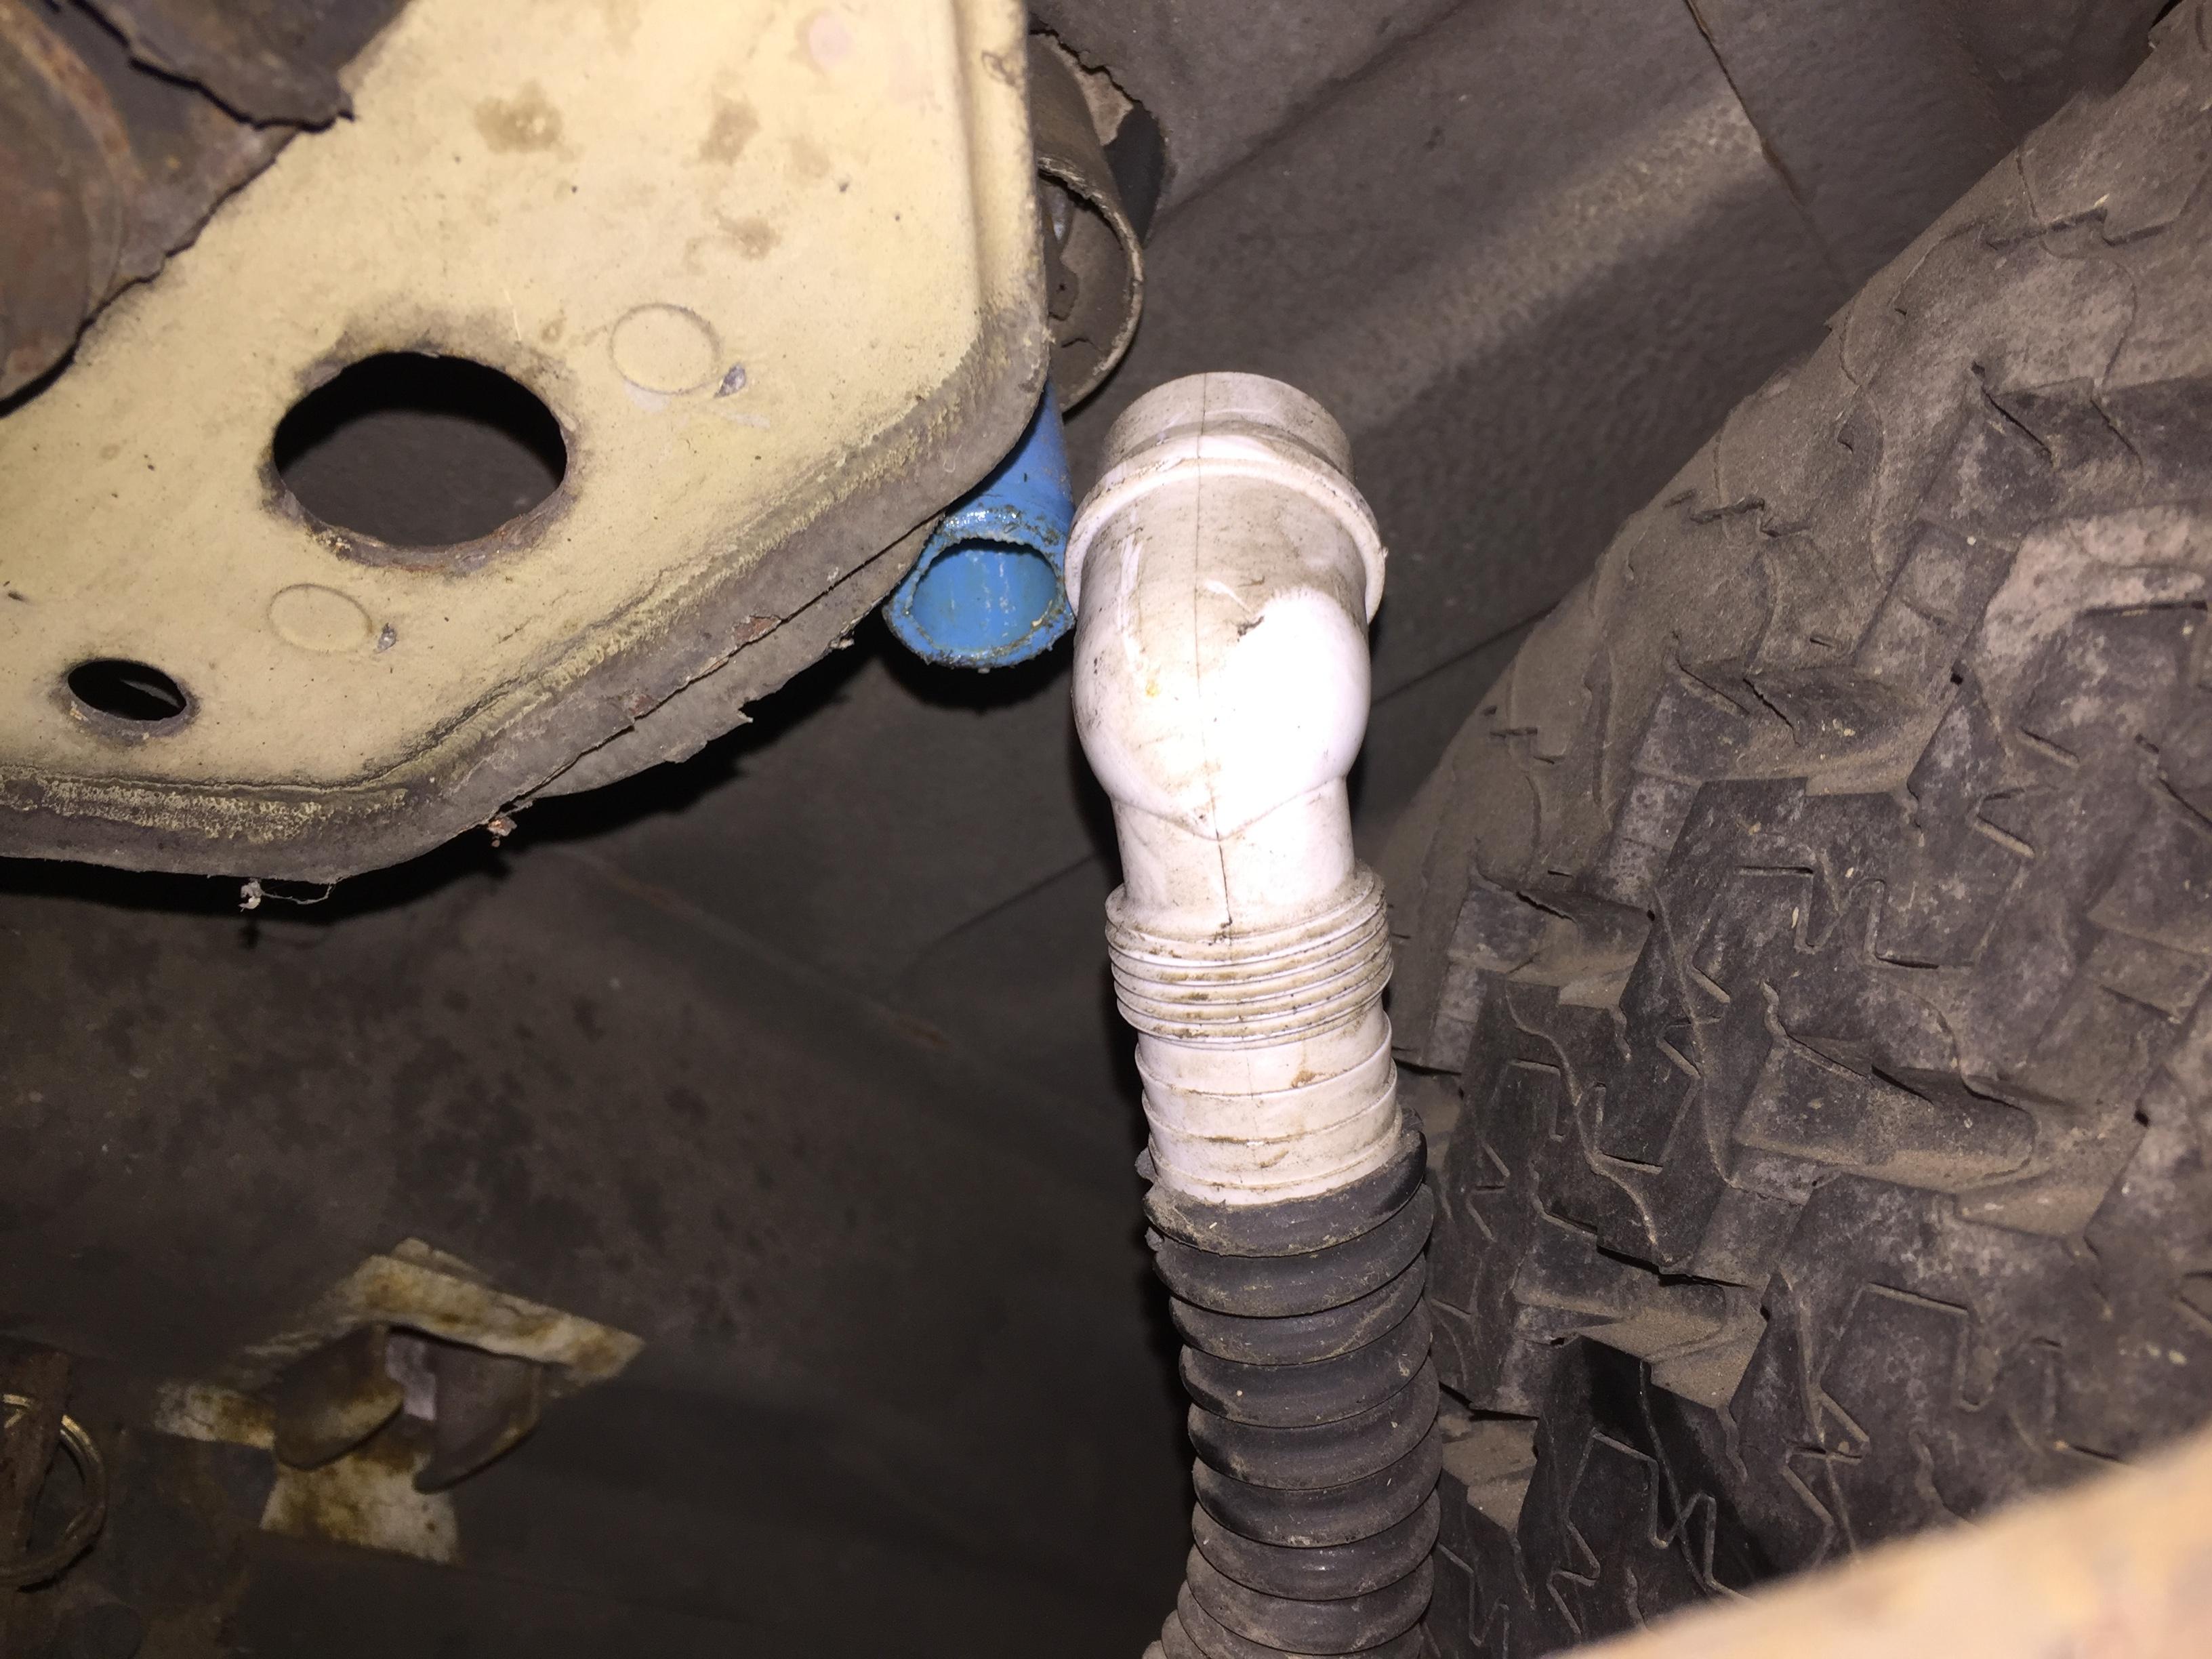 l clip into something (can’t remember) which holds the pipe safely in place at the side.
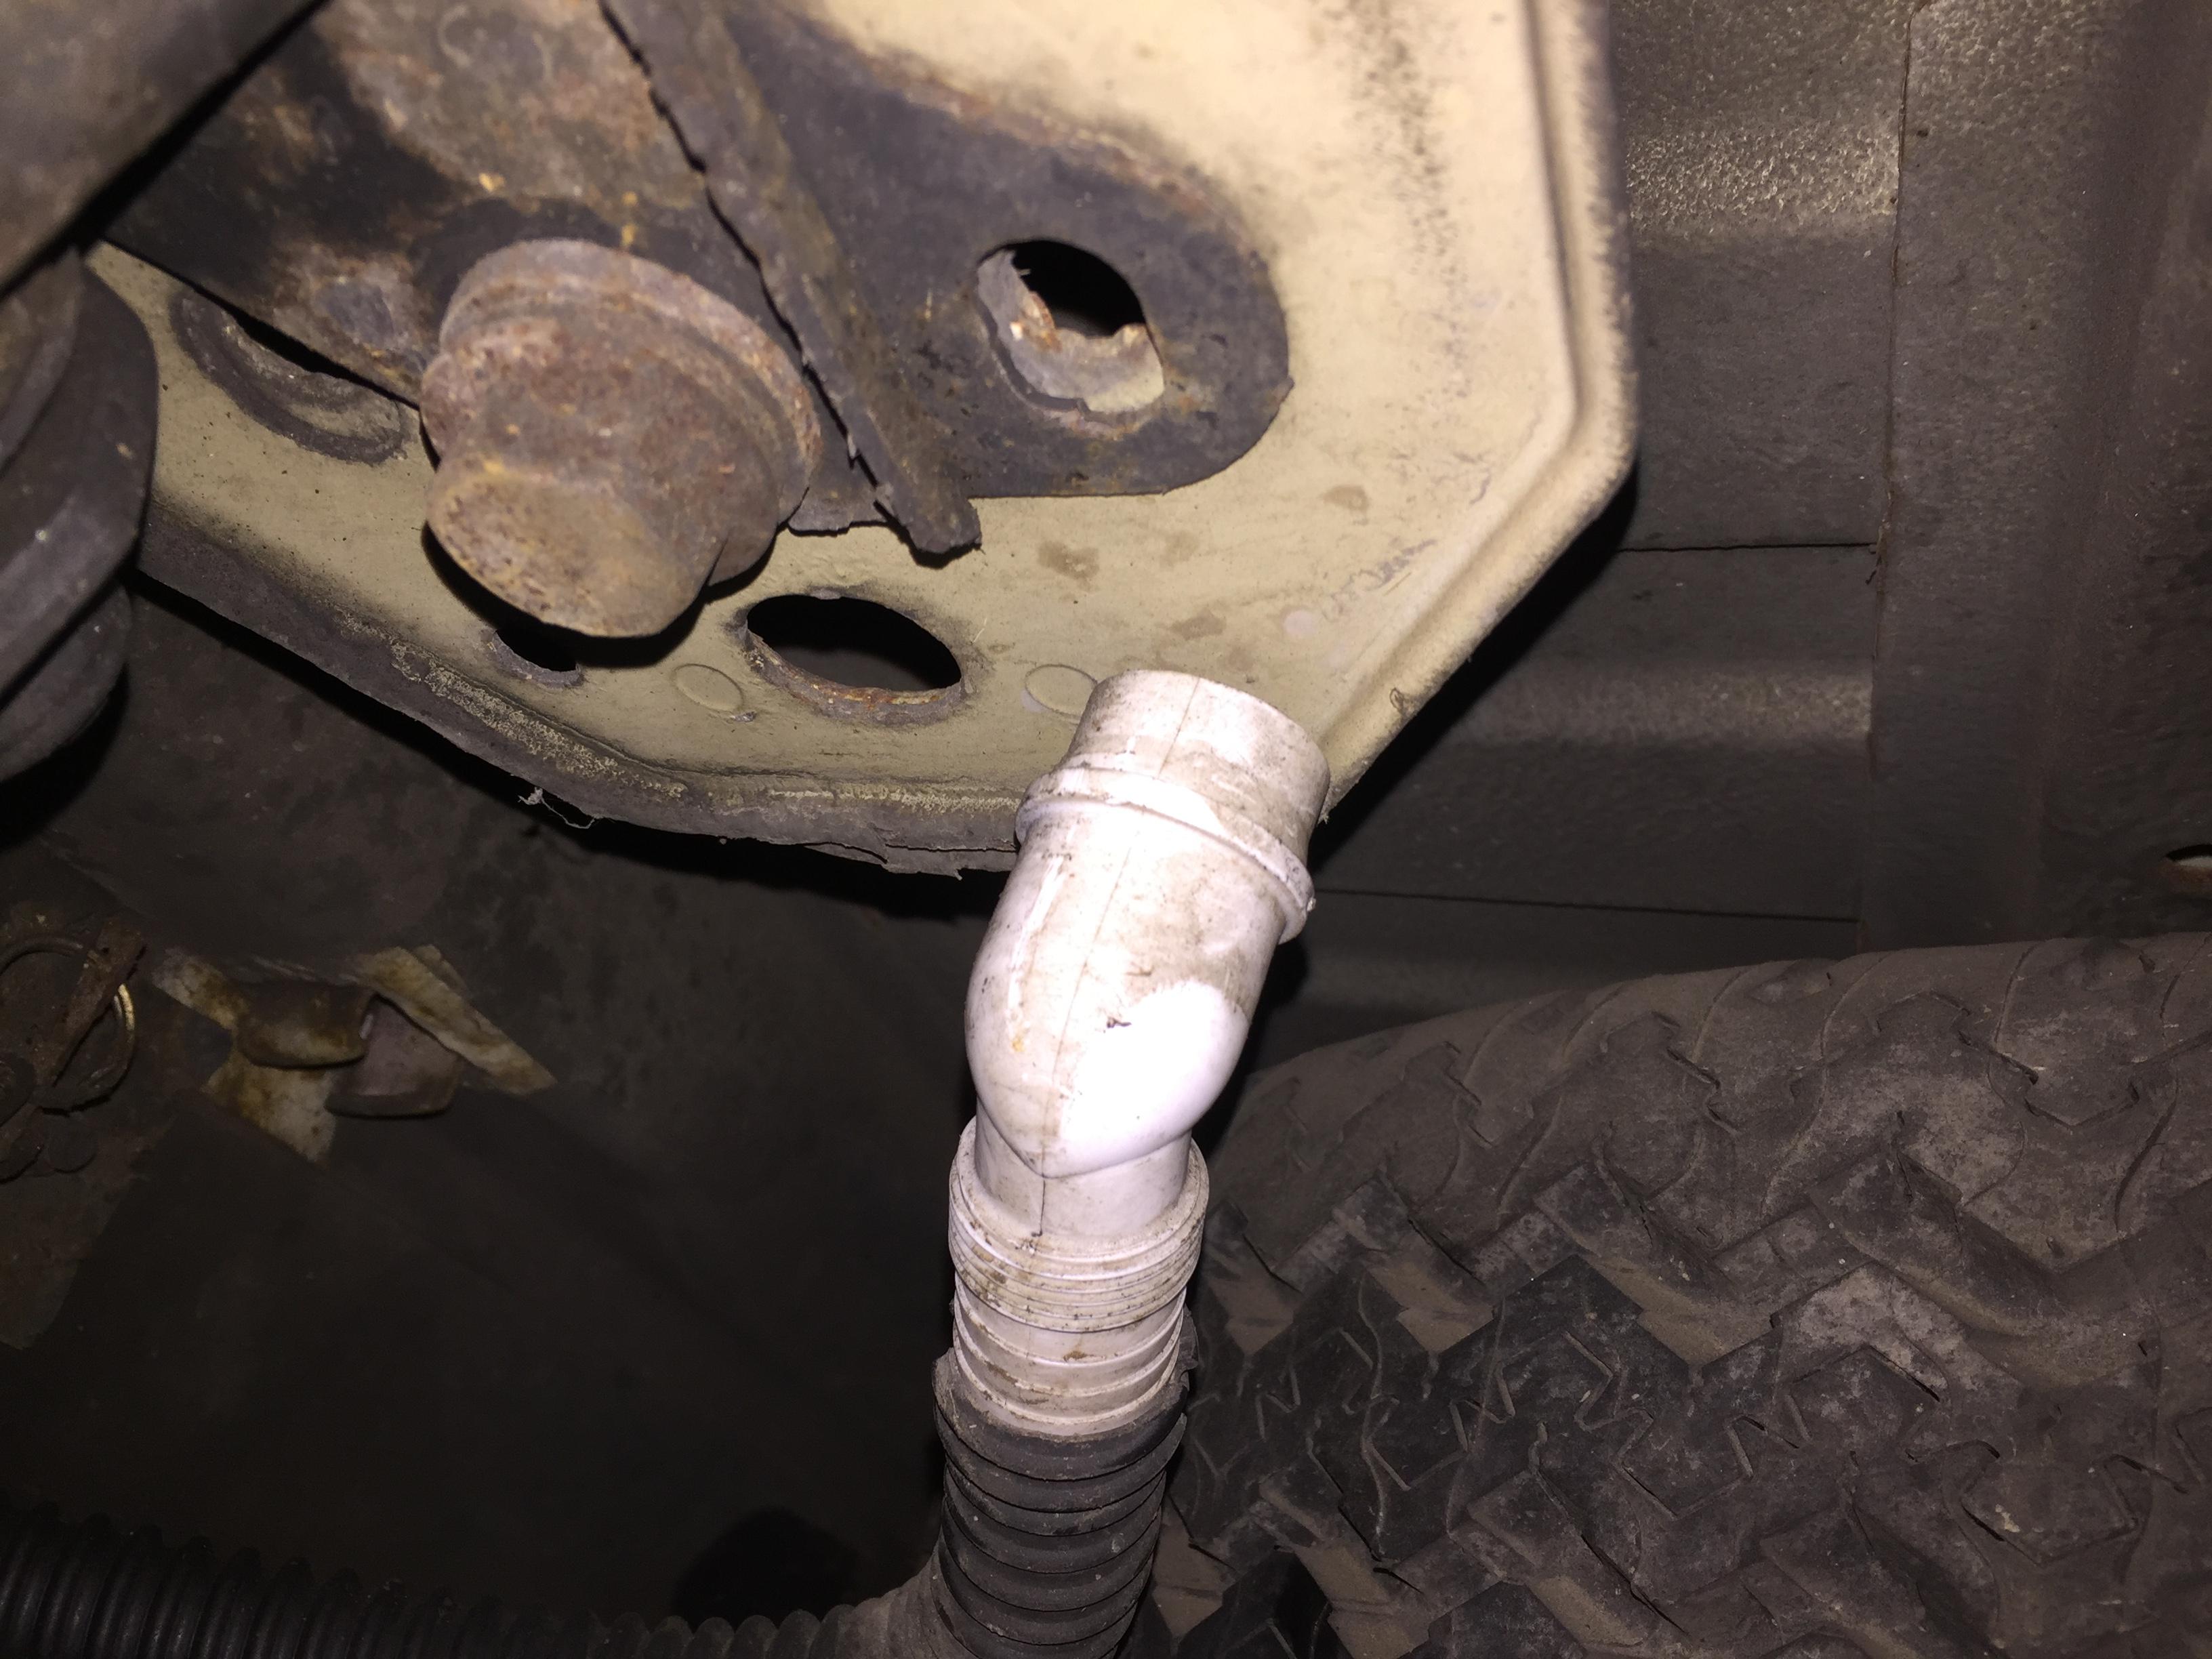
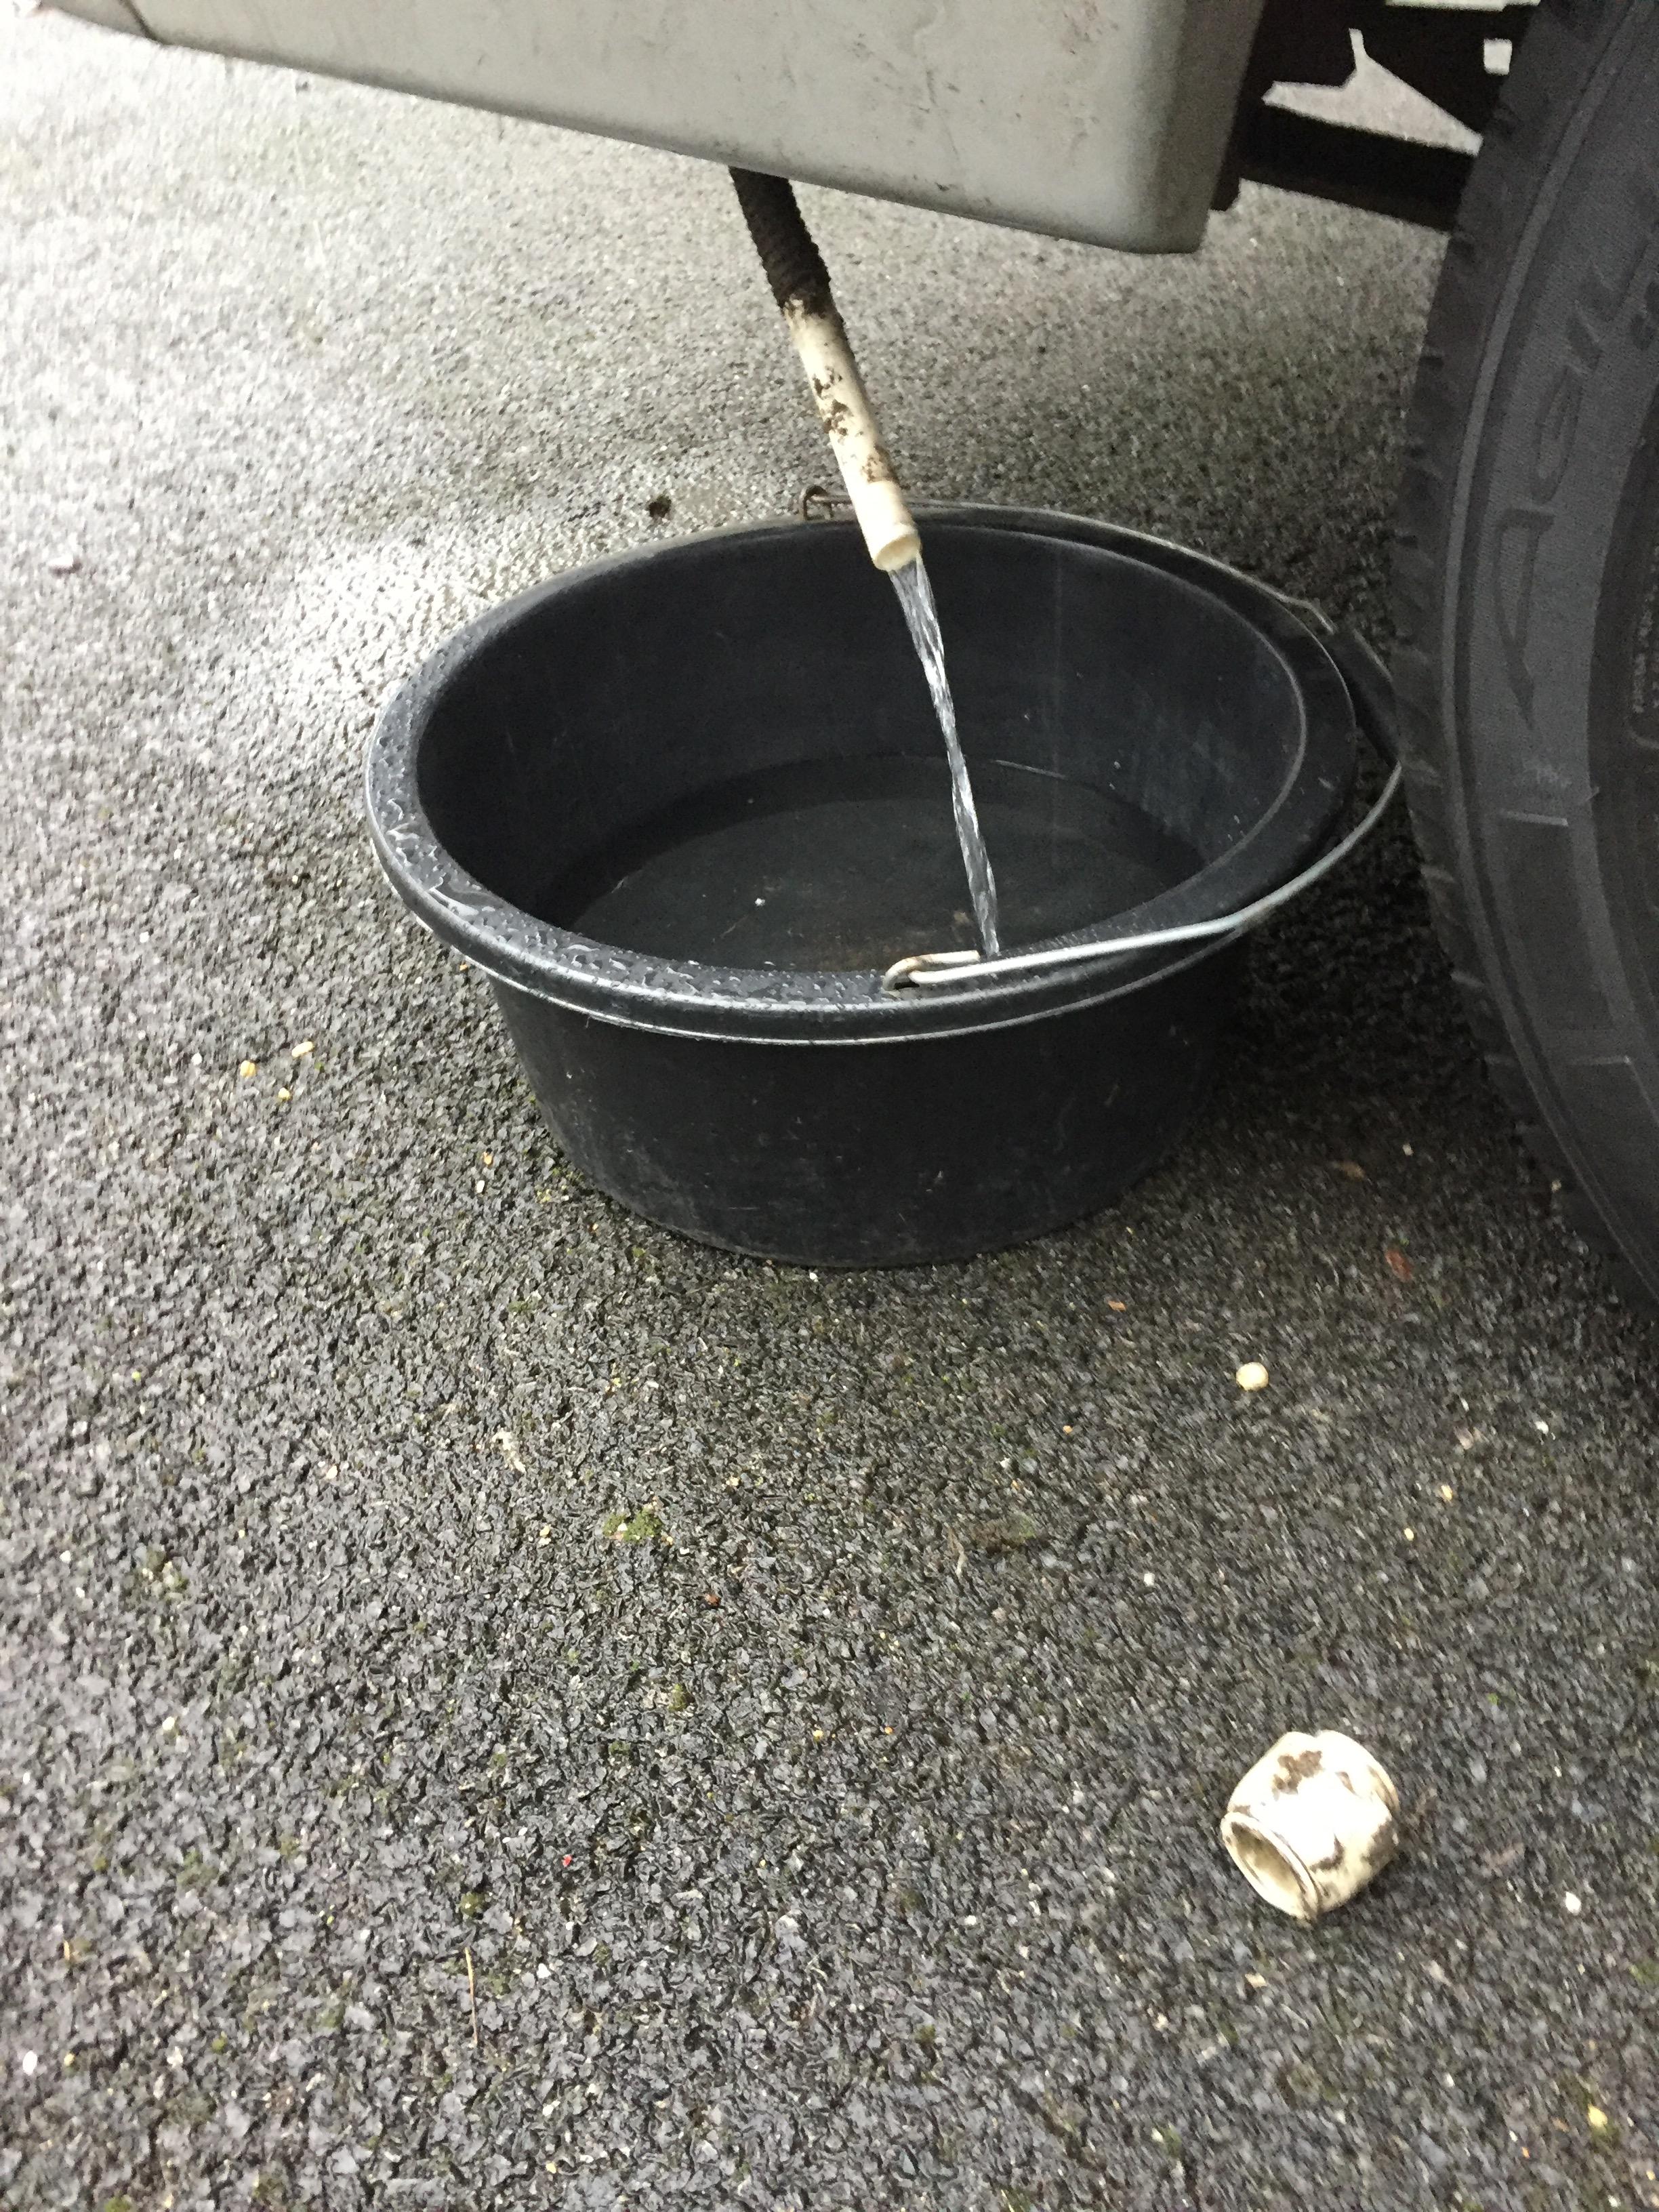
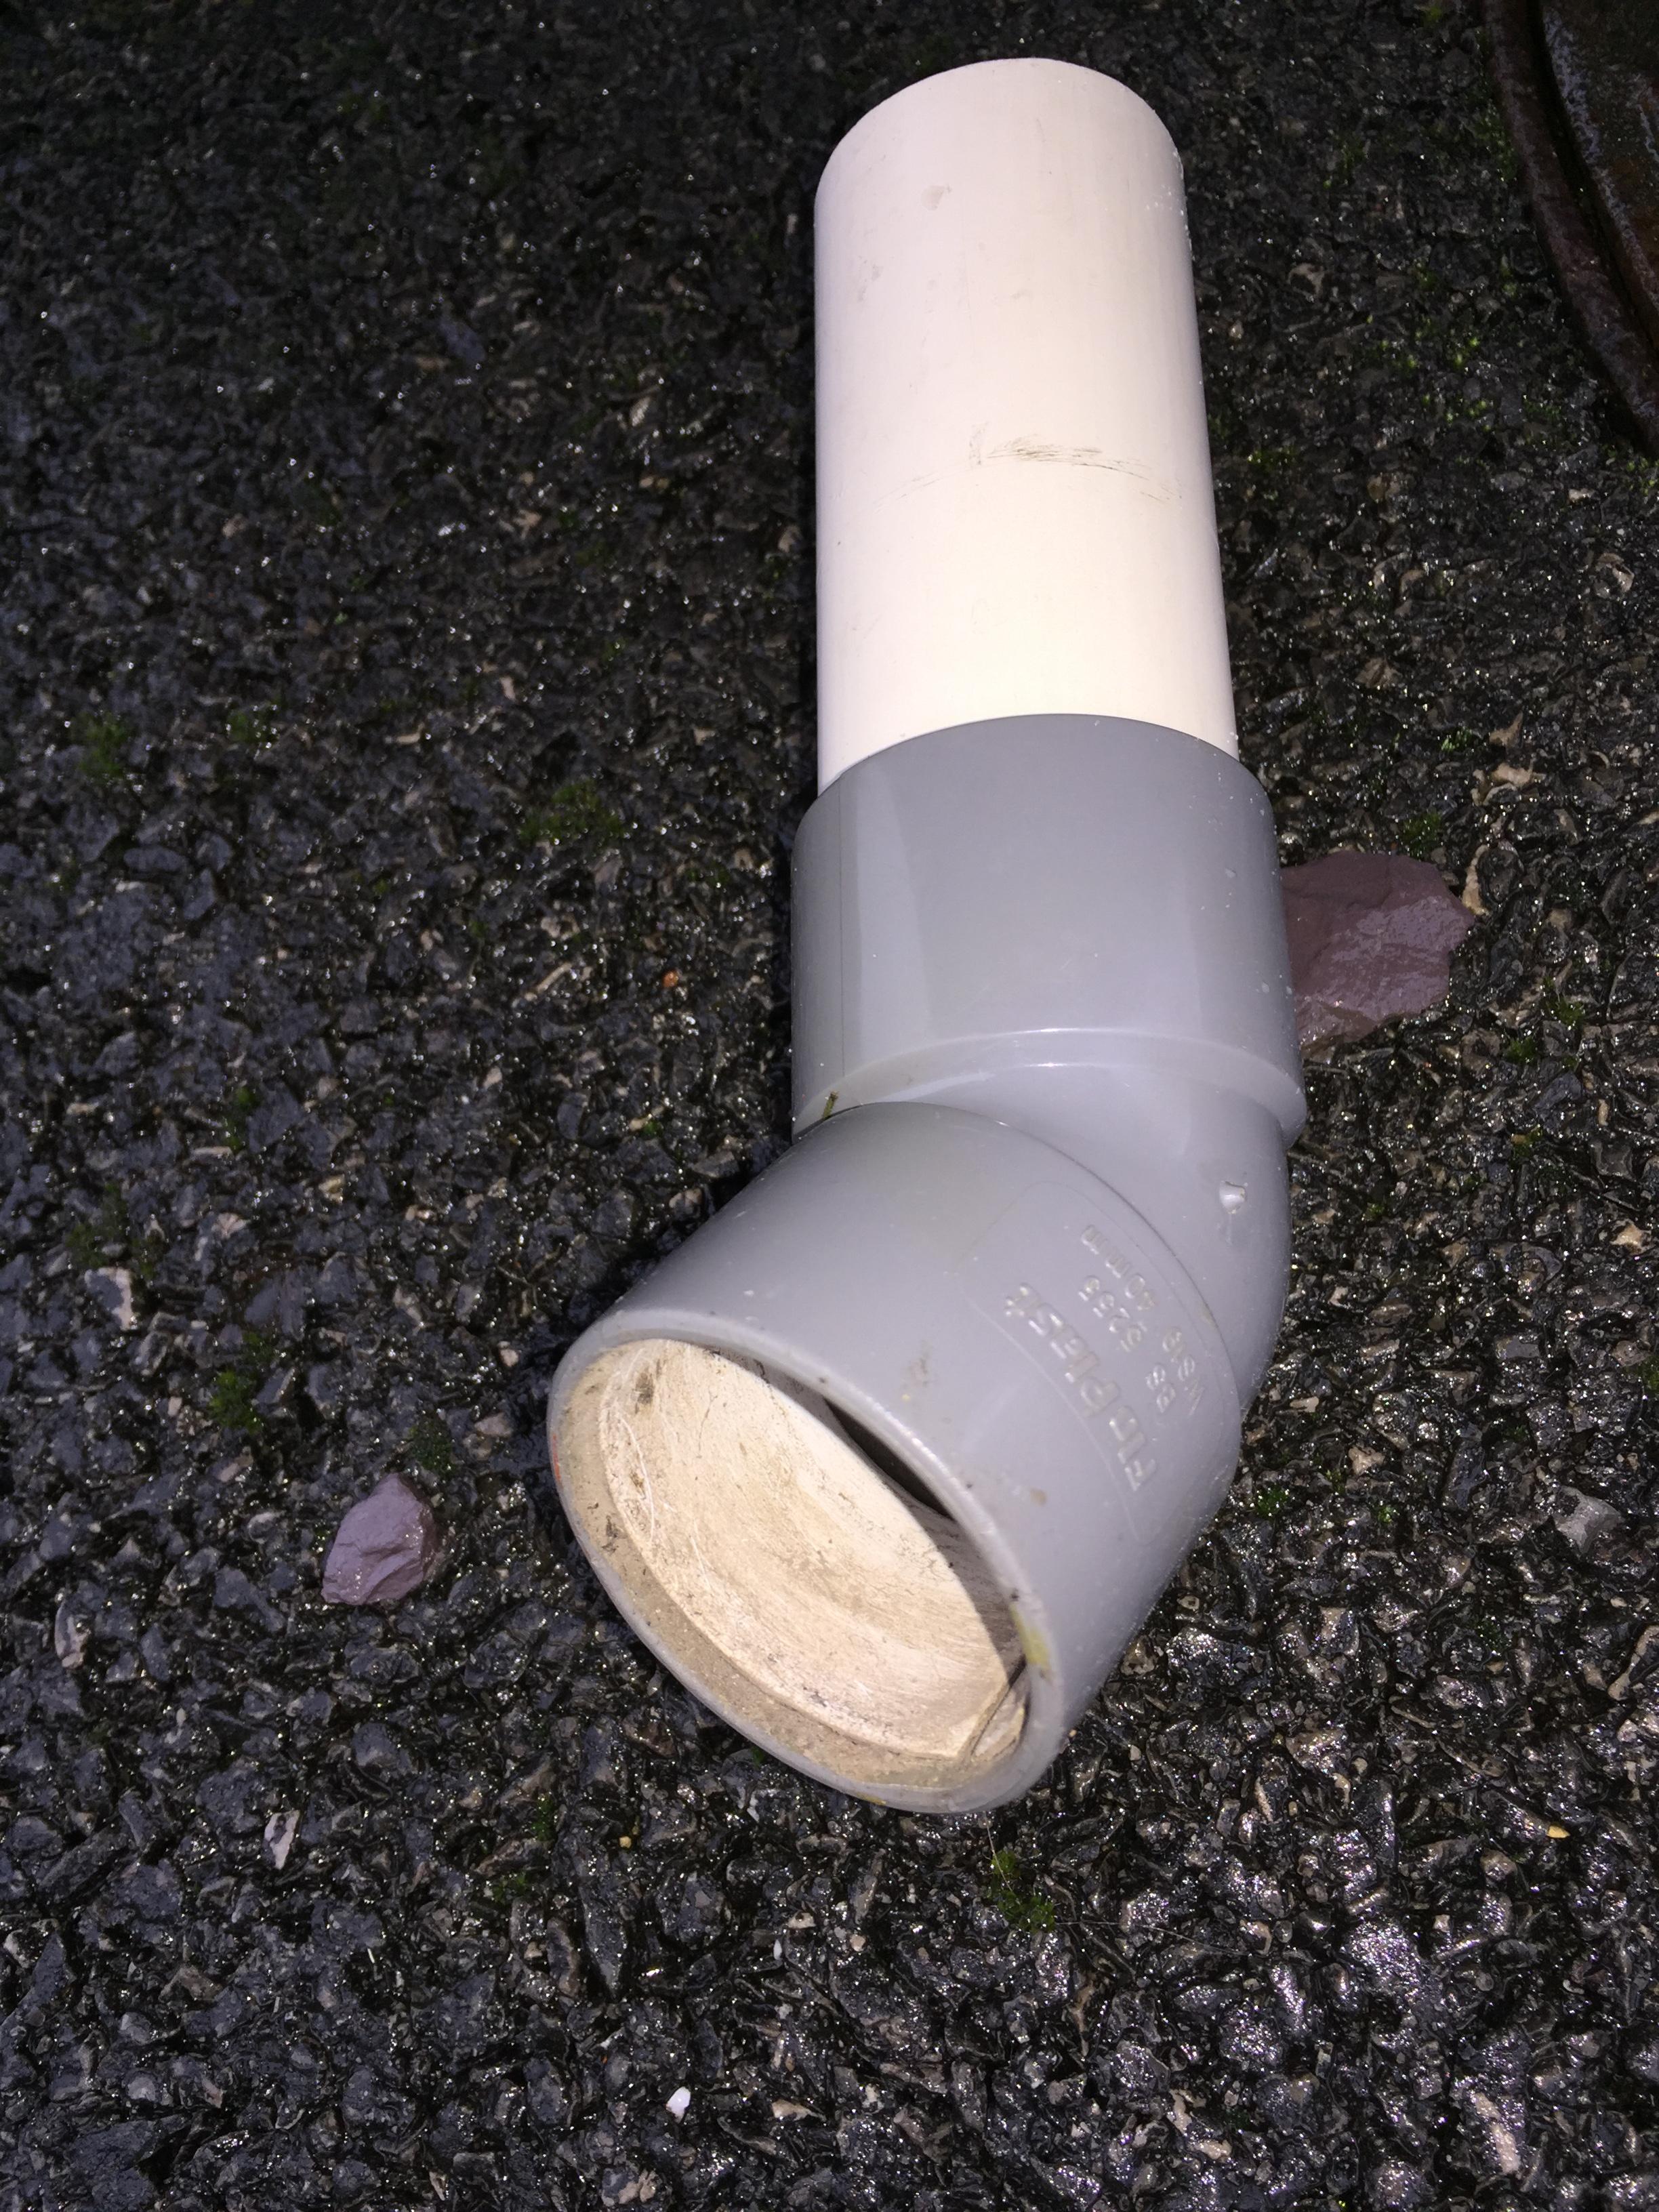
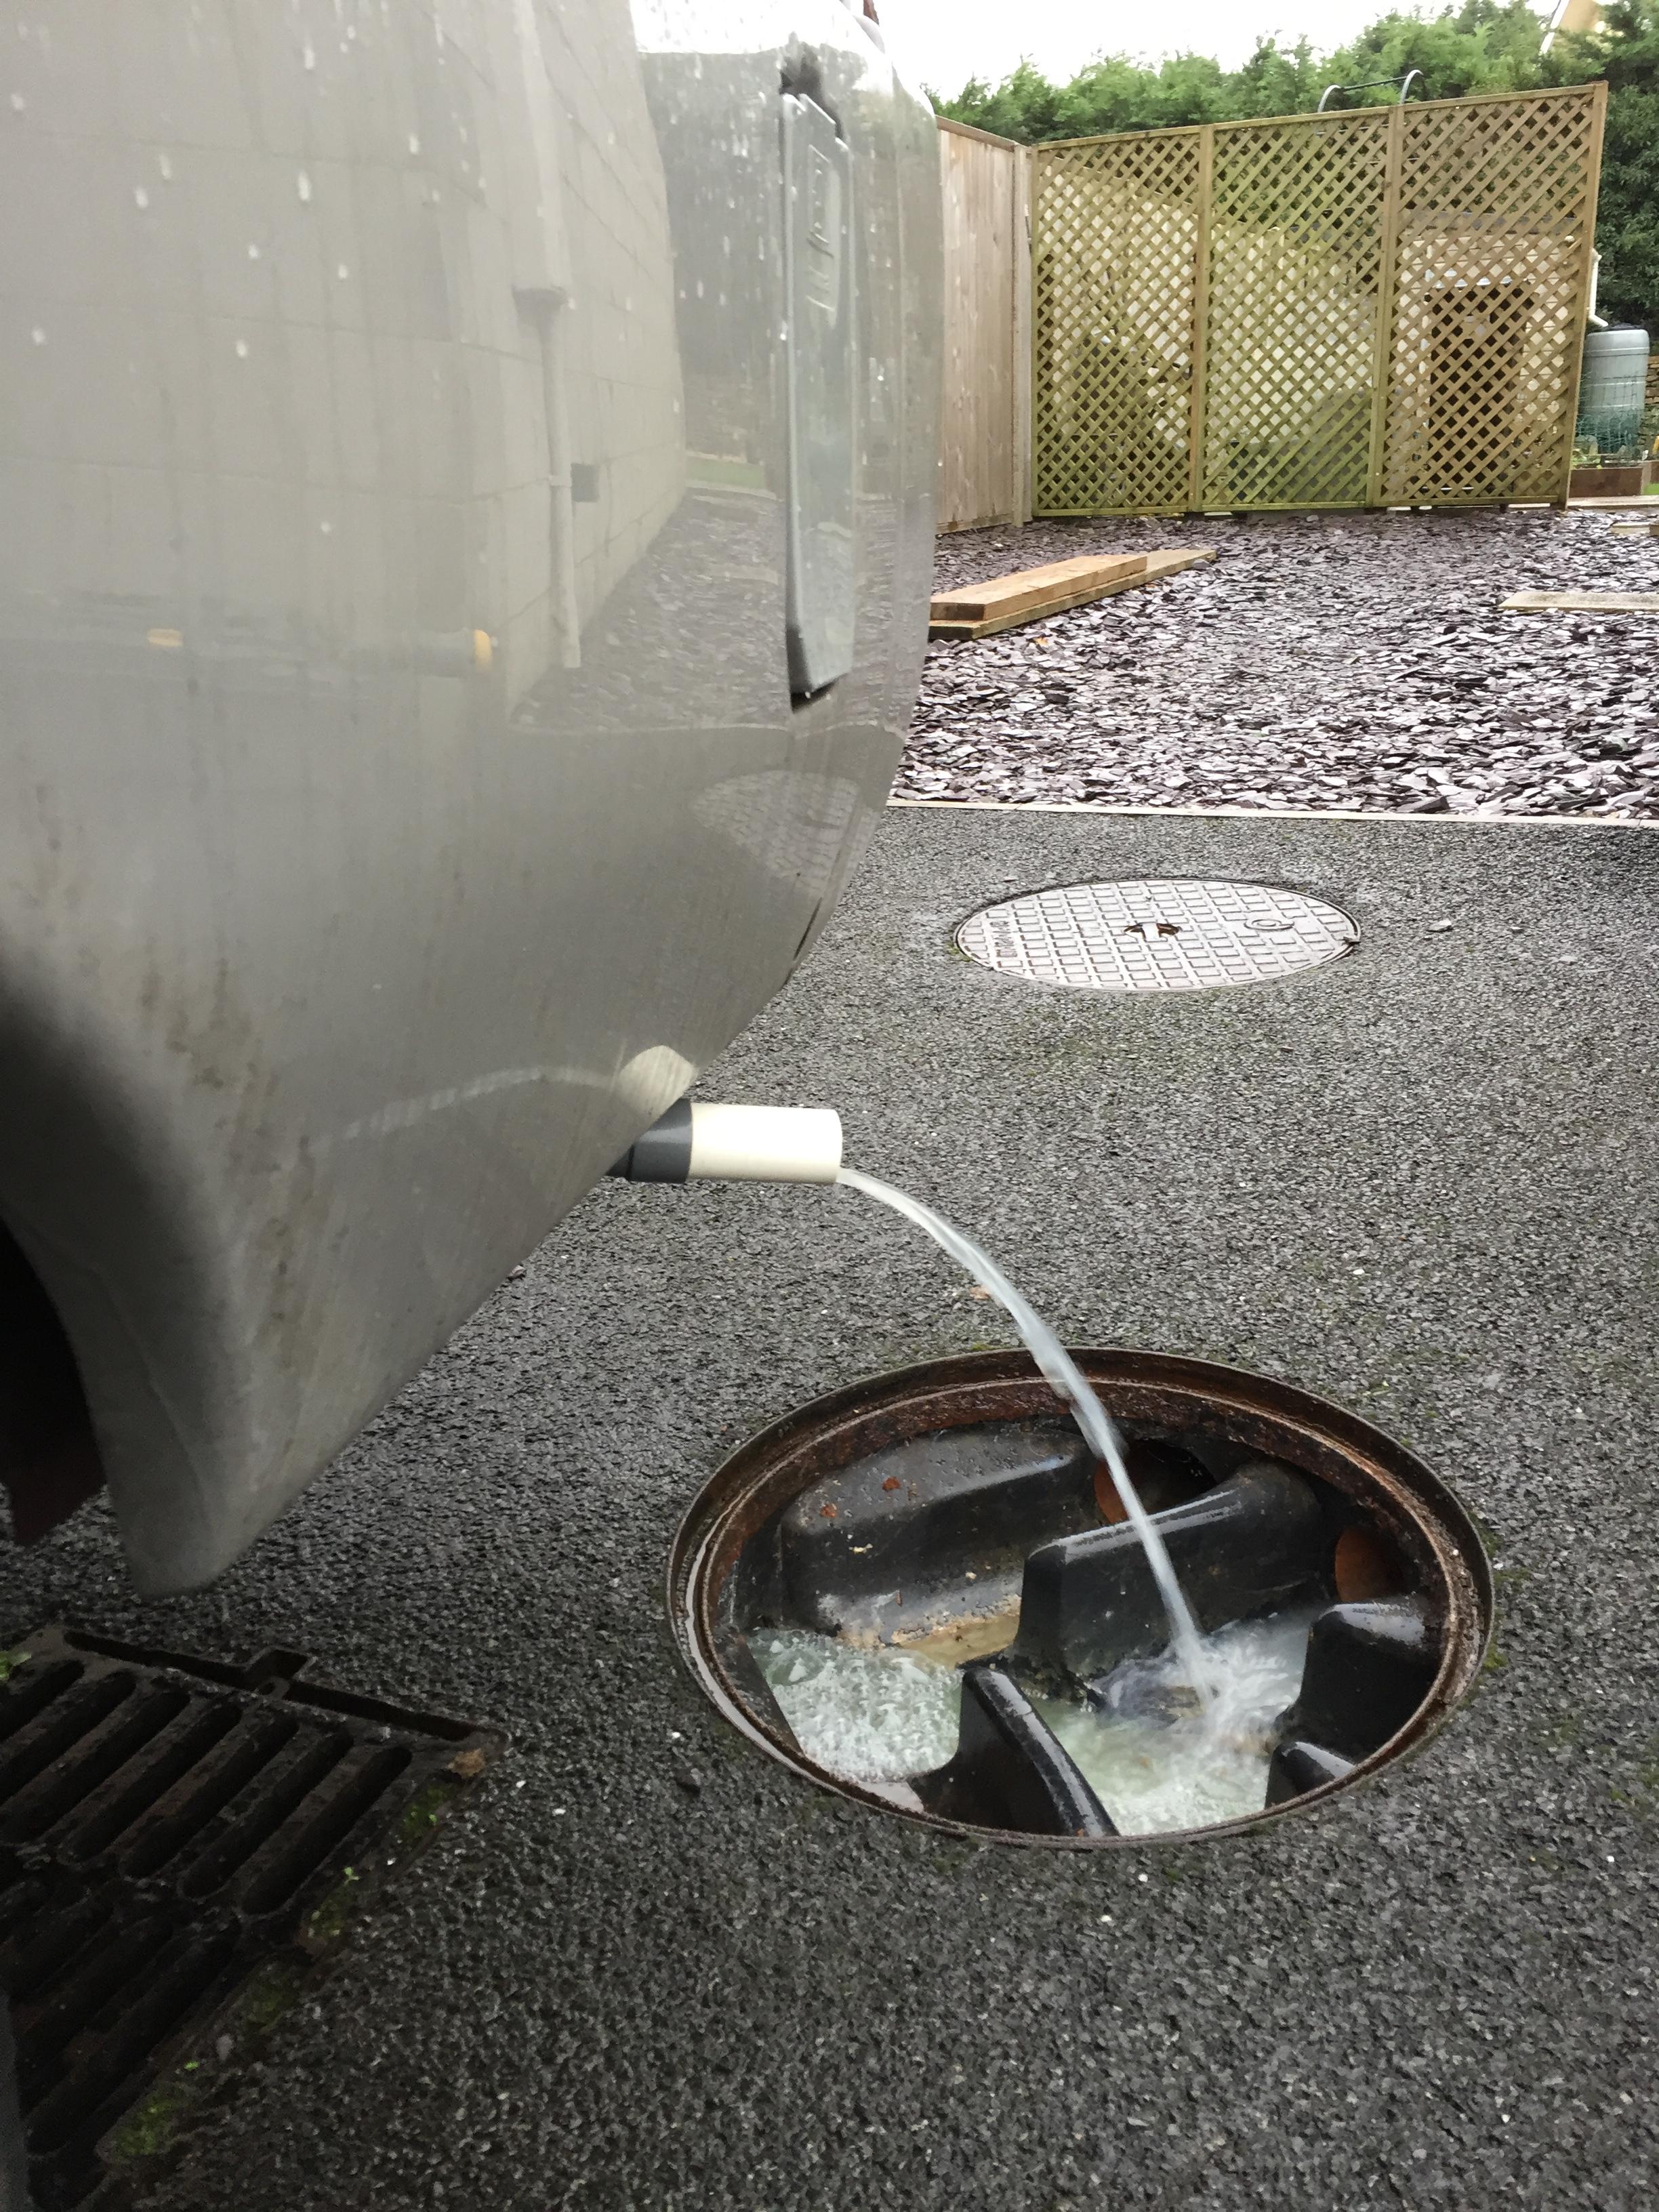
For waste emptying I have no need of a hose because if on a CL I drain waste into my empty toilet cassette and trudge off to the waste point which is not usually accessible to the motorhome. I made a fitting from 45mm bend (not 90deg) and a sleeve from waste pipe as an insert to fit over the odd size German outlet fitting and sanded down for a easy push fit. This fitment allows me to easily direct water into my cassette or into a drive over waste point as demonstrated in the photo at my house today.
The tech gets quicker and I get slower!
The photo, which is on the CMC website informing people that there will not be a Temporary Site at the Feb 2019 NEC Show should of had a caption
“Free Publicity for us centre Stage of the CMC announcement……..”
Happy New Year to all our Exsis members, Fred
And a Healthy one too
Fred

Hopefully, one day you will be able to add your Exsis to that collection.
Long term members on here have discussed in the past that we think they are a future ‘Classic’.
Best wishes that your lovely Rover soon finds a nice new home.
A mate of mine, who was an apprentice mechanic had one, didn’t we feel smug lads back in the early 60’s – lovely car.
Fred
Hello Dave and welcome to the forum , well done for finding those old photos – there is some explanation within the photos.
If you combine that info with the information from Harvey as reference by Barry you will have a better idea.
Problem is the old grey matter and memory isn’t what it was and I need some time to think it through properly, but for starters……
The metal Hymer extension fits onto the short original lock and is held by a grub screw.
i didn’t know for sure if it screwed onto the heavy thread (likely) or just fitted snugly over and held in place by the grub screw – and as you note, nobody else knew or replied.
The grub screw was corroded in- so rather than drill it out and try to remove the Hymer extension piece one way or another, I played safe and used the original body and just fitted the new handle to it.
My problem was that the handle would not turn because the body had seized in the black boss. This was caused by the white spacer piece breaking allowing damp and muck in. The spacer holds the plastic trim panel away from the boot. It is just plumbing waste pipe and can be pieced back together and fitted inside a larger 32mm waste pipe.
I cleaned up the corroded surface of the Hymer extension piece, greased it and put it back together using the old body boss ( black) and fitted the new handle to the old unit.
I removed the new lock barrel from the new handle and fitted the original lock barrel to keep the keys the same. It is still working fine.
Hope this helps, I’ll try to recollect my thoughts and also research the Exsis Book if I get time ( in the middle of bathroom project at the moment)
Fred
-
AuthorPosts