Home › Forums › General Discussion › leak at base of kitchen tap
Tagged: leaky tap
- This topic has 9 replies, 4 voices, and was last updated 4 years, 11 months ago by
 Barry & Maggie.
-
AuthorPosts
-
-
2nd March 2019 at 14:56 #954
Hi all,
After a lot of investigation as to its source, I’ve found that the puddle on the floor in front of the sink is coming from the base of the tap. Any ideas on how to access that to see if i can fix it?
Thanks
Ellen SJ
-
2nd March 2019 at 22:18 #955
Hi Ellen SJ,
I’ve personally had no problem with the sink or tap. Depending which type depends on how you tackle it.
If it’s the earlier type, it has four screws, one on each corner of the sink, covered with little black or grey decorative caps. Flick these off with the point of a knife, undo the screws under them and you will be able to lift off the sink complete. You may have to disconnect the sink waste first from underneath – I don’t know as I’ve not done this before so proceed with caution.
With the sink lifted and waste disconnected (you may not have to disconnect it, depending upon how much ”slack” there is in the pipework). You will now be able to get access to the red and blue pipes (hot and cold) under the tap and investigate where the leak is and why it is leaking.
If (and I repeat “if”) the tap is the same kind as the washroom one, there is a small pin, inserted in a tiny hole under the tap, that holds the pipes in. Push this pin out and the pipes will be released. I repeat that I’ve not done this before on the kitchen tap and I’m only giving this info in an attempt to help you, so proceed with caution and be prepared for it not to be the same.
There may also be a large, probably plastic, nut underneath that may release the tap if unscrewed.
If you have the newer type of sink unit, I’m afraid I can’t help you – I’m just not that familiar with new one.
Someone else on here may be able to help you though.
Good luck with this and as ever, let us know how you resolve it, as a help to others in the future. Thanks
Barry
-
3rd March 2019 at 15:31 #956
You perhaps need to be more specific regarding the model that you have SK/SG, as the sinks & taps are different.
For a SK version, there is an excellent article with full description and photographs on page 701 (approx.) of the ‘Little Exsis Book’. This describes complete removal and replacement of the sink and shows pictures of the tap and water pipes. It was posted by long term owner Dave and Sharron and is one of my favourite memories as I can’t get over seeing Dave inside the cupboard, apart from the frustration of your leak, the photo will make you smile.
Hope all goes well, come back if you need more info.
Fred
-
3rd March 2019 at 20:26 #957
We’ll done, Fred! I’d forgotten all about Dave’s “appearance” in his kitchen unit!
Thanks, mate.
Barry
-
3rd March 2019 at 22:18 #958
Hi Ellen Sj
My first attempt to join a discussion on the new site – hope I make it!
I have a very early SK delivered to me in May 2004 with the repositioned windscreen wipers and therefore thought to be in the first batch made. Barry’s description above was exactly how I found my sink/tap set-up to be. Total time taken to remove the sink, find that the tap was faulty and fit a new tap was just over an hour. It took me longer to drive to my local caravan supplies shop to source the new tap and return home than it did to do the job itself.
Hymer quoted cost : over £100. Local supplier : under £50. Job done : over 6 years ago.
I haven’t got Fred’s recommended article so do not know if it’s based on my SK’s sink/tap. It really is a straightforward task. Good luck.
Keith
-
4th March 2019 at 15:21 #959
Thanks, Keith. Good post!
Can you remember how the hoses connect to the tap? That’s the only point of contention that I can see presenting a problem for anyone replacing/servicing the kitchen tap.
Barry
-
5th March 2019 at 12:06 #960
Hi Barry
I’m pretty sure that the hoses in my van connect to the taps by being pushed on and then held there and made watertight by hose clips – one for each tap. I believe that I re-used the originals but if not then I would have purchased replacements when sourcing my new tap at my caravan parts shop.
Keith
-
5th March 2019 at 12:33 #961
Thanks for that, Keith.
The reason I asked is that I know the bathroom tap’s hoses were fixed by a block with a pin through it, something I’ve never seen before and that I had to wrestle with until I figured out how it worked! If the kitchen tap uses just hose clips, that’s SO much simpler!
Thanks.
Barry
-
1st May 2019 at 18:34 #1082
I hope that the information passed on by Barry and Travel Happy (Keith) to Ellensj was helpful. I can add a little more now so perhaps in the future new owners have a better understanding. Perhaps the problem was that the Jubilee Clip needed tightening or one of the tails had ‘popped’ out past the pin due to water/frost.
The micro switch on my kitchen sink tap has been a little troublesome for a year or so and sometimes I had to coax it into action, it finally broke on our last trip a couple of weeks ago so that coaxed me into action to replace it. By the way to get at the micro switch the tap has to be turned fully on as far as it will go and then you can just pull the handle off. If you don’t do this you will probably break the microswitch – it’s a tip I read years ago ( and I remembered Barry).
In the SG and probably the SK (different tap), the hoses have to be removed from underneath because the hole in the sink is too small to pull through the tails with the pipes still attached – so its a fiddly job for us oldies once the back of the cupboard has been removed.
First remove the two wire connectors from the microswitch noting which way round for re-assembly.
Loosen the Jubilee Clip on the pipe (hopefully the screwhead is in a forward facing position from assembly) and slide it down the pipe to clear the tail then tighten it up a little to prevent it slipping too far down. —Repeat for the other clip/pipe.
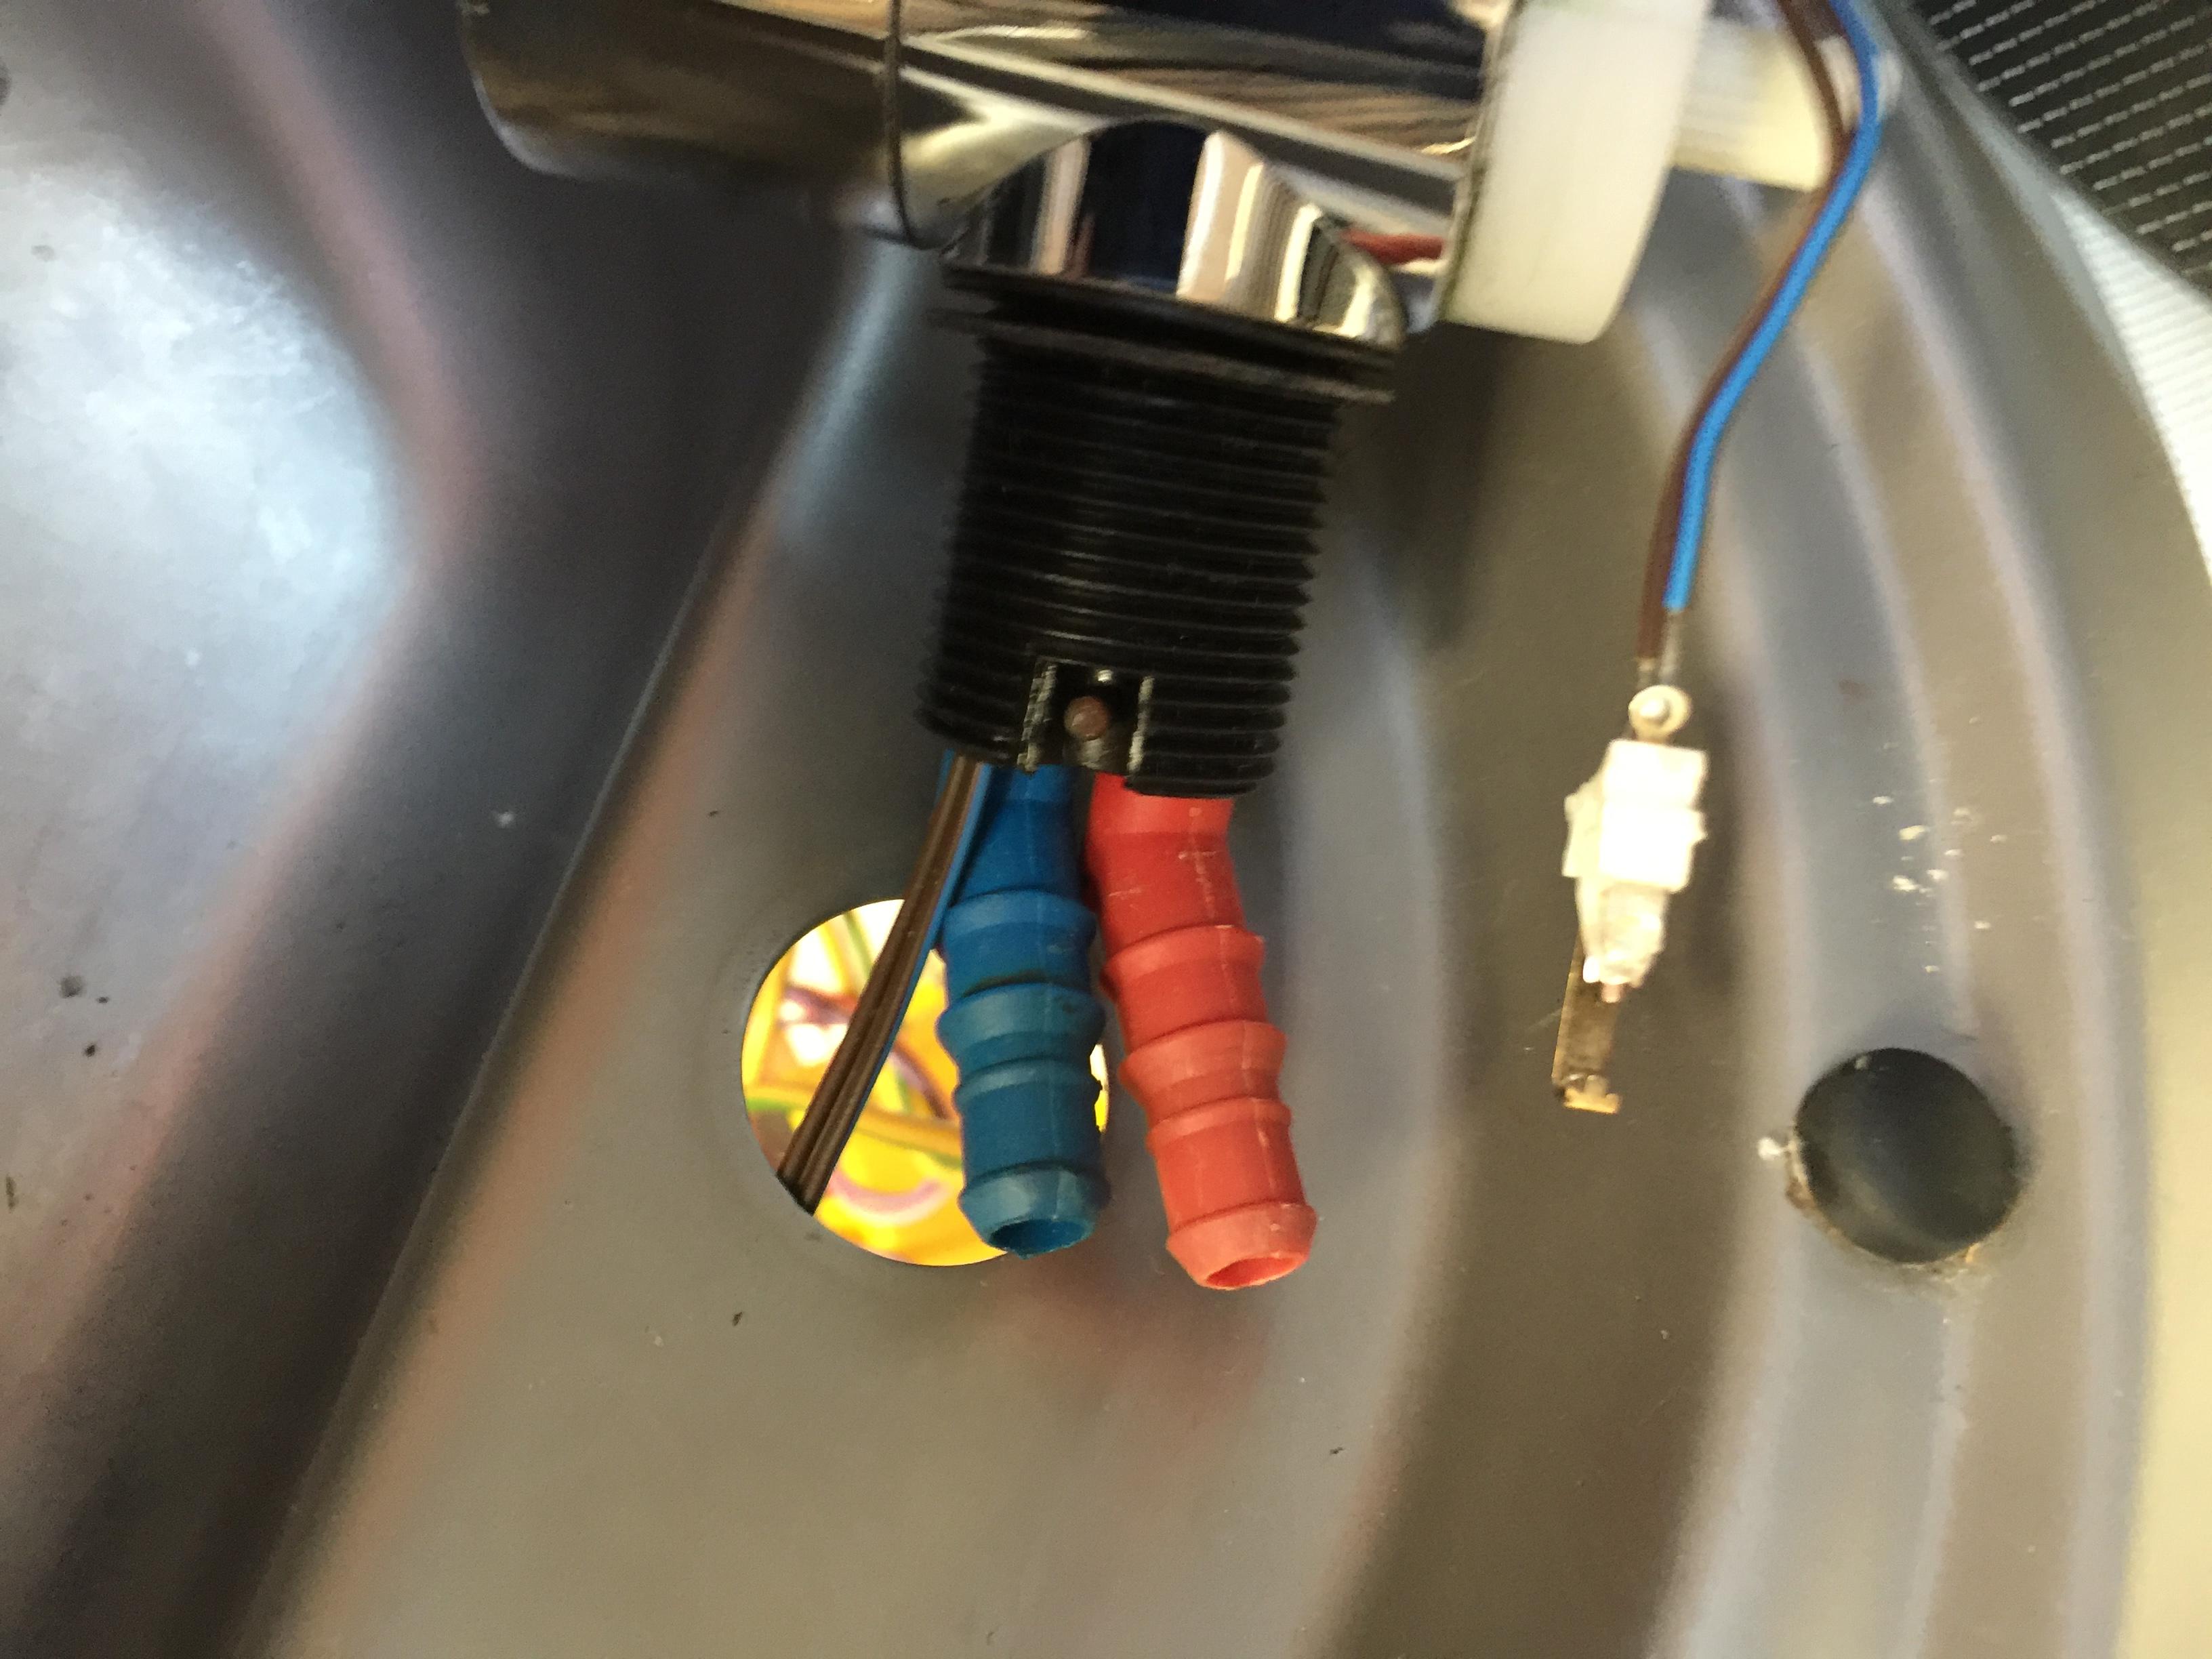
Undo the plastic lock nut from under the tap base (mine was a firm finger tight – not much room for spanners) and wriggle the nut down over the tails to remove – the tails will swivel together to help. The tap can now be lifted off from the top.
I have attached a photo below so that folk can see the tails and also in the middle the rusty looking pin in the middle. It is this pin that holds the tails in place by fitting in a groove in the tails. The pin can be pushed right through and removed. The tails can now be removed as they will easily pull out. I cleaned my pin up before putting it all back together and sprayed it with PTFE.
There is an ‘O’ Ring on each tail and ideally this should be lubricated/wetted before re-assembly ( I used PTFE spray. Make sure that the tails are fully pushed into the base of the tap when reassembling and that the pin fits properly to hold them in place.
Re-assembly is reverse order – it pays to turn the tap away a little so that when you tighten the nut as far as possible from underneath you can hold the nut and pull the tap to the correct position to firmly tighten.
-
1st May 2019 at 20:35 #1083
That’s great, thanks, Fred. A good “How To”.
Folks should understand that the standard Exsis water system is an on-demand pump, where the in-tank pump is switched on by the microswitch in the tap. If buying a new tap, it’s important to get one with a built-in microswitch (some taps don’t have them) OR change to a pressurised water system, when microswitches are not needed.
I don’t think the polarity of the switch actually matters, Fred, though it’s good to try to keep the same configuration of wires.
For those interested in converting to a pressurised water system, read my article on Page 286 of Tom’s “Little Exsis Book”.
-
-
AuthorPosts
- You must be logged in to reply to this topic.